In this guide you’ll learn how to convert InfoPath Forms to HTML files in SharePoint using Muhimbi PDF Converter. The InfoPath to HTML facility can generate output in doc, docx, rtf, txt and odt formats.
There are some limitations to these conversions due to the nature of the non-PDF-based destination formats:
Attachments: When converting an InfoPath form to HTML, the software does not work in the same way as PDF which also converts all attachments and merges them into the main PDF document. The attachments are not converted and appended to the HTML file.
View Selection: The software provides a number of ways to specify which view or views to convert. When converting to HTML, it is only possible to convert a single view as these file formats don’t support merging like how PDF supports them. A workaround for getting all views in a single HTML file is to create a ‘conversion-specific view’ and then to combine the content of multiple views in it.
Note: Print Views are ignored when converting to HTML. You can use Muhimbi’s View Selection facilities if you wish to convert any view other than the default View.
Formatting: PDF is a very flexible format that allows any content to be placed anywhere on the page. However HTML is not necessarily as flexible as PDF and you may need to optimize your InfoPath form for conversion, or create a ‘conversion-specific view’.
Selecting InfoPath Views to Export to HTML
Muhimbi PDF Converter allows you to select specific views to export. However, when converting to HTML, it is only possible to convert a single view as these file formats don’t support merging like how PDF supports them. A workaround for getting all views in a single HTML document is to create a ‘conversion specific view’ and then combine the content of multiple views in it.
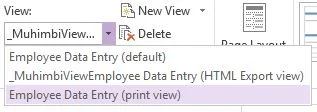
In this scenario we have an Employee Review form with the following three views:
Employee Data Entry (default view): This is a view used for populating the data in the MS SharePoint List using the InfoPath client or Forms Services. This is the default view which is usually selected for conversion to HTML.
Employee Data Entry (print view): A special view that is optimized for printing to a network laser printer. This is specified as the print view. However as Print Views are ignored when converting to HTML, you can use Muhimbi’s View Selection facilities to select this view to convert.
_MuhimbiView Employee Data Entry (HTML Export view): A conversion-specific separate view containing all views that are used to export the InfoPath form to HTML format. When converting to HTML it is only possible to convert a single view as HTML doesn’t support merging like how PDF supports them. A workaround for getting all views in a single HTML file is to create a ‘conversion-specific view’ like this one combining the content of multiple views in it. You will need to start the name of the view with “_MuhimbiView”. The Muhimbi PDF Converter will detect this view that starts with this name and export them into an HTML document.
Note: You can hide these views from the end user by marking them as such in the properties of the view.
This is a handy feature of Muhimbi PDF Converter if you know beforehand that you will always be exporting the same view(s) to HTML file format.
Determine at Runtime InfoPath Views to Export
There are times when you need to export different views depending on the state of the data. In order to achieve this, you can do the following steps:
Let us design an Employee Expense Claim form, where we need an HTML file to be generated once the employee creates the expense claim. A second HTML file needs to be generated once the manager approves the claim.
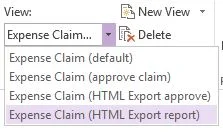
In this scenario, our Expense Claim form consists of the following Views:
Expense Claim (default): Used by the employee to report expenses.
Expense Claim (approve claim): Used by the manager to add comments and additional information for approval.
Expense Claim (HTML Export report): A conversion-specific separate view that is used to export the form to an HTML file after the employee has submitted, it but before the manager has reviewed the form.
Expense Claim (HTML Export approve):A conversion-specific separate view that is used to export the form to an HTML file after the manager has reviewed the form.
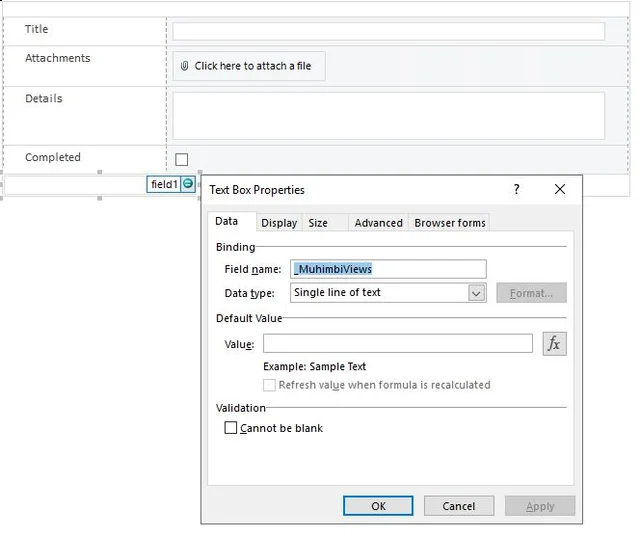
We can implement this by adding a (hidden) text box named “_MuhimbiViews” (case sensitive and using the default ‘my’ namespace) to any of the views and populating it with the name of the view name. The Muhimbi PDF Converter will automatically pick up this view and export it to an HTML file.

Note: You cannot specify multiple views, and even if they are specified, only the first view in the list is converted.
In addition to adding the “_MuhimbiViews” text field to the form, all the developer of the form needs to do is add a little bit of logic by creating multiple Submit buttons and enabling one of these buttons when the employee submits the expense report and enabling another Submit button when the manager reviews and approves the expense report. When one submits button is enabled, the other can be disabled and hidden. The developer of the form needs to also add a little bit of logic to each of the Submit events of the form to specify in the “_MuhimbiViews” field which specific view name to export.
Note: The export to HTML does not export attachments like converting to PDF.
Converting InfoPath to HTML Using MS SharePoint Designer
One of the more popular features of the Muhimbi PDF Converter for SharePoint is the ability to control which view to converting to HTML format. It is even possible to specify which view to converting depending on the current status of the form.
The view that needs to be converted can be specified during design time, or at run time using a little bit of custom code or InfoPath rules. You can also control which views to convert using MS SharePoint Designer workflow. The example provided below uses MS SharePoint Designer workflow. But this works equally well in the Nintex workflow as well.
Creating the InfoPath Form
Navigate to the MS SharePoint List where you want to design the Infopath form.
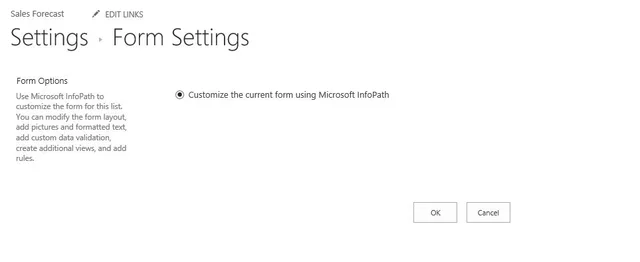
Go to Site Settings → Form Options and click Customize the current form using Microsoft Infopath and click OK button.
InfoPath Designer for the list opens.
Create a Text box and name it '_MuhimbiViews'.
On the Page Design tab select New View and name the new view ‘FormView’. Change the Title at the top to 'Form View'.
Select the fields you like to see in this view and design the Form View accordingly.
On the Page Design tab select New View again and name this view as ‘DocView’. Change the Title at the top to 'Document View'.
This will be a conversion-specific separate view. Select the fields you like to see in the converted HTML file in this view and design this Document View accordingly.
Click File → Publish.
Creating the Workflow
From the Library ribbon in MS SharePoint select Workflow Settings → Create a workflow in SharePoint Designer.
Name the workflow whatever you like.
In this workflow, you will need to set the value of the _MuhimbiViews field before carrying out the conversion. The workflow does not persist the value of the changed field before executing the conversion step, so we need to ensure the values are updated accordingly before this step. You can do this in two ways:
Using an Impersonation Step
Position the cursor before Step 1 and click the Impersonation Step button in the ribbon.
Position the cursor inside the Impersonation Step and add a ‘set field in current item' action.
‘Use this action to set the value of the ‘_MuhimbiViews’ field to '’DocView’.
Position the cursor after the Impersonation Step and click the Step button to add a new step.
In this new step add the 'Convert Document' action and fill in the blanks.
Publish the workflow and execute it on a previously filled-out form.
The resulting HTML file should contain DocView in HTML format.
Using Pause for Duration
The steps below assume the default, empty, workflow state and not the workflow entered as part of the previous use case.
Position the cursor inside the first Step and add a 'set field in current item' action.
‘Use this action to set the value of the ‘_MuhimbiViews’ field to '’DocView’.
Add the 'Pause for duration' action as the next step and let it pause for one minute (it may actually take five minutes, but that can be tweaked)).
Add the 'Convert Document' action and fill in the blanks.
Publish the workflow and execute it on a previously filled-out form.
It may take a while to execute due to the Pause action, but the resulting HTML file should contain the DocView in HTML file format.
A third option exists, which is to specify Converter Specific Settings using the XML Override facility in the ‘Convert Document’ Workflow activity. For more information see this example.
Note: When converting an InfoPath form to HTML using any of the above methods, the software does not work in the same way as PDF. It can only convert one view specified to an HTML file format. If more than one view is specified in the Convert Document action, then the first view is only converted to HTML file format.
Converting InfoPath Forms-based List Items to HTML
Note: When converting from or to HTML format, please make sure you are running the latest version (8.3 or higher) of the Muhimbi PDF Converter as that version comes with a much improved HTML Converter.
The Muhimbi PDF Converter comes with extensive InfoPath support to deal with InfoPath attachments and Dynamic View Selection. However, most of the facilities provided are for 'real' InfoPath forms that are stored in a Forms or Document library.
MS SharePoint also allows the List Item Data Entry Form to be customized using InfoPath, but the data filled out using this facility is not stored as real InfoPath Forms and therefore cannot be converted using Muhimbi's PDF converter.
As the List Items are rendered as HTML, even when customized via InfoPath, you can use the many facilities provided by the Muhimbi PDF Converter for MS SharePoint to convert InfoPath-based List Items to HTML format.
When using MS SharePoint 2010 or later, the results will improve dramatically when leaving out the SharePoint ribbon, branding, and logo by adding '&IsDlg=1' to the URL of the list item that is being converted. If you need to convert a specific view, then add '&DefaultView=[viewname]' to the URL.
HTML is not a format that is suited for output on printed media. We do our very best to make things work and render the HTML file as well as possible. Unfortunately, we cannot make any guarantees, especially when it comes to third-party products that are not under our direct control.