In this guide you’ll learn how to convert DOC to DOCX or DOCX to DOC in SharePoint. The guide includes automatically converting DOC or DOCX formats using a SharePoint Designer Workflow or a Nintex Workflow.
Before you convert, you can review the following points of interest:
It is now possible to convert from both DOC to DOCX and vice versa. Both steps are usually similar, except for changing the source and destination file format accordingly.
It is even possible to ‘convert’ to the same format as the source, e.g. docx to docx, but specify additional settings such as a password on the document.
Converting MS Word DOC to DOCX format via MS SharePoint Workflow Designer
You can use the example below to create a simple workflow in MS SharePoint Designer, which converts MS Word DOC to DOCX format (or vice versa) as soon as it has been approved.
The legacy MS SharePoint 2007 / 2010 workflow engine is fully supported, as is the optional Workflow Manager that comes with MS SharePoint 2013 and later versions.
Before you start, ensure the PDF Converter for SharePoint has been installed and you have access to a site collection with the appropriate rights to create workflows.
To convert MS Word documents from DOC to DOCX format (or vice versa) via a workflow using MS SharePoint Designer, you will need to configure the Document Library containing the MS Word documents and then also configure the workflow as per the details given below:
Create and Configure the Document Library Containing MS Word Documents
You can create and configure the Document Library containing MS Word documents by performing the following steps:
Create a Document Library named Proposal Documents. You can use any name of your choice.
Ensure you upload all the MS Word (DOC) documents you like to convert to this location.
Once created, navigate to the library’s Settings →
Document Library Settings → Versioning Settings screen and enable Requires content approval for submitted items.In the Document Library, create two folders (you can use any name of your choice): Confidential Proposals and
Approved Files.Note: If you are converting from DOCX to DOC, then the source MS Word (DOCX) documents need to be uploaded into this folder instead of MS Word (DOC) documents.
Create and Configure MS SharePoint Designer Workflow
You can create and configure the MS SharePoint Designer Workflow by performing the following steps:
Start MS SharePoint Designer and open the site collection that contains the Proposal Documents Document Library. This contains MS Word (DOC) Documents.
Click Add Item and select List Workflow. Specify the following settings:
Name for the workflow: Convert DOC to DOCX.
Select the Document Library associated with the Workflow: Proposal Documents.
When creating a SharePoint Designer Workflow in SharePoint 2013 or later, select the appropriate Platform Type.
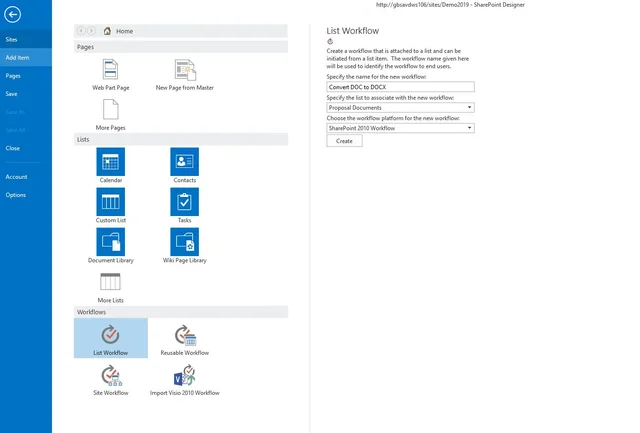
Click Create button to proceed.
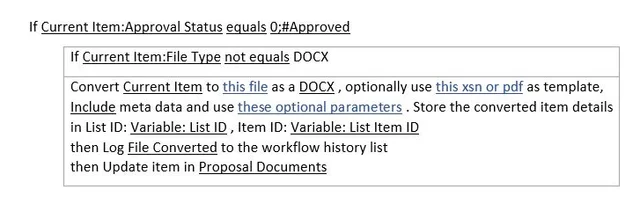
We are now ready to create the workflow. From the ‘Conditions’ menu, select the ‘If value equals value’ condition.
Click the first value followed by the display data binding (fx) button.
Select ‘Current Item’ as the Source and select ‘Approval Status’ in the field.
Click the OK button to continue.Click the second value and select ‘Approved’ from the list.
To avoid the same workflow being executed on the converted MS Word (DOCX) file after the conversion has taken place, we need to specifically exclude the MS Word (DOCX) files as follows:
Add another ‘If value equals value’ condition.
Click the first value followed by the display data binding (fx) button.
Select ‘Current Item’ as the Source and select ‘File Type’ in the Field. Click the OK button to continue.
Select ‘equals’ and change it to ‘not equals’.
Click the second ‘value’ and enter ‘DOCX’, without a period ‘.’.
With the Conditions in place, we can now add the Actions, which is where the magic happens.
From the Actions menu, select Convert Document. It may be hidden behind the PDF option.
The following action is inserted:
Convert ‘this document’ to ‘this file’ as a ‘select file type’ , optionally use ‘this xsn or pdf’ as template, ‘include / exclude’ meta data and use ‘these optional parameters’. Store the converted item details in List ID: ‘Variable: List ID1’ , Item ID: ‘Variable: List Item ID1'Let’s examine what the various options within the action mean:
this document: Specify which document to convert. Select the option
and make sure Current Item is selected.this file: Specify the location to which the converted file will be written. The following options are available:
Leave it empty: When no value is specified then, the converted MS Word (DOCX) document is written to the same folder as the source file.
Site Relative URL: By specifying a URL relative to the current site, e.g. subsite/shared documents/DOC Files, any folder location in the current site collection can be targeted. This is the option we want to use so enter ‘Proposal Documents/Approved Files’.
Web Application relative URL: Using a URL that is relative to the entire web application, e.g. /sites/Press Office/Public Documents/To Distribute, any folder location in any site collection can be targeted.
select file type: Select the file type you want the file to be converted to.
this xsn or pdf : If you want to specify a template, you can specify a xsn or pdf template. The following options are available:
Leave it empty: When no value is specified then no template is used.
Template from a Site Relative URL: By specifying a URL to the template relative to the current site, e.g. subsite/shared documents/template.pdf.
Template from a Web Application relative URL: Using a URL to the template that is relative to the entire web application, e.g. /sites/Press Office/Public Documents/template.xsn
include / exclude metadata: In case of sensitive documents, we may want to strip out any custom SharePoint columns information from the file. Assuming that our document library contains a column Yearly sales forecast, and the MS Word document uploaded has information entered in that column, we want to select ‘Exclude’.
these optional parameters: You can add many additional parameters for the conversion document here.
Variable: List ID: A new workflow variable named List ID is automatically created. After the file has been converted, this variable will contain the ID of the list the converted file was saved to. This can later be fed into another action in order to manipulate this file further.
Variable: List Item ID: A new workflow variable named ‘List Item ID’ is automatically created. After the file has been converted, this variable will contain the ID of the item the converted file was saved to. This can later be fed into another action to manipulate this file further.
Insert a new action named ‘Log to History List’ and enter ‘File converted’.
Insert a new action named ‘Update List Item’ and select ‘this list’. We are now going to automatically mark the converted DOCX file as ‘approved’.
- From the ‘List’ dropdown select ‘Confidential Proposals’.
- Click Add button and set the field to ‘Approval Status’ and the value to ‘Approved’, and click OK.
Note: Starting with MS SharePoint 2010, it is no longer possible to set the value of the ‘Approved’ field. - In the ‘Find the List Item’ area set the field to ‘ID’.
- Click the fx button next to ‘Value’, specify ‘Workflow Variables and Parameters’ as the Source and set the field to ‘Variable: List Item ID’ and click the OK button.
- Click OK again to return to the MS SharePoint Designer Workflow. It should look like the image below:
Click Publish button to deploy and activate the workflow.
Testing the Workflow
You can test the workflow created by performing the following steps:
Create or upload a document in MS Word (DOC) file format to the ‘Confidential Proposals’ folder.
From the context menu, select Approve / Reject and approve the file.
This will automatically start the workflow, and after a few seconds, the Workflow status should change to Completed, as shown in the screenshot below.
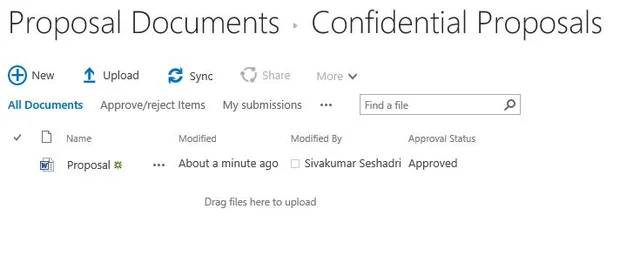
Once the workflow has been completed, you will find the DOCX version of the MS Word document in the ‘Approved Files’ folder.

If an error occurs during the execution of the workflow, you can perform the following to troubleshoot the same:
Check the messages on the workflow status screen.
Check for errors in the Windows Event log.
Check for errors in the SharePoint trace log.
Converting MS Word Documents from DOC to DOCX using Nintex Workflow
The Muhimbi PDF Converter for SharePoint comes with comprehensive support for all Nintex Workflow versions, currently NW2007 – NW2019. It can easily convert MS Word documents from one format to another (DOC to DOCX). In this example, a Nintex workflow retrieves all the MS Word documents in DOC format modified during the current day and converts them to DOCX. In an ideal setup, you will schedule this workflow to run out of office hours to process this as a batch for all new and modified files.
To create a new workflow, you can follow the instructions below or download the complete workflow in NWF format from the following link:
Nintex Workflow to retrieve and convert files to PDF
Prerequisites
Before we start building the workflow, ensure all prerequisites are in place. It is also assumed that the reader has some knowledge of building Workflows using Nintex Workflow.
Ensure the PDF Converter for SharePoint version 4.1 (or newer) is installed in line with chapter two of the Administration Guide.
Naturally, Nintex Workflow will need to be installed as well.
Make sure the Muhimbi.PDFConverter.Nintex.WebApp SharePoint Feature is activated on the relevant Web Application using SharePoint Central Administration.
You will need to have the appropriate privileges to create workflows.
Creating a new workflow
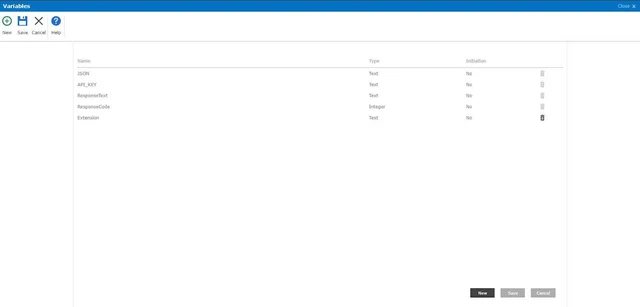
To get started, create a new workflow and choose the blank template. Ensure the workflow doesn’t start automatically, and add the workflow variables listed in the following screenshot.
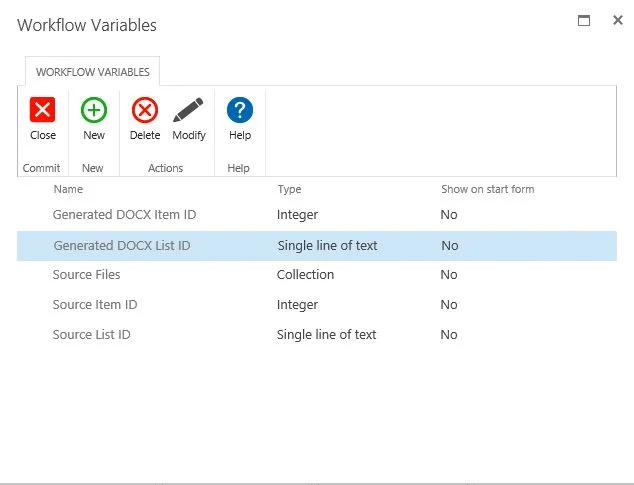
Ensure that the appropriate data types are assigned. They are listed under the ‘Type’ column beside each variable name. The names are largely self-explanatory, but some additional information is provided below:
- Source Item ID: By default, the item that triggered the workflow is converted to DOCX format. However, as we are iterating over multiple items, we need to specify the ID of the item to convert in this variable. In SharePoint 2010 and later select Integer as the Type, not List Item ID.
- Source List ID: The PDF Converter assumes the item being converted is located in the same list the workflow is attached to. However, if this is not the case, then the ID (a GUID) of the list will also need to be specified. In this example, everything is located in the same list, so this variable is not actually used.
- Source Files: As we are potentially converting multiple files we need to define a variable of type Collection to hold the list of files we will be iterating over.
- Generated DOCX Item ID: Once a file has been converted to DOCX, you may want to carry out additional actions on this new file. For example, check it in. Once converted, the ID of the DOCX is automatically stored in this variable. In SharePoint 2010 and later, select Integer as the Type, not List Item ID.
- Generated DOCX List ID: As the PDF Converter allows files to be written to different document libraries and even utterly different Site Collections, you may want to know the ID of the destination list.
Adding the workflow actions
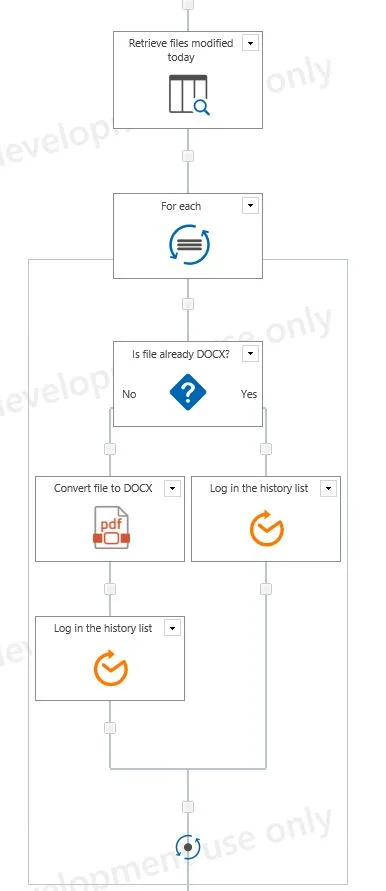
You are now ready to add the actions to the workflow. You can start by adding a Query List action, allowing you to retrieve all files modified today and store the results in the Source Files collection.
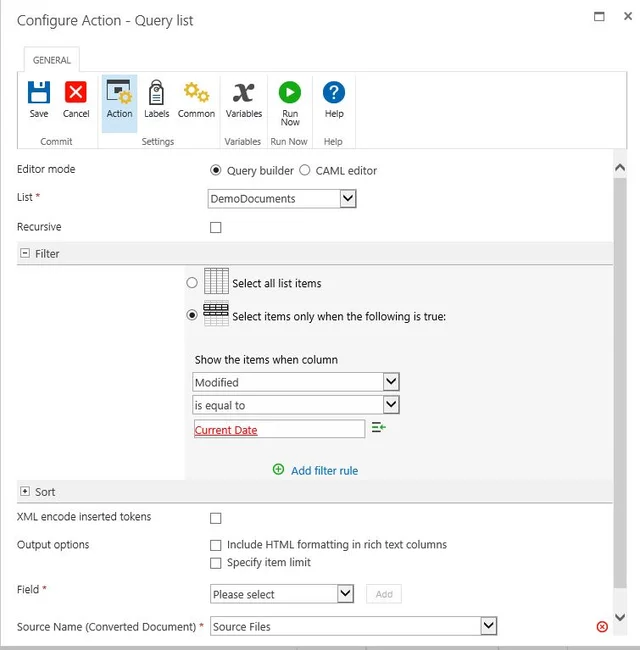
You can fill out the settings for this action as per the screenshot above. You may want to add a filter rule to check that Content Type is not equal to Folder or Document Set.
You can continue by adding the For Each action to the workflow. Specify the collection’s name to iterate over and the variable’s name to store the Item’s ID.
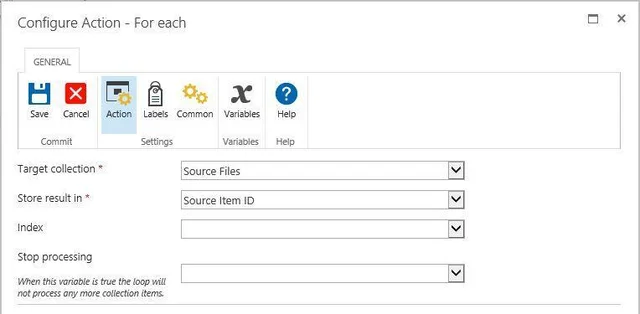
The next set of actions you add will need to be added inside the For Each action to ensure they are executed separately for each file in the list.
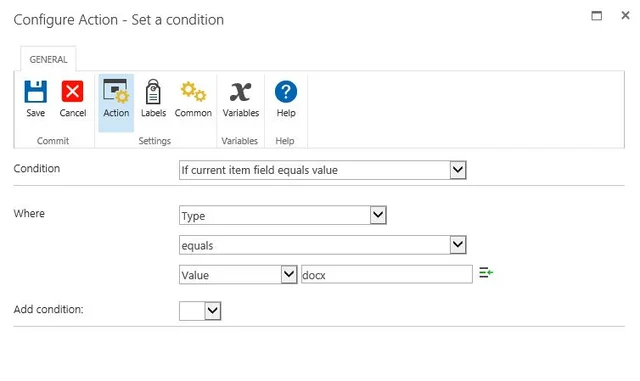
You need to ensure that the workflow only invokes the PDF Converter for those files that are not already in DOCX format. To achieve this, add a condition and check that the file type equals ‘docx’ as per the following screenshot.
After this, you need to add the Convert document action listed under the Muhimbi PDF section to the No branch of the workflow condition (as we want this workflow to only convert those files that are not of type docx). You can fill this section as per the image below:
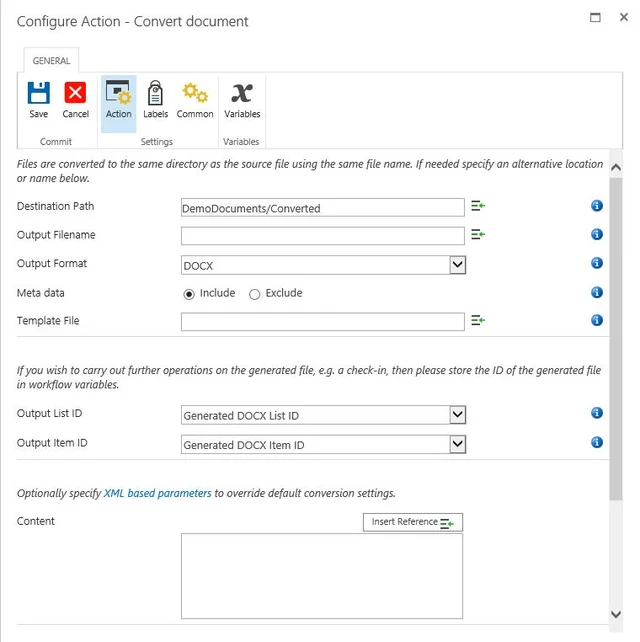
The PDF Converter integrates with all Nintex Workflow versions.
You may want to leave the Destination Path empty, which will write the DOCX File to the exact location as the source file. Hover the mouse over the small information icons for more information about the Destination Path or any other fields.
The workflow is now done. You may want to add some logging information using the Log In the History List action. In our example, we use the following two logging information:
- Last action in the No branch:
List ID: {WorkflowVariable:Generated DOCX List ID} - List Item ID: {WorkflowVariable:Generated DOCX Item ID} - Last action in the Yes branch:
Already in DOCX Format: {WorkflowVariable:Source Item ID}
Running the workflow
You can finalize the workflow by saving and publishing it, after which the workflow is ready to be executed. You can either run the workflow manually or schedule it to run at a specific time of your choice.
Converting MS Word Documents from DOC to DOCX using Nintex Workflows (O365) using REST API
Note: This tutorial is for the SharePoint Online version of Nintex Workflow.
You can also convert MS Word Documents from DOC to DOCX using Nintex Workflows using REST API. This section shows how to integrate the functionality exposed by the Muhimbi PDF Converter for SharePoint Online directly into a Nintex Workflow by invoking our comprehensive REST API.
Although Muhimbi’s comprehensive Web Services (SOAP) interface works well with our on-premise products, the brand-new, much-simplified, REST-based interface works very well with cloud-based products.
This new REST-based service is part of the Muhimbi PDF Converter Services Online product. It comes as a separate product and does not have any dependencies on SharePoint, and can be integrated with services such as:
- Microsoft Flow,
- Azure Logic Apps,
- C#,
- Java,
- PHP,
- JavaScript,
- Python
- Ruby,
- and many other services, including Nintex Workflow for Office 365.
Although available as a stand-alone subscription, this new service is automatically included in each PDF Converter for SharePoint Online subscription at no additional charge.
Prerequisites
Before you begin, please make sure the following prerequisites are in place:
- Muhimbi PDF Converter for SharePoint Online installed and enabled in your workflow's site with a regular or trial subscription.
- Muhimbi PDF Converter Services Online full or trial subscription and associated API KEY.
- Nintex Workflow for Office 365 installed and enabled in your workflow's site.
- The appropriate privileges to deploy these Apps, and author workflows.
- Working Knowledge of Nintex Workflow for Office 365.
Building the Workflow
This section explains in detail how you can create the workflow to convert MS Word documents from DOC to DOCX format.
This workflow is available for download as well. If you are downloading, you can import it to Nintex Workflow for Office 365, set the API KEY, and publish it. Once the workflow is published, you are ready to go.
If you are creating the workflow step by step, you can navigate to a site collection and document library of your choice containing the MS Word document in DOC format to convert and choose the option to create a new Nintex Workflow. In this example, we use the standard Shared Document library that is available on most site collections.
Create the Following Workflow Variables
The following Workflow Variables need to be created for the workflow to work correctly:
JSON (Text): Contains the JSON, JavaScript Object Notation, the command that will be sent to the conversion service.
API_KEY (Text): A unique ID that will be used to look up your Muhimbi subscription details.
ResponseText (Text): The status message returned by the Conversion Service.
ResponseCode (Integer): The status code returned by the Conversion Service.
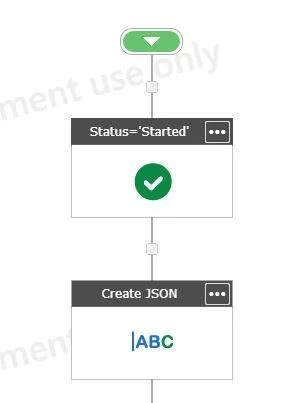
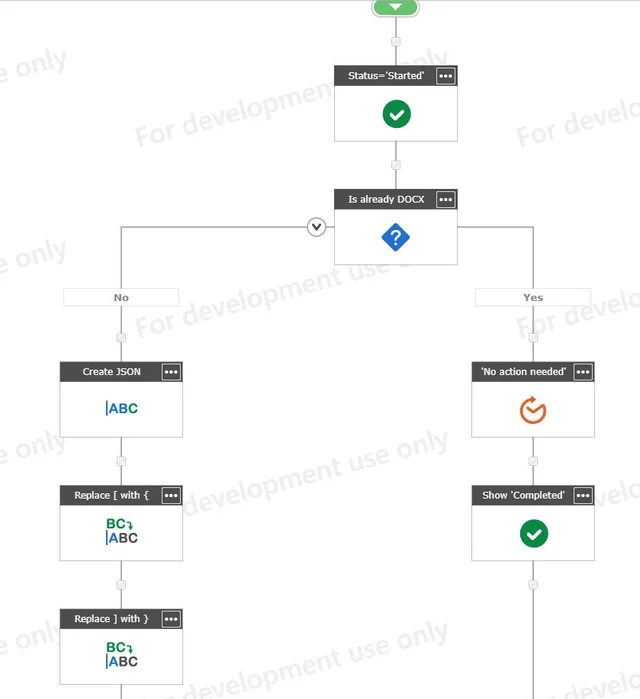
As a first step, insert a Set Workflow Status action, edit it and set it to Started. This status will let you know that the workflow has actually been triggered (as there is no other way to track this in MS SharePoint Online). This will also give you the option to click on something to inspect the current status of the workflow.
Add a Build String action and set the Output to the JSON workflow variable. In the String field enter the following:
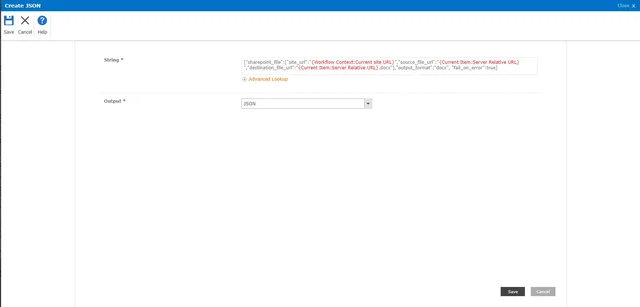
When you insert code, pay attention to the following:
- JSON Notation: You may be familiar with JSON notation, but note that we have replaced the curly braces - { } - with square brackets [ ]. This is due to a bug in Nintex Workflow for Office 365. If you have any concerns about using square brackets (as they are also used for Array types) feel free to replace them with anything else. In a follow-up step we will fix them.
- Copy & Paste: When pasting this JSON code from the browser window, paste it in Notepad (and copy back) to strip out non-standard characters and formatting.
- References: The text displayed in red are Nintex Workflow references. After pasting the entire fragment, replace each Nintex reference using the Advanced Lookup facility on the bottom of the text box in the screenshot above.
- Output file name: In this basic example, we just add '.docx' to the end of the output path and file name. To keep things simple, we are not including the Nintex Workflow actions to strip off the old extension and add the new one. You can use any valid output path and file name.
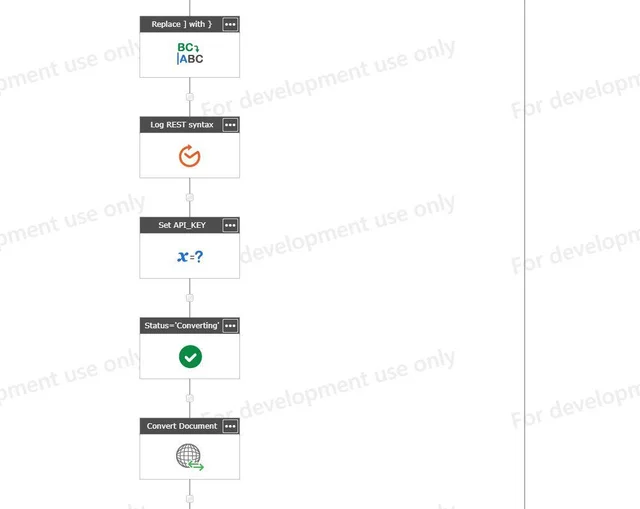
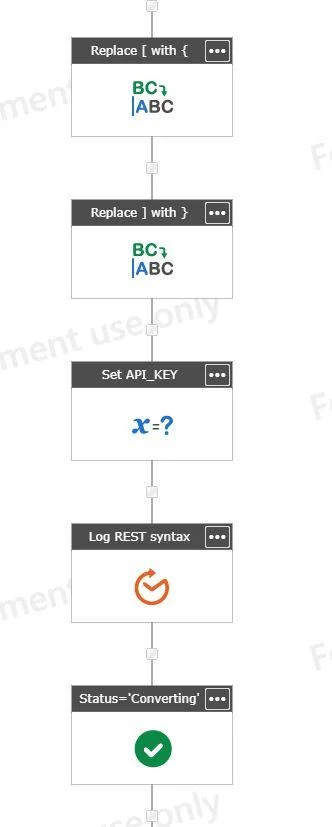
As mentioned above, we have used square brackets for JSON above and we need to replace these with curly braces again. You can insert a Replace Substring in String action and configure it as follows:
Search String: Enter the opening square bracket [.
Replace String: Enter the opening curly brace {.
String: Insert a reference to the workflow variable named JSON.
Output: Pick the JSON workflow variable to store the results in.
Click Save button.

Copy the workflow action (using the actions menu), and paste it as the next action. Configure the newly pasted workflow action and replace the opening bracket with the closing bracket ']'. Do the same for the curly brace, and replace '{' with '}'. Click the Save button, and we now have a valid JSON that we can send to the Conversion Service.
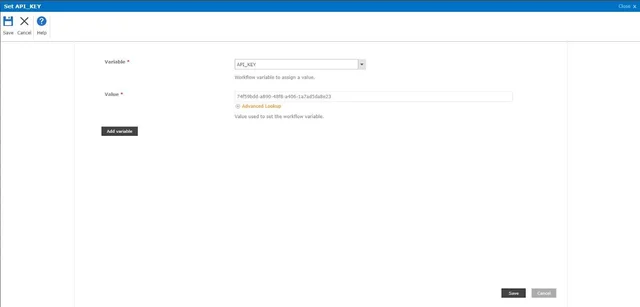
You need to next set the API_KEY. Insert a Set Variable action and configure it to set the API_KEY workflow variable to the API Key you received by email when signing up for the Muhimbi PDF Converter Services Online and click the Save button. E.g.:
decafbad-baad-baad-baad-decafbaaaaad
Note: Do not try to use this particular key, as it will not work. Do not put curly braces around the key.
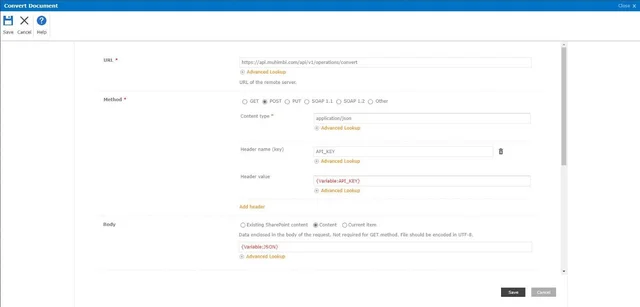
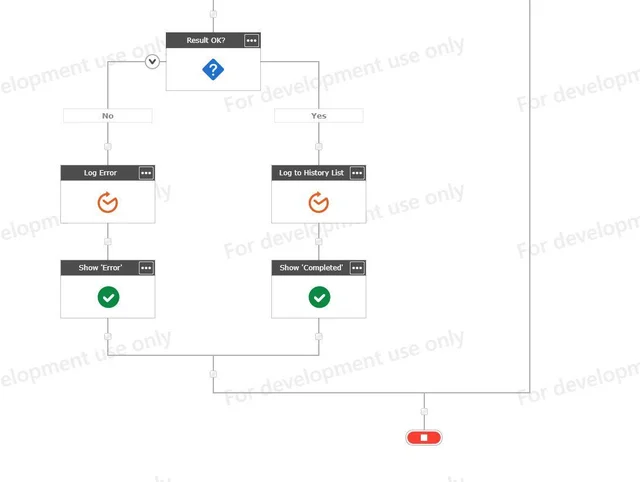
Next, you need to insert the Web Request action and configure it as follows:
- URL: https://api.muhimbi.com/api/v1/operations/convert
- Method: POST
- Content type: application/json
- Add header: Click Add header, specify API_KEY as the Header name and insert a reference to the API_KEY workflow variable for the Header value.
- Body: Select the Content option, add a reference to the JSON workflow variable in the Data field.
- Store response content in: ResponseText.
- Store http status code in: ResponseCode.
- Click Save button.
Finally, insert another Set Workflow Status action and configure it with the text Completed. This will help us when we run the workflow, as we can now easily see when the workflow has been completed.Your completed workflow should look like the following:
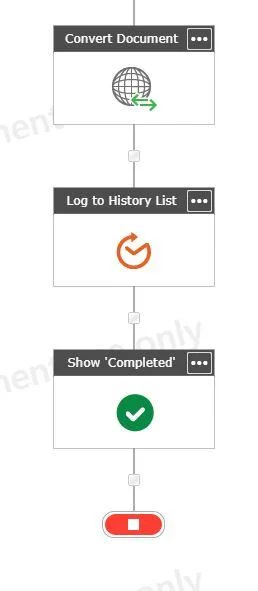
The workflow is complete and can now be published.
Once published, open the document library the workflow is associated with and ensure that a MS Word document document in DOC format is present. You can manually start the workflow. After a few seconds, the DOCX file will show up next to the file the workflow was started on.
Troubleshooting
Although both Nintex Workflow for Office 365 and the Muhimbi PDF Converter work very well together, there are a lot of moving parts in the workflow like custom generated JSON, customer-specific API keys, paths to the document libraries, etc. So, there are chances that you may encounter some issues when deploying the workflow. Some common issues and troubleshooting tips are provided below for your reference:
- Check prerequisites: Double-check that the prerequisites listed in the beginning of this section are in place.
- Log to History List: If it is not clear what is going wrong, log critical parts such as the JSON workflow variable (after the replace operation) as well as the ResponseText workflow variable (after the web request) using the Log To History List workflow action. You can see the contents of this list by clicking on the Workflow Status column for the List Item the workflow is running on.
- Send email: The amount of text that can be logged to the History List is limited (roughly 250 characters). For larger messages, use the Send an Email action instead to send an email with debug content in the body of the email to yourself.
- Copy & Paste: When copying the JSON fragment into your workflow, paste it into Notepad first to clean it, and then copy it from Notepad and paste it into your workflow. This is because browsers tend to insert hidden characters that are not filtered out by the Nintex Workflow editor.
- Nintex References: Make sure that the Nintex Workflow references in the JSON provided are replaced by actual Nintex Workflow references. You can double-check if the references are active by logging the JSON workflow variable to the History List. You should see the actual paths and not {Current Item:Server Relative URL}.
- Muhimbi Support: After double checking all prerequisites and going over all troubleshooting steps in this section, if you are still stuck, please contact our friendly support desk, who are here to help.
Fine-tuning
The workflow created in the previous section was to give a quick idea of how to use the Converter. However, this workflow would benefit from error handling. It also needs a solution for problems where the workflow will be triggered for DOCX files that are created by the workflow itself.
We have created a version of the workflow that is more production ready. Full details on the same are beyond the scope of this article. You can download the full workflow here and customize this as per your requirements.
After customization, you can import it into Nintex Workflow for Office 365, and set the API KEY, and then publish it for your use.
Other Operations
This section demonstrated how to invoke the Convert action on Muhimbi's REST interface to convert MS Word documents in DOC format to DOCX. In addition to DOCX Conversion, we also expose additional end-points for Merge, Watermark, Secure, Split, OCR and also for Copy Metadata operations. Full examples are beyond the scope of this article, but you can find examples in the SharePoint section of our GitHub repository.