In this guide, you'll learn how to add a table of contents (TOC) to a PDF using Muhimbi PDF Converter for SharePoint and Muhimbi PDF Converter API.
Object Model
This section explains the generation of a table of contents via our API. You can use this functionality from a SharePoint workflow as well. You can also use our XML-based workflow syntax to generate a table of contents from SharePoint Designer, Nintex, and K2-based workflows.
The classes relevant to dealing with TOCs are shown in the image below, followed by an explanation.
- MergeSettings — When merging multiple files and generating a single table of contents, follow the normal procedure for merging files and populate the
MergeSettings.TOCSettingsproperty as shown in the sample code below. - ConversionSettings — To generate a table of contents for a single document, follow the normal procedure for converting or processing a single file and populate
ConversionSettings.TOCSettingsas shown in the sample code below. - TOCSettings — All settings related to the generation of the table of contents can be found in this class. The available properties are as follows:
- Bookmark — The TOC can have its own PDF bookmark to aid with navigation. Specify the text in this property.
- Location — TOCs can be added to the front or back of the document. Enter the relevant option here.
- MinimumEntries — For certain simple documents that only have one or two bookmarks, it may not be beneficial to add a table of contents. Specify the minimum number of entries here before a TOC is generated. The default value is
0, which will always create a TOC, regardless of the number of entries. - PageMargins — Set page margins using the format below. It defaults to a uniform half inch margin.
#{dim}— for a uniform margin#{dim},#{dim},#{dim},#{dim}— for individual margins where:#is the numeric value.{dim}is the dimension. This should either be empty (meaning inches) or specify mm, in, in., inch, or inches.
- PageOrientation — The orientation used by the TOC. The options are portrait, landscape, or default. The default option uses the same orientation as the page following (or preceding) the TOC, depending on the value specified in the location.
- PaperSize — A named paper size, such as A4 or Letter (see MSDN), or a custom size in the
{width}{dim}{sep}{height}{dim}format where:{width}and{height}are numerical values (please use a colon '.' as the decimal separator).{dim}is the dimension, which can be mm, in., or inches (it defaults to inches when nothing is specified).{sep}separates the width and the height, either by comma,or the letterx. Example: 8.5 in. by 6 in.
- Properties — Optional properties to pass to the XSL template for display or processing purposes. For details, see below.
- Template — The XSL template (details below) to use for formatting purposes. This can either be a string containing all the XSL, a path that's local to the server running the conversion service to the location of the XSL file, or a URL to the XSL file on a web (or SharePoint) server.
- BookmarkGenerationOption — As explained in the XML Source Data section below, the TOC system is based on the content and structure of PDF bookmarks. It's therefore essential that during the conversion of the source documents,
ConversionSettings.GenerateBookmarksis set toAutomatic. - NameValuePair— A single value that can be passed into the XSL using
TOCSettings.Properties. - TOCLocation — Used by
TOCSettings.Locationto determine where the TOC should go.
To add a TOC, use the sample code, add the following code, and then pass tocSettings into either ConversionSettings.TOCSettings or MergeSettings.TOCSettings:
You can also use your own code, and even pass the tocSettings to both ConversionSettings.TOCSettings and MergeSettings.TOCSettings to generate TOCs for each individual document in a merge operation. You can then add an overall TOC for the entire merged document.
XML Source Data
To determine what entries to include in the TOC, the conversion service looks at the PDF bookmarks present in the PDF. If the source file isn't already in PDF format, it'll be converted to PDF, and when possible, it'll generate PDF bookmarks based on the internal structure of the document. For example, when converting an MS Word file, the various headings determine the structure of the PDF bookmarks.
Although, in most cases, it isn't important for our customers to have any knowledge about the internals of the Muhimbi Conversion Service, in this particular case, and by design, we recommend our customers understand this. Internally, an XML document that represents the content and structure of the PDF bookmarks is generated, and this XML document is then transformed into HTML using XSL. It's this HTML, which is the language that underpins every website on the internet, that determines the formatting of the TOC. Developers have full control over the XSL, providing them with an enormous amount of flexibility.
As an example, consider the comprehensive Administration Guide. When it's converted to PDF, a set of nested PDF bookmarks is generated, which internally generates the following XML:
Generated XML
The generated XML is fairly straightforward, and a number of nested topic elements make up the structure. Each element has a descriptive title attribute, a level attribute (which matches the nesting level), a page attribute containing the page number, and a target attribute, which is used for internal processing purposes.
Note: All page numbers in the TOC reflect the physical page number of that page in the generated PDF, including the addition of the TOC page itself. If the source document(s) already contain page numbers, then these may no longer be the same as the page number listed in the TOC or their actual page number in the generated PDF. If you want to change the page numbers displayed in the footer of a document, please use our watermarking capability.
The list of topic elements is followed by a properties section (line 84 onward in the example above). This section and its contents consists of a number of optional values that may have been passed into the request. This allows, for example, the addition of information to the TOC to display the document's status, author, title, or any other kind of information. In this example, you're passing the title of the document.
XSL Transformation
Although the XML document’s content may differ between requests, the structure is always the same. As a result, you can use the XSL industry standard to convert the XML into an attractive looking HTML document. Although XSL may look daunting to the uninitiated, the following sample is a good starting point and can be used as is or amended to suit your particular needs:
Although this is a standard XSL file, the following sections are of particular interest:
- Lines 12–56 – Standard HTML CSS stylesheet that controls the look of the generated HTML.
- Line 60 — Insert a custom property passed into the conversion request. In this example, it's the document’s title.
- Line 76 — An empty template for the properties element to prevent this information from being displayed as a plain list.
- Lines 78–97 — An XSL template for generating HTML associated with all level 0 topics. If you want to control the generated HTML for a specific level, copy the topic[@level=’0’] template and change the level number to match to appropriate nesting level.
- Lines 99–118 — XSL template for all topic levels that don't have an explicit template defined.
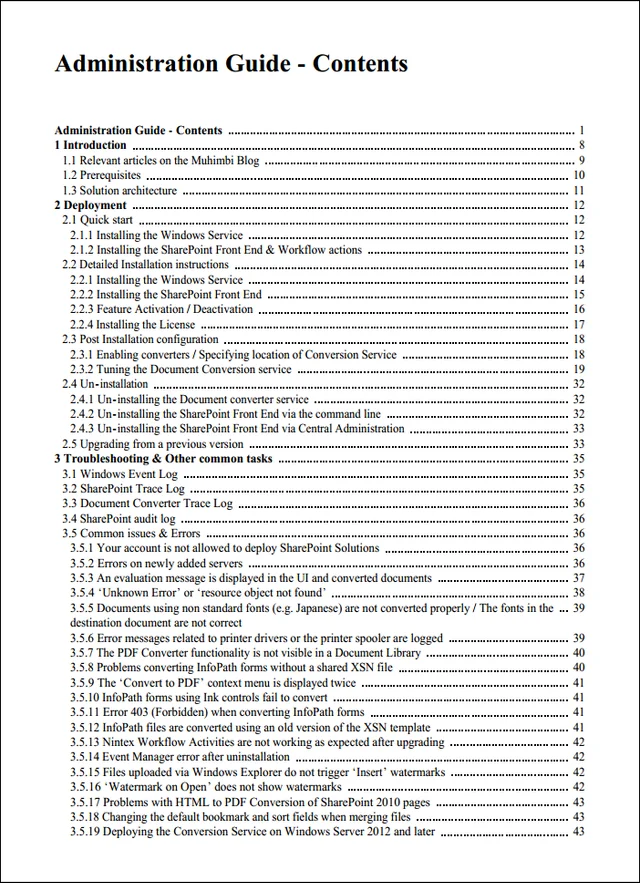
If you find it difficult to create, you use the XSL sample provided above in your project. An example of the resulting generated file is given below.
Testing and Troubleshooting
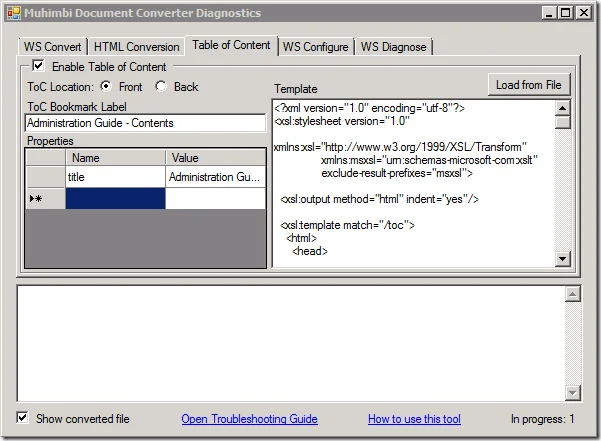
PDF Converter comes with a handy diagnostics tool (including full source code) to test the table of contents feature. While this is merely a test tool, and not the official user interface for the TOC feature, it gives you the option to quickly test various XSL template designs before integrating them into your solution.
To test the XSL and TOC output, enable the TOC as shown in the screenshot above, modify the XSL template if needed, specify any optional properties, select a file or folder in the WS Convert tab, and choose either the Convert or Merge button.


