In this guide you’ll learn how to convert images (BMP, GIF, JPG, PNG, TIFF) to PDFs in SharePoint. For this particular guide we will convert TIFF files to PDF but you can use this same example to convert other image formats like BMP, GIF, JPG, and PNG by simply changing the file format from TIFF.
This guide can be used in SharePoint Online and legacy MS SharePoint 2007 / 2010 workflow engine is fully supported, as is the optional Workflow Manager that comes with MS SharePoint 2013 and later versions. For more details, refer to this post.
Two of the more popular uses for multi-page TIFF files are the scanning of multiple pages into a single file and the reception of multi-page faxes. As these kinds of document management scenarios are very common we offer the following key features of TIFF to PDF conversion facility are as follows:
Convert multi-page TIFF files to a single PDF file.
Automatic page size detection.
Compatible with PDF/A.
Supports all TIFF formats recognised by the underlying operating system.
Before you start, ensure the PDF Converter for SharePoint On-Premises has been installed, and you have access to a site collection with the appropriate rights to create workflows.
To convert TIFF images via a workflow using MS SharePoint Designer, you will need to configure the Document Library containing the TIFF images (if not already available) and then also configure the workflow as per the details given below:
Create and Configure the Document Library Containing TIFF Images
You can create and configure the Document Library containing TIFF images by performing the following steps, if this is not already available:
Create a Document Library named Proposal Documents. You can use any name of your choice.
Ensure you upload all the TIFF images you like to convert to this location.
Once created, navigate to the library’s Settings →
Document Library Settings → Versioning Settings screen and enable Requires content approval for submitted items.In the Document Library, create two folders (You can use any name of your choice): Confidential Proposals and
Approved PDF Files.
Create and Configure MS SharePoint Designer Workflow
You can create and configure the MS SharePoint Designer Workflow by performing the following steps:
Start MS SharePoint Designer and open the site collection that contains the Proposal Documents Document Library. This contains TIFF images.
Click Add Item and select List Workflow. Specify the following settings:
Name for the workflow: Convert Approved TIFF Images to PDF
Select the Document Library associated with the Workflow: Proposal Documents.
When creating a SharePoint Designer Workflow in SharePoint 2013 or later, select the appropriate Platform Type.
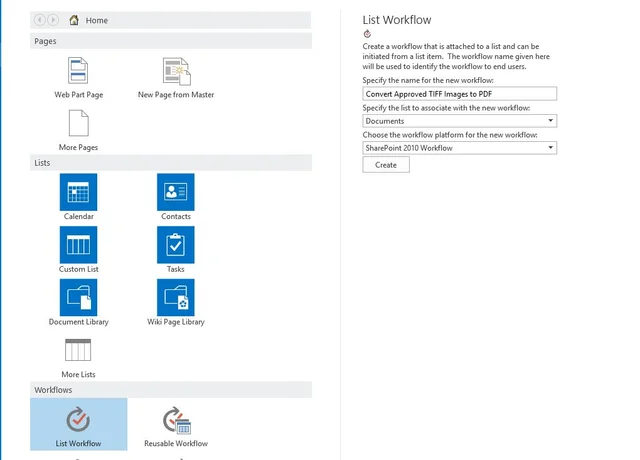
Click Create button to proceed.
We are now ready to create the workflow. From the ‘Conditions’ menu, select the ‘If value equals value’ condition.
Click the first value followed by the display data binding (fx) button.
Select ‘Current Item’ as the Source and select ‘Approval Status’ in the field.
Click the OK button to continue.Click the second value and select ‘Approved’ from the list.
To avoid the same workflow being executed on the converted PDF file after the conversion has taken place, we need to specifically exclude image files as follows:
Add another ‘If value equals value’ condition.
Click the first value followed by the display data binding (fx) button.
Select ‘Current Item’ as the Source and select ‘File Type’ in the Field. Click the OK button to continue.
Select ‘equals’ and change it to ‘not equals’.
Click the second ‘value’ and enter ‘PDF’, without a period ‘.’.
With the Conditions in place, we can now add the Actions, which is where the magic happens.
From the Actions menu, select Convert Document. It may be hidden behind the All Actions option.
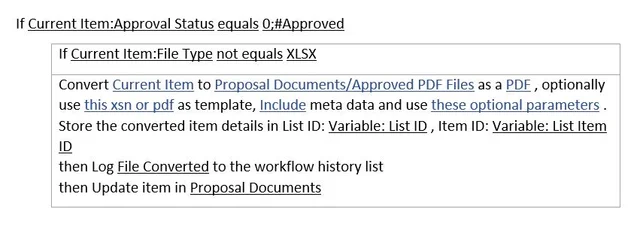
The following action is inserted:
Convert ‘this document’ to ‘this file’ as a ‘select file type’ , optionally use ‘this xsn or pdf’ as template, ‘include / exclude’ meta data and use ‘these optional parameters’ . Store the converted item details in List ID: ‘Variable: List ID’ , Item ID: ‘Variable: List Item ID’ then Log ‘File Converted’ to the workflow history list then Update item in ‘Proposal Documents’Let’s examine what the various options within the action mean:
this document: Specify which document to convert. Select the option
and make sure Current Item is selected.this file: Specify the location to which the converted file will be written. The following options are available:
Leave it empty: When no value is specified then, the converted image file is written to the same folder as the source file.
Site Relative URL: By specifying a URL relative to the current site, e.g. subsite/shared documents/PDF Files, any folder location in the current site collection can be targeted. This is the option we want to use so enter ‘Proposal Documents/Approved PDF Files’.
Web Application relative URL: Using a URL that is relative to the entire web application, e.g. /sites/Press Office/Public Documents/To Distribute, any folder location in any site collection can be targeted.
Select file type: Select the file type to which you want to convert the file. We will select PDF in our case.
include / exclude metadata: In case of sensitive documents, we may want to strip out any custom SharePoint columns information from the file. Assuming that our document library contains a column Yearly sales forecast, and the Image file uploaded has information entered in that column, we want to select ‘Exclude’.
Variable: List ID: A new workflow variable named List ID is automatically created. After the file has been converted, this variable will contain the ID of the list the converted file was saved to. This can later be fed into another action in order to manipulate this file further.
Variable: List Item ID: A new workflow variable named ‘List Item ID’ is automatically created. After the file has been converted, this variable will contain the ID of the item the converted file was saved to. This can later be fed into another action in order to manipulate this file further.
Insert a new action named ‘Log to History List’ and enter ‘File converted’.
Insert a new action named ‘Update List Item’ and select ‘this list’. We are now going to automatically mark the converted PDF file as ‘approved’.
- From the ‘List’ dropdown select ‘Confidential Proposals’.
- Click Add button and set the field to ‘Approval Status’ and the value to ‘Approved’, and click OK.
Note: Starting with MS SharePoint 2010, it is no longer possible to set the value of the ‘Approved’ field. - In the ‘Find the List Item’ area set the field to ‘ID’.
- Click the fx button next to ‘Value’, specify ‘Workflow Variables and Parameters’ as the Source and set the field to ‘Variable: List Item ID’ and click the OK button.
- Click OK again to return to the MS SharePoint Designer Workflow. It should look like the image below.
Click Publish button to deploy and activate the workflow.
Testing the Workflow
You can test the workflow created by performing the following steps:
Create or upload an image in TIFF file format to the ‘Confidential Proposals’ folder.
From the context menu, select Approve / Reject and approve the file.
This will automatically start the workflow, and after a few seconds, the Workflow status should change to Completed.
Once the workflow has been completed, you will find the PDF document version of the TIFF file in the ‘Approved PDF Files’ folder.
If an error occurs during the execution of the workflow, you can perform the following to troubleshoot the same:
Check the messages on the workflow status screen.
Check for errors in the Windows Event log.
Check for errors in the SharePoint trace log.