In this guide, you'll get step-by-step instructions for converting a wide variety of file types to PDF using the SharePoint user interface (UI). You'll also learn how to convert an entire folder or document library to PDF in SharePoint. This guide can be used in SharePoint Online or on-premises deployments.
Converting a Single File
To convert a single file to PDF, follow these steps:
Go to the document library and folder where the file is located.
Select the file you want to convert.
Open the context menu. Then click Convert to PDF.
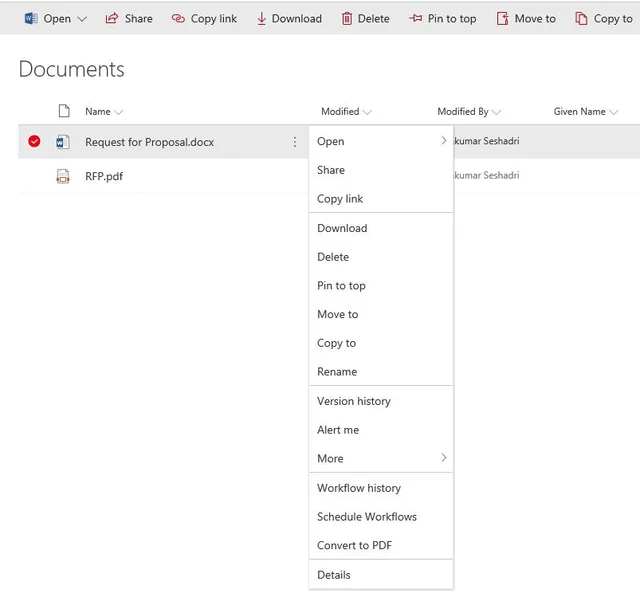
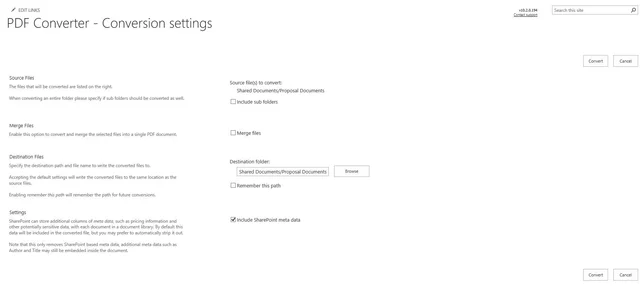
Review the Conversion Settings Page, and then click Convert.
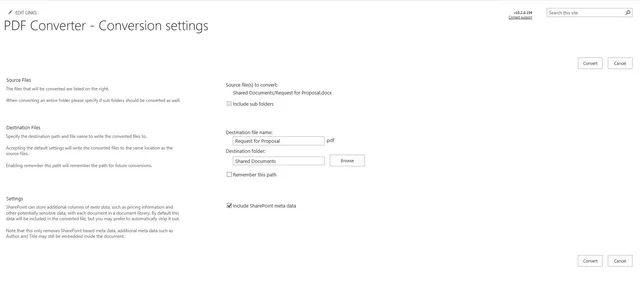
UI Element
Description
Source Files
This field displays the file selected for PDF conversion.
Destination Files
This field displays the filename that will be displayed for the converted PDF file.
You can also select a different folder to save the PDF by clicking Browse and selecting the appropriate folder.
If you select Remember this Path, this will become the default path for future conversions, which can also be changed if needed.
Settings
If you select Include SharePoint metadata, this will automatically include all the meta data available in the source file.
Review the Conversion results page to check if the conversion was successful and without any errors.
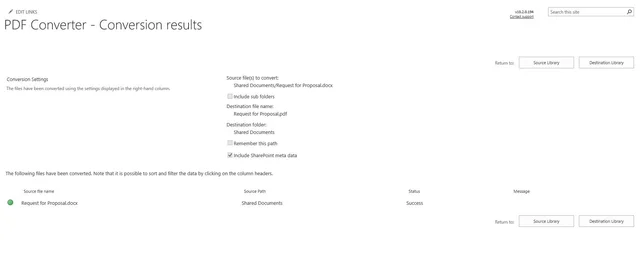
Click Destination Library to go to the converted PDF file’s directory.
Note: When using the PDF Converter with MS SharePoint 2010 or later, you can also convert the file by selecting it and choosing Convert to PDF in the ribbon.
Downloading a Single File
If Muhimbi.PDFConverter.ConvertAndDownload.Site Feature is enabled in a site collection, then the Download as PDF option is also added to both the MS SharePoint ribbon and the file context menu.
Download as PDF works very similar to the Convert to PDF option, except that it opens/downloads the PDF file on a local machine rather than saving it to MS SharePoint.
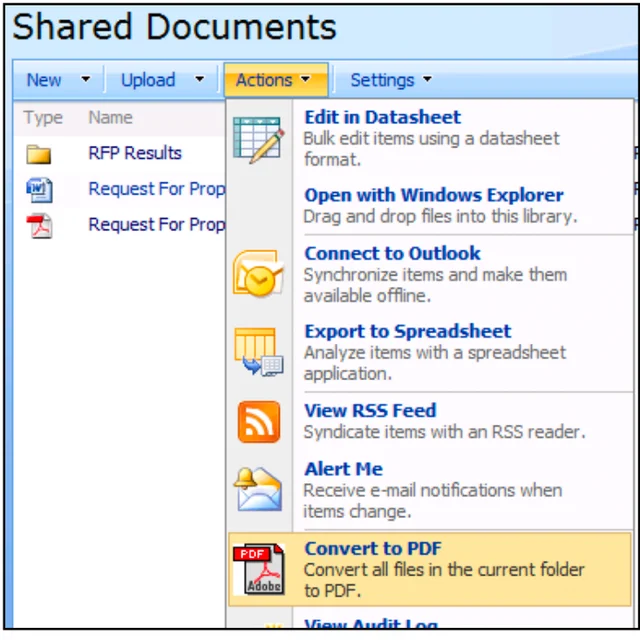
Converting an Entire Folder
To convert an entire folder to a PDF, follow these steps:
Go to the document library that contains the folder to convert.
Open the context menu. Then click Convert to PDF.
The Conversion settings page will be displayed. You can review the settings and click Convert.
UI Element
Description
Source Files
This field displays the folder selected for PDF conversion.
If there are subfolders inside this selected folder, select Include sub folders.
Note: The time taken for the conversion might be significantly higher if there are many files to convert.
Merge Files
If you want to merge all the files in the selected folder to a single file, select Merge files.
When you select this option, you will be given further options to select the files that you want to merge, and also select the merge order for the same from this folder.
You can also select the field that can be used for PDF bookmark.
Destination Files
This field displays the folder name that will be displayed for the folder that will contain the converted PDF files.
You can also select a different folder in which the converted PDF file(s) needs to be saved by clicking Browse and selecting the appropriate folder.
If you select Remember this Path, it will become the default path for future conversions, which can also be changed if needed.
Settings
If you select Include SharePoint metadata, it will automatically include all the meta data available in the source file(s).
The Conversion results page will be displayed. You can review the results on this page to check if the conversion was successful and without any errors.

Click Destination Library to navigate to the directory containing the converted PDF file(s).
Note: When using the PDF Converter with MS SharePoint 2010 or later, you can convert the file by selecting it and choosing Convert to PDF in the ribbon. The Download as PDF feature doesn't work for folders.
Converting an Entire Document Library (MS SharePoint 2007)
This section is only valid for MS SharePoint 2007.
Although it's possible to convert an entire document library (MS SharePoint 2007) in one go, it may take a long time to complete, or even time out, if the library contains many files. You'll automatically receive a warning if many files are in the library.
You can convert an entire document library to PDF by performing the following steps:
Navigate to the root folder of the document library to convert.
Select Convert to PDF from the Actions menu.
Note: This option is only available in MS SharePoint 2007.
Specify if you want to convert subfolders as well.
Review all the other settings and click Convert to start the conversion process.
Verify the files have been converted without errors.
Click Destination Library to navigate to the directory containing the converted PDF files.
Note: If you're using MS SharePoint 2010 or above, select all files and use the Convert to PDF option in the ribbon instead, as this option is only available in MS SharePoint 2007.
Saving the Converted File to a Different Location
By default, PDF files are saved to the same folder in which the source files are located. However, as discussed above, it's possible to specify a different folder, document library, site, or even site collection to save the converted PDF files to.
To specify a different folder, open the PDF Conversion screen and select the destination folder. When the site is hosted on a SharePoint server rather than the free Foundation server, a user-friendly Browse button is available, allowing folders or sites to be selected within the current site collection.
Browse for a destination folder (commercial versions of SharePoint only)
If the Browse button isn't available or the destination folder is located in a different site collection, then you'll need to enter the destination path manually. The format is as follows:
A folder in the current site collection: Document Library Name/Folder path, e.g. Shared Documents/PDF Files
A folder in the different site collection: Absolute path to Site Collection/Document Library Name/Folder path, e.g. /sites/Press Office/Shared Documents/PDF Files
Note: Don't include http:// and the domain name in the absolute path. An absolute path always starts with /.
If the files are always written to the same directory, it may be a good idea to select Remember this path to automatically default to whatever custom path was last entered.
Note: These settings are remembered per user and stored at the site collection level.
Clearing the Remember this path checkbox will automatically forget the settings during future conversions.
Note: Document Sets can be used as a source as well as a destination for PDF conversion. They work exactly the same as folders.
Working with the Conversion Results Screen
The Conversion results screen contains functionality to simplify managing a large number of converted documents.
The following features are available:
Filter by column — Click the column's header to filter on and select the value to filter for. For example, select Error in the Status column to generate an overview of all files that caused an error during the conversion process.
Sort by column — Click the header of a column to sort its contents either in ascending or descending order. For example, click the Source Path column to group all documents by folder.
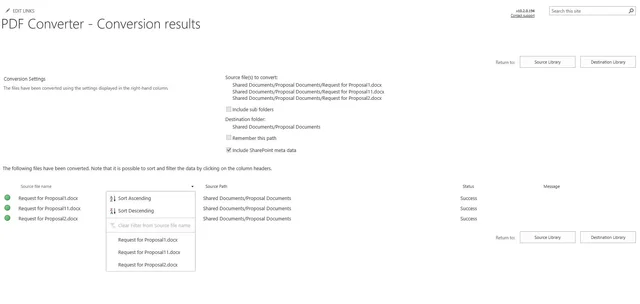
Jump to the destination folder — Click Destination Library to navigate to the folder to which the PDF file was written. This is particularly useful when a different destination folder has been specified during the conversion process.
Page through results — A page is automatically displayed when you convert more than 100 files.
Next Steps
If you’d like to get started with PDF Converter for SharePoint, we offer a free trial for both SharePoint Online and SharePoint on-premises deployments. We also provide free support to help you intergrate our solutions into your SharePoint environment. If you have any questions, please contact our Support team.