Stay informed about InfoPath deprecation and explore alternatives with our PDF converter solutions. Watch the recording of our latest webinar and learn how to convert your InfoPath documents using Power Automate, Nintex workflows, SharePoint Designer, and code.
In this guide, you’ll learn how to convert InfoPath files to a Word document using Power Automate. Converting InfoPath to Word (DOCX) is a more involved process than other conversion types, because InfoPath uses two files to create a single form: an XML (data) file, and an XSN (template) file.
In this example, you'll create a simple flow that's triggered whenever a form is added to a folder in a SharePoint Online library. Once this is added, the form is automatically converted to an MS Word document and stored in an MS SharePoint folder.
This example can easily be adjusted to use different file services (e.g. the trigger can be for files uploaded to OneDrive, Box.com, Dropbox, and Google Drive, or it can even be used to migrate your SharePoint On-Premises InfoPath forms to SharePoint Online).
Prerequisites
Ensure the following prerequisites are met:
- A subscription to Muhimbi PDF Converter REST-Based API for Server Platform
- Appropriate privileges to create flows
Using Power Automate to Convert to DOCX
From a high-level perspective, the flow looks as shown in the image below.
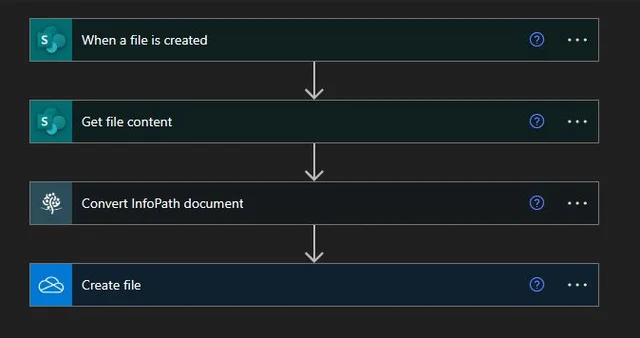
Note: Converting an InfoPath form is similar to converting any other document type using Muhimbi's flow actions, but you'll also need to pass in the XSN file (the file content, not the URL to the file) alongside the XML file.
1: Creating a New Flow
Create a new flow and use the When a file is created trigger . Fill out the URL for the site address and select the relevant SharePoint library from the dropdown menu.
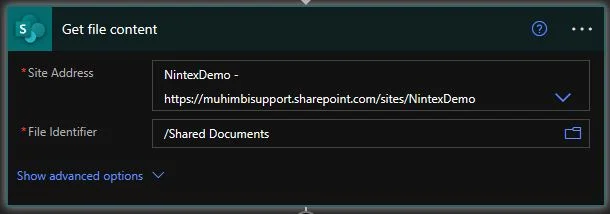
2: Getting the File Content
Insert the Get file content action and specify the path to the SharePoint Online location where the XSN has been published. By default, it's stored in the Forms folder, e.g. https://yourdomain.sharepoint.com/sites/Sitecollectionname/Library/Forms/template.xsn.
3: Converting the Document
Insert Muhimbi’s Convert InfoPath document action, and fill it out as follows.
- Source file name — File name, which is the output of the When a file is created in a folder trigger.
- Source file content — File Content, which is the output of the When a file is created in a folder trigger.
- Output format — DOCX
- Template file content — File Content, which is the output of the Get file content action, which contains the InfoPath XSN file.
- View names — Enter the comma-separated view names that need to be converted.
- Include attachment — If you'd like the attachments to also be converted, select Yes.
- Attachment action — You can choose how to deal with attachments. The available options are:
- Default — If this is selected, the attachments are merged into the output file, and unsupported attachments are removed.
- Merge — If this is selected, the supported attachments are merged to the output file.
- Unsupported attachments — If this is selected, the behavior will be determined according to the settings in
InfoPathConverterFullFidelity.UnsupportedAttachmentBehaviour. - AttachAsPDF — If this is selected, supported attachments are converted into PDF and attached to the output document.
- AttachOriginal — If this is selected, all attachments are attached to the output document in their original format.
- Unsupported attachment action — You can select what to do when the converter encounters unsupported attachments. The default value is Error:
- Error — When this option is selected, an error is raised when unsupported attachments are found.
- Remove — When this option is selected, the unsupported attachments are ignored and not included in the output.
- AttachOriginal — When this option is selected, unsupported attachments are attached in their original format.
- Break merge on error — When you select Yes, then the merging of the document is stopped and an error message is shown.
- Default paper size — Select the paper size to be used, if not specified in the view.
- Default paper size (custom) — Enter the paper size to be used if Default paper size (custom) is used.
- Force paper size — Force the paper size to be used regardless of whether it's set in the views.
- Force paper size (custom) — Enter the paper size to be used if Force paper size (custom) is used.
- Default page orientation — Select the default page orientation.
- Force page orientation — Force the page orientation to be used regardless of whether it's set in the views.
- Start page — Select the first page to include.
- End page — Select the last page to include.
- Conversion quality — Select the quality of the output file.
- Override settings — You can enter additional optional settings using Muhimbi’s XML syntax.
- Fail on error — When an error message is encountered, it'll stop the process if Yes is selected.
Note: Don't just pass the path to the XSN file into the Muhimbi action, as it doesn’t have the privileges to read the file.
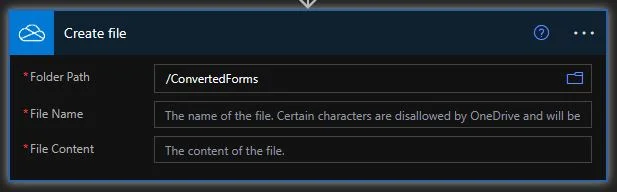
4: Creating a File
Insert a Create file action to write the converted file back to the OneDrive folder where the converted DOCX files are written. In the Folder Path field, specify the path to the OneDrive folder. In the File Name field, pass in the Base file name field returned by the Convert document action, along with the .docx suffix. In the File Content field, pass the Processed file content returned by the Convert document action.
You can write the converted file back to the OneDrive folder, Dropbox, or Google Drive, or you can send the DOCX via email.

5: Publishing the Workflow
Publish the workflow and upload a Microsoft InfoPath file in the specified document library. After a few seconds, the flow will trigger and a DOCX file will be generated.
Note that this is just a basic example. Muhimbi PDF Converter also comes with the ability to convert files attached to InfoPath forms, as well as the ability to choose which InfoPath view or views to convert. For more information, contact us.
Additional Resources
For more information, refer to the following resources.