In this guide, you’ll learn how to split a PDF into multiple PDF files using Power Automate.
For this specific example, you'll use Power Automate to automatically split a newly uploaded PDF file in OneDrive for Business into multiple files containing 10 pages each, and then add the split files to SharePoint. You can also use this example for other file formats by first converting them to PDF and then splitting them into more manageable file sizes.
In this example, you're splitting documents in OneDrive and sending them to SharePoint. However, you can easily split and save them to another destination like Dropbox, Google Drive, or any platform supported by Power Automate.
The key features of the PDF splitting facility are the abilities to:
- Split a single PDF file into one or more individual PDF files.
- Split based on the number of pages or PDF bookmarks.
- Automatically generate numbered file names using .NET’s formatting syntax — for example,
split-{0:D3}.pdfwill use three digits for the sequential numbers starting atsplit-001.pdf. When splitting by bookmark, an optional{1}parameter can be inserted in the file name to include the name of the bookmark as well. - Combine this with other actions, e.g. converting and merging.
Note: When splitting based on bookmark levels, an extra page will always be exported for each file split based on bookmark levels. This is because PDFs store bookmarks at the page level, and so it won't be clear for the converter to identify on what part of the page a heading starts or ends.
Prerequisites
Before building the workflow, ensure all prerequisites are in place:
- A full or free trial subscription to Muhimbi PDF Converter for Power Automate.
- Appropriate privileges to create Power Automate flows.
- Working knowledge of Power Automate.
Splitting PDF Files Using Power Automate
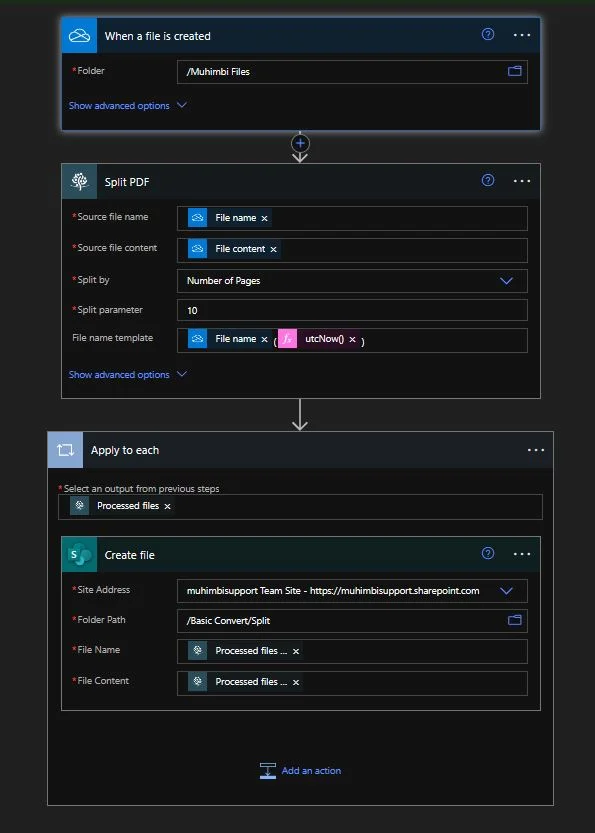
From a high level, the flow will look like what's shown below.
Creating a New Flow
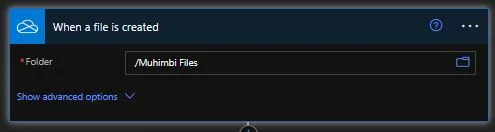
Create a new flow using the OneDrive for Business When a file is created trigger. In the Folder field, select the OneDrive folder where the files to be converted will be uploaded.
Splitting the PDF
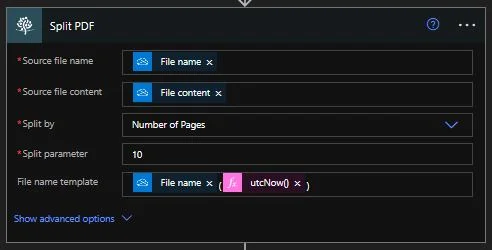
Insert Muhimbi's Split PDF action and fill it out with the following information:
- Source file name — Specify File name, which is the output of the When a file is created action.
- Source file content — Specify File content, which is the output of the When a file is created action.
- Split parameter — When splitting based on the number of pages, this parameter must be set to the maximum number of pages to include in each split file. When splitting based on the bookmark level, this parameter should contain the depth at which to split. For example, specify
1to split into top-level chapters (Chapter 1, Chapter 2, etc.) or a higher number to split at a deeper level (2splits at chapters 1, 1.1, 1.2, 2, 2.1, etc.) - File name template — This parameter determines the file name for the returned file. This example uses
File name’-(fx (utcnow())).
Creating a File
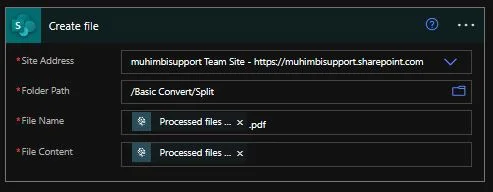
Insert an MS SharePoint Create file action to write the converted file to an MS SharePoint Online location. Fill out the action according to the following:
- Site Address — Select the location of the MS SharePoint site where you want to store the split documents.
- Folder Path — Select the folder where you want the split files to be saved.
- File Name — Specify Processed files content, which is the output of Muhimbi’s Convert document action. Ensure you add the
.pdfextension to the file name. - File Content — Specify Processed files content, which is the output of Muhimbi’s Convert document action.
Publish the workflow and upload a new PDF document to the OneDrive for Business location. After a few seconds, the flow will trigger and the PDF file will be split and uploaded to the MS SharePoint location.