In this guide, you’ll learn how to automatically generate a PDF using Power Automate.
This example automatically generates a PDF file when a new MS Word document is added to a OneDrive folder. Once the file has been generated in OneDrive, it's then automatically added to a specified location within SharePoint.
It’s important to note that you aren't limited to generating PDFs from MS Word documents, as Muhimbi supports a wide range of file types. You can also generate your PDF on another platform, like Dropbox, Google Drive, or any other platform supported by Power Automate. If desired, you can extend our example by adding additional automation, such as sending the generated PDF in an email.
Prerequisites
Ensure the following prerequisites are in place:
- An Office 365 subscription with Power Automate and OneDrive for Business support.
- A full or free trial subscription to Muhimbi PDF Converter for Power Automate.
- Appropriate privileges to create flows.
- Appropriate privileges in MS SharePoint Online and OneDrive for Business.
- Working knowledge of Microsoft Power Automate.
The Flow
This example takes you through generating a PDF when a file is created in OneDrive (Business) and then adding the generated file to SharePoint.
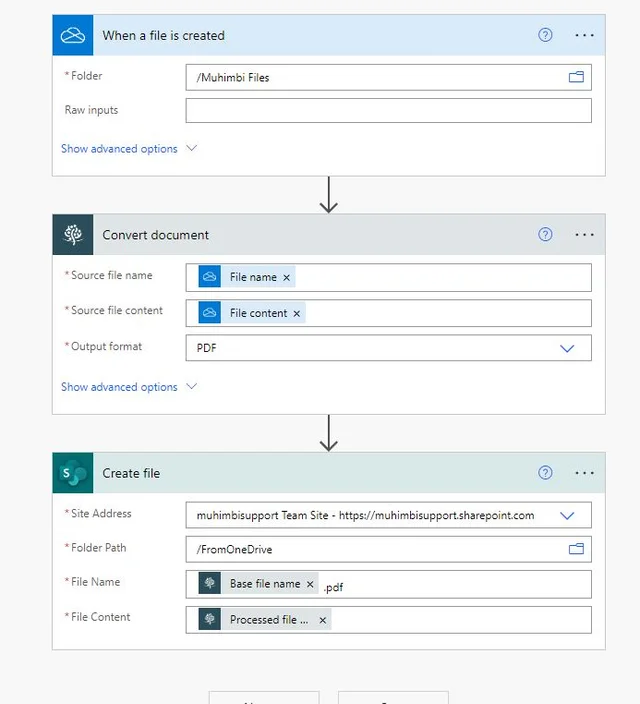
On a high level, the flow will look like what's shown in the following image.
Creating a New Flow
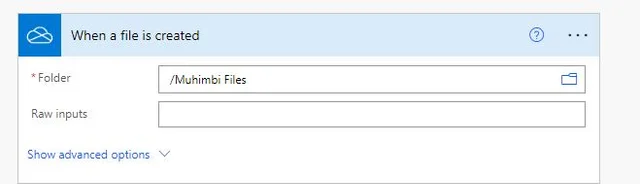
Create a new flow and use the When a file is created OneDrive (Business) trigger. In the Folder field, select the OneDrive folder where the converted files will be uploaded.
Converting the Document
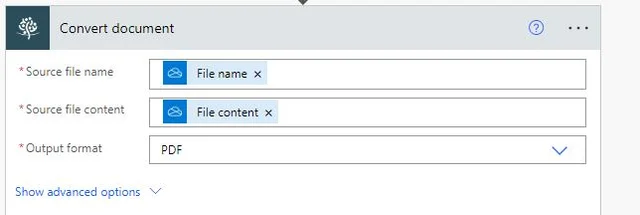
Insert Muhimbi's Convert document action. In the Source file name field, specify File name, which is the output of the When a file is created action. In the Source file content field, specify File content, which is the output of the When a file is created action. For the Output format field, specify PDF.
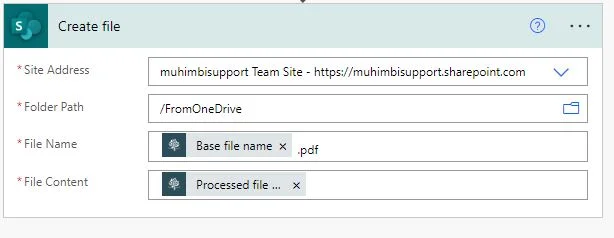
Creating a File
Insert the SharePoint Create file action to write the generated file to a SharePoint Online location. Fill out the fields as follows:
- Site Address — Select the location of the MS SharePoint site where you want to store the converted PDF document.
- Folder Path — Select the folder where you want the generated PDF file to be saved.
- File Name — Add Base file name, which is the output of Muhimbi’s Convert document action. Ensure you add the
.pdfextension to the file name. - File Content — Add Processed file content, which is the output of Muhimbi’s Convert document action.
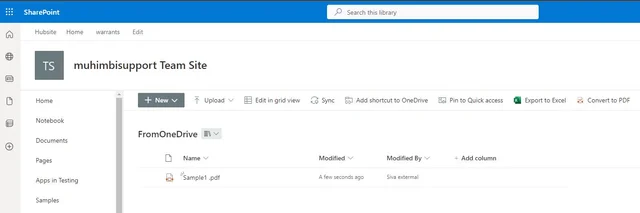
Publish the workflow and upload a new item, such as an MS Word document, to the OneDrive (Business) location.

After a few seconds, the flow will trigger and a PDF file will be generated and uploaded to the MS SharePoint location.