Muhimbi PDF Converter version 8.3 and above supports the conversion of CAD files to PDF. The key features of CAD conversion include:
- Full 2D and 3D support.
- Highly configurable (output paper size, margins, layouts/views to convert)
- Automatic and intelligent recoloring of drawings, e.g. switch the background to black, white, or any other color without losing visibility of elements that were already using that color. Full black and white support is available as well.
- Conversion of individual layouts or all layouts while skipping empty and invalid ones.
- Automatic detection of paper orientation.
As the converter is part of our highly scalable PDF Converter Server Platform, it automatically benefits from all its features, including reliability, scalability, a watermarking engine, cross-platform support, a web services-based API, PDF security, SharePoint integration, Nintex workflow integration, Java support, InfoPath attachments, Windows Azure, and more.
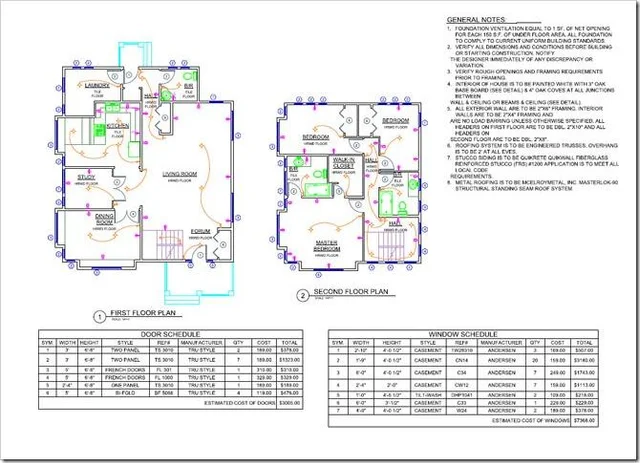
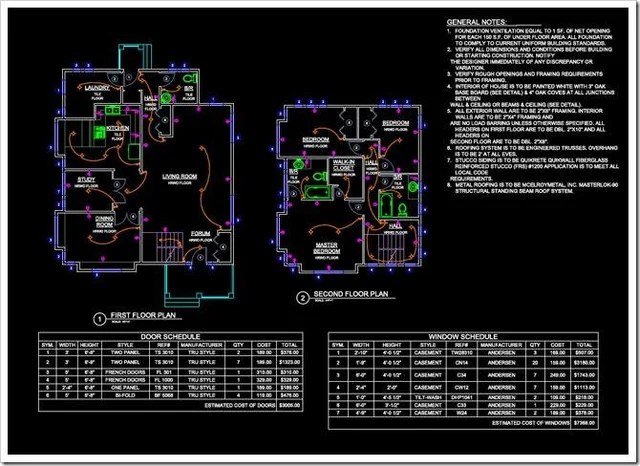
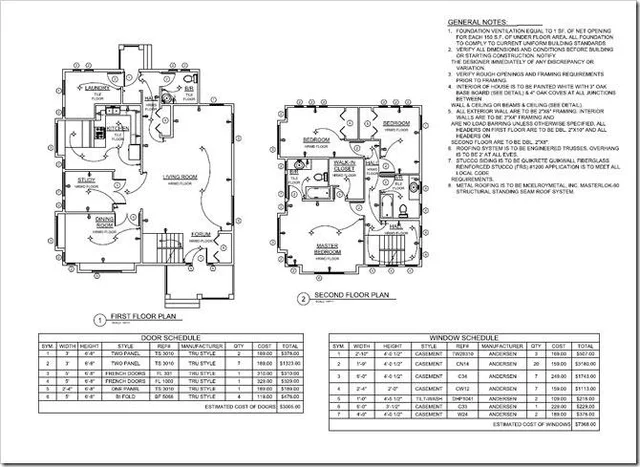
Below are three different images of the same drawing after conversion to PDF, but with different recoloring options.
You can also use third-party CAD converters in combination with Muhimbi PDF Converter.
Using Power Automate to Convert CAD Files to PDF
This example takes you through converting CAD files to PDF.
Before beginning, make sure the following prerequisites are in place:
- A Power Automate subscription.
- Gateway for Power Automate (installed and configured).
- A full or free trial subscription to Muhimbi PDF Converter for Power Automate.
- Appropriate privileges to create Power Automate flows.
- Working knowledge of Power Automate.
1: Creating a Flow
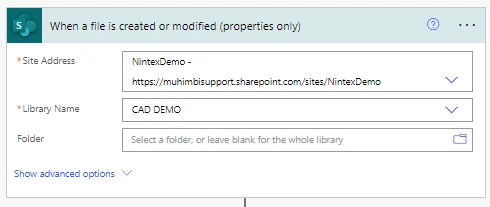
Create a flow and find the When a file is created or modified (properties only) trigger, which will allow you to start the flow when adding or modifying a property of a file into a folder.
In the action, specify the path to the SharePoint Online library to monitor for new items
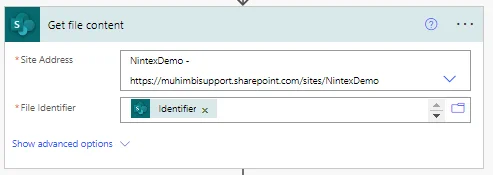
2: Getting the File Content
Add the SharePoint Get file content action to the Power Automate canvas. In the Site Address field, specify the path to the SharePoint Online site collection that holds the file. In the File Identifier field, specify Identifier, which is the output from the When a file is created or modified (properties only) action.
Step 3: Converting a CAD Drawing to PDF
Add the Muhimbi Convert CAD drawing to PDF action to the Power Automate canvas and configure it according to the details below. If your source documents are already in PDF format, this step isn't necessary.
In the Source file name field, add File name with extension, which is the output from the When a file is created or modified (properties only) action. In the Source file content field, add Get file content.
Leave the other options as their defaults. However, you may want to change the advanced option to match the details below.
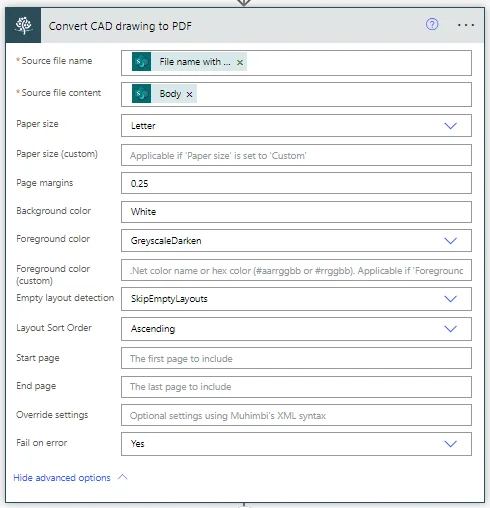
Name | Key | Description |
|---|---|---|
Source file name |
| Name of the source file, including extension |
Source file content |
| Content of the file to convert |
Paper size |
| Paper size for the output |
Paper size (custom) |
| Applicable if 'Paper size' is set to 'Custom' |
Page margins |
| E.g. '1.5cm' (for uniform) or '0.5in, 0.25in, 0.5in, 0.25in' (for non-uniform) margins |
Background color |
| .NET color name or hex color ( |
Foreground color |
| The foreground effect or color |
Foreground color (custom) |
| .NET color name or hex color ( |
Empty layout detection |
| Select which layouts should be skipped |
Layout Sort Order |
| Specify the sort order in which the layouts are converted |
Start page |
| The first page to include |
End page |
| The last page to include |
Override settings |
| Optional settings using Muhimbi's XML syntax |
Fail on error |
| Fail on error |
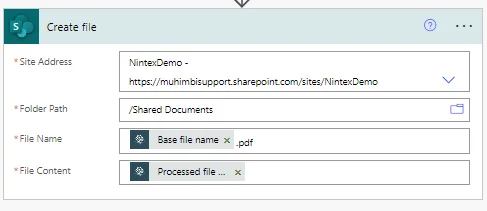
Step 4: Creating a File
Add the Create file SharePoint action to store the PDF document in the File Explorer action library.
Note: You'll need to configure a gateway to write files to your file system, as mentioned in the prerequisites section.
In the File Name field, add Base file name.pdf, which is the output variable of the Convert CAD drawing to PDF action. In the File Content field, add Processed file content, which is the output variable of the Convert CAD drawing to PDF action.
Now, publish your flow and upload a file (e.g. a CAD drawing) to the folder that's monitored by the configured SharePoint trigger. After a short wait, you'll find the PDF document in the destination document library or folder in SharePoint.