We recently released the Muhimbi PDF Converter Xtension for Nintex Automation Cloud. You can download it here or learn more about available Muhimbi deployments for Nintex on our product page.
Muhimbi PDF Converter for SharePoint has the ability to control which view or views to convert to MS Word. It is even possible to specify which views to convert depending on the current status of the form.
The views to convert can be specified during design time, or at run time using a little bit of custom code or Nintex forms rules. You can also control which views to convert using Nintex workflow or Nintex for O365 in MS SharePoint Online. The example provided below uses the Nintex workflow. But this works equally well in the MS SharePoint Designer workflow as well.
Compared to creating similar conversions in MS SharePoint Designer, it has become much easier using Nintex Workflow, especially in combination with the PDF Converter For SharePoint’s native Nintex support. In addition to the PDF Conversion Workflow Activity, there are also Nintex activities for PDF watermarking, PDF security, PDF merging, HTML to PDF conversion and more.
This section illustrates the power of these combined tools using an example that is usually quite tricky to achieve in MS SharePoint Designer Workflow: In this example, we create a workflow to retrieve all files modified during the current day and convert them to MS Word. Ideally, you would schedule this workflow to run off-peak to batch process all new and modified files.
Nintex Dialog for the new Convert Document Action
The Nintex Convert Document Action can use Nintex Lookups and Workflow Variables and can be used to convert items other than the ones that triggered the workflow, which makes it ideal for converting entire sets of documents.
Prerequisites
Before we build the workflow, please ensure all prerequisites are in place. It is also assumed that the reader has some knowledge of building Workflows using Nintex Workflow.
Make sure the PDF Converter for SharePoint version 4.1 (or newer) is installed in line with chapter two of the included Administration Guide.
Naturally Nintex Workflow will need to be installed as well. Nintex Workflow versions 2007, 2010 and 2013 are supported.
Make sure the Muhimbi.PDFConverter.Nintex.WebApp SharePoint Feature is activated on the relevant Web Application using SharePoint Central Administration.
You will need to have the appropriate privileges to create workflows.
Creating the Infopath Form
Navigate to the MS SharePoint List where you want to design the Infopath form.
Go to Site Settings → Form Options and click Customize the current form using Microsoft Infopath and click OK button.

InfoPath Designer for the list opens
On Page Design tab select New View.
Name the new view ‘DocView’ or any name of your convenience.
Change the Title at the top to 'Doc View' so you know the exact view that has been exported.
Select the fields you like to see in this view and design the Form View accordingly.
Click File → Publish.
Creating the Nintex Workflow
To get started, create a new workflow and choose the blank template. You can download the complete workflow in NWF format and reuse it for your environment.
Make sure the workflow doesn’t start automatically and add the workflow variables listed in the following screenshot.
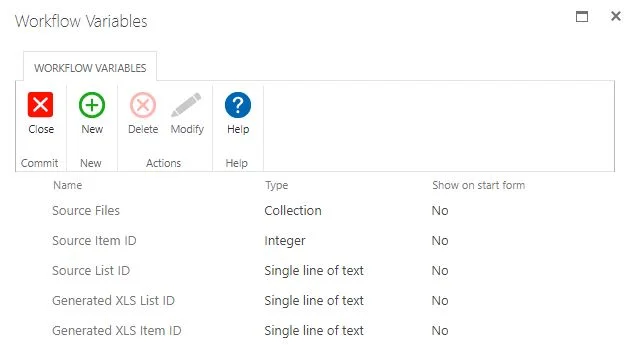
Please ensure that the appropriate data types are assigned (They are listed between round brackets behind each variable name). The names are largely self-describing, but some additional information is provided below:
- Source Item ID: By default, the item that triggered the workflow is converted to MS Word document format. However, as we are iterating over multiple items, we need to specify the ID of the item to convert in this variable. In SharePoint 2010 / 2013 select Integer as the Type, not List Item ID.
- Source List ID: The PDF Converter assumes the item being converted is located in the same list the workflow is attached to. However, if this is not the case, then the ID (a GUID) of the list will need to be specified as well. In this example everything is located in the same list so this variable is not actually used.
- Source Files: As we are potentially converting multiple files, we need to define a variable of type Collection to hold the list of files we will be iterating over.
- Generated Doc Item ID: Once a file has been converted to MS Word document, you may want to carry out additional actions on this new file, for example checking it in. Once converted, the ID of the MS Word document is automatically stored in this variable. In SharePoint 2010 / 2013 select Integer as the Type, not List Item ID. This example uses the newer Convert Document activity, so please take into account that the Generated Doc Item ID is of type Text. If you wish to pass this ID into a secondary activity, you may need to convert it to the correct data type using the Convert Value Workflow Activity. An example can be found here. If you are using the (Legacy) Convert to PDF Workflow Activity, you can have data type Integer.
- Generated Doc List ID: As the PDF Converter allows files to be written to different document libraries, and even utterly different Site Collections, you may want to know the ID of the destination list.
Adding the workflow actions
We are now ready to add the actions to the workflow. Begin by adding a Query List action, allowing us to retrieve all files modified today and store the results in the Source Files collection
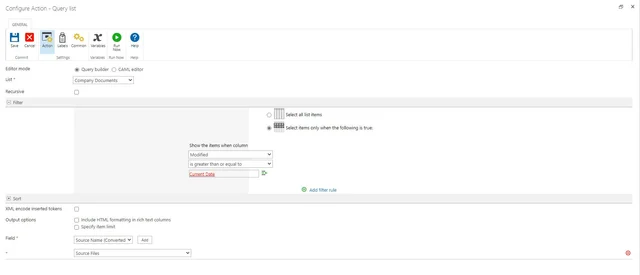
You can fill out the settings for this action as in the screenshot listed above. You may want to add an additional filter rule to check that Content Type is not equal to Folder or Document Set.
Continue, by adding the For Each action to the workflow. Specify the name of the collection to iterate over and the name of the variable to store the Item’s ID in.
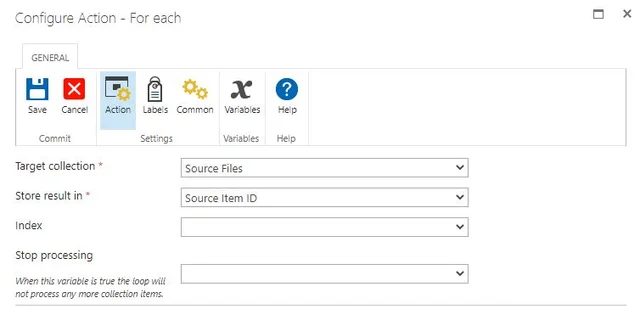
The next set of actions will all need to be added inside the For Each action, to make sure they are executed separately for each file in the list.
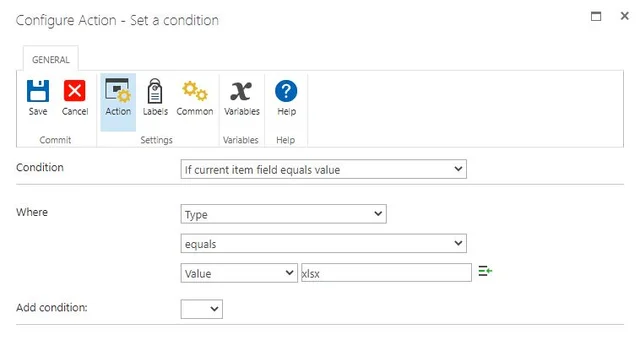
We want to make sure that we only invoke the PDF Converter for files that are not already in Word document format. So, add a condition and check that the file type equals ‘docx’ as per the following screenshot:
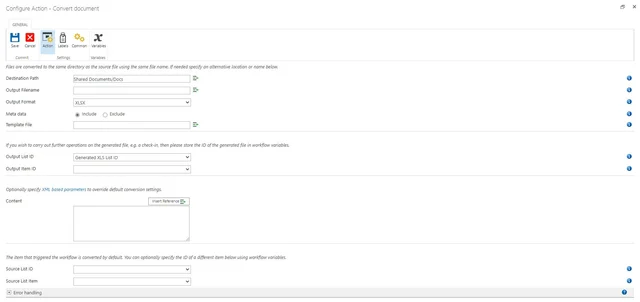
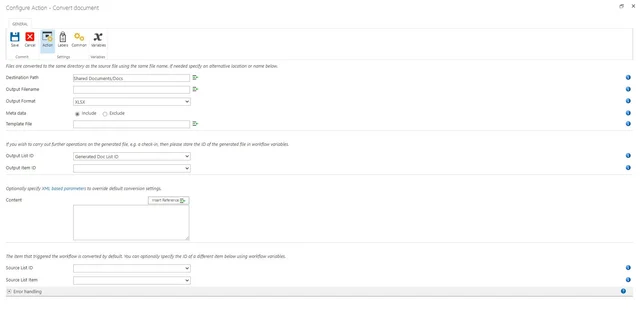
Add the Convert document action listed under the Muhimbi PDF section to the No branch of the condition (type is not docx). Fill it out as per the image in the following screenshot.
PDF Converter integrates with Nintex Workflow 2007, 2010 & 2019
Please ensure you enter the following override in the Content parameter of this action.
You may want to leave the Destination Path empty, which will write the MS Word document to the same location as the source file. For more information about the Destination Path or any of the other fields, hover the mouse over the small information icons.
The workflow is now done. You may want to add some tracking information using the Log In the History List action. In our example we use the following:
- Last action in the No branch:
List ID: {WorkflowVariable:Generated Doc List ID} - List Item ID: {WorkflowVariable:Generated Doc Item ID} - Last action in the Yes branch:
Already in Doc Format: {WorkflowVariable:Source Item ID}
Running the Workflow
Finalize the workflow by saving and publishing it, after which it is ready to be executed.
You can either run the workflow manually or schedule it to run at a time of your choice..