Muhimbi’s PDF Editor for SharePoint lets you copy and move PDF pages and reorganize your documents natively in SharePoint Online or on-premises. It features a document editor that lets you move, copy, delete, rotate, and add new pages. Once the PDF is displayed in the Document Editor, you can easily drag and drop pages using an intuitive user interface (UI).
Step 1: Opening PDFs and the Document Editor
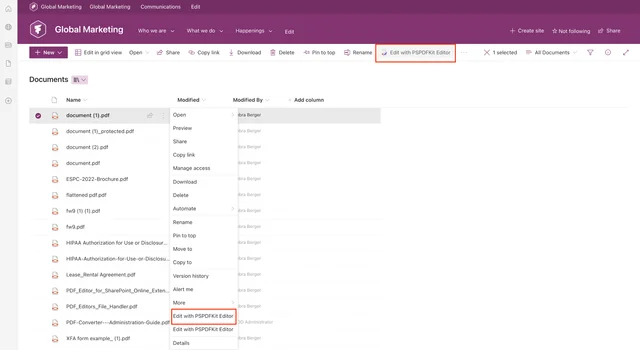
Select a PDF from the SharePoint library and right-click on the three dots menu. Click Edit with PSPDFKit Editor. In the top-right toolbar, click the icon to the left of the magnifying glass to open the Document Editor.
Step 2: Moving PDF Pages
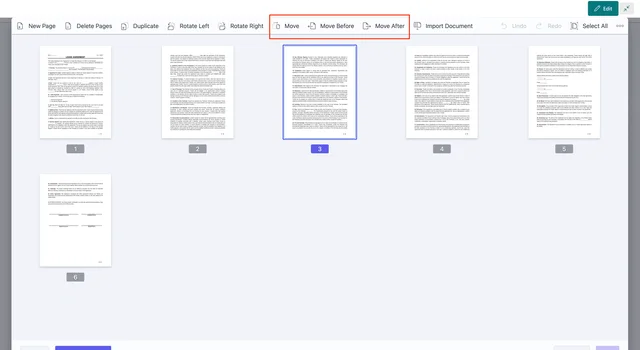
Start by selecting a PDF page or pages you want to move. To unselect a page, click it again.
Then, select the Move After or Move Before options in the top menu of the Document Editor and the page(s) will be moved accordingly. If you want to insert a PDF page after a specific page number, click Move in the same menu, enter the number of the page, and click Move again.
Step 3: Copying PDF Pages

You can copy PDF pages in the same way in the Document Editor. After you’ve selected one or more pages, click Duplicate to make a copy of the page(s). The page(s) will be positioned after the original page, but you can easily move the page(s) following the steps provided above.
To save a new PDF in SharePoint Online, click Save and the document will be updated. Alternatively, you can click Save As to download the new PDF document to your computer, and then Cancel to keep the original document in SharePoint.
Free Trial
Try PDF Editor for SharePoint Online free for 14 days by downloading the app directly from Microsoft App Source. This is a full trial version, without watermarks, but limited in time. There’s an unlimited trial version, where all files are watermarked, and you can choose between three different installations: file handler, web part, or online extension. Refer to the table on the free trial page to learn more.
PDF Editor for SharePoint On-Premises covers all different license types and SharePoint editions (2013–2019 and SE). The detailed installation guide is included in the download. During the free trial, all your documents will be watermarked.