Muhimbi’s PDF Editor for SharePoint lets you permanently redact sensitive information in SharePoint without downloading documents to local devices. Users can highlight specific text or select an area in a document before applying and saving redactions directly into their SharePoint library. The redaction color can be customized, and redaction notes can be added to tell a brief description of the type of information that has be hidden.
The Difference between Hiding and Redacting Content
When you choose to black out the sensitive or private information in PDFs using the Text Redaction or Area Redaction tools of Muhimbi’s PDF Editor for SharePoint, the selected content will be permanently redacted, and it won’t be visible any longer.
That’s the main difference between redacting content and hiding it by highlighting text in black color or applying a background that’s the same color as the text.
Although these alternative methods make the information immediately invisible to the naked eye, they don’t necessarily make it inaccessible. Other people can copy and paste the hidden text into Word, Notepad, or other text processing programs. They can also open the document in a PDF editor and change the background color or text color to make the hidden text visible. As a result, these methods won’t permanently black out sensitive information, which is why redaction is the most secure option.
To learn how to redact information in SharePoint, keep reading.
Step 1: Opening a PDF File in SharePoint
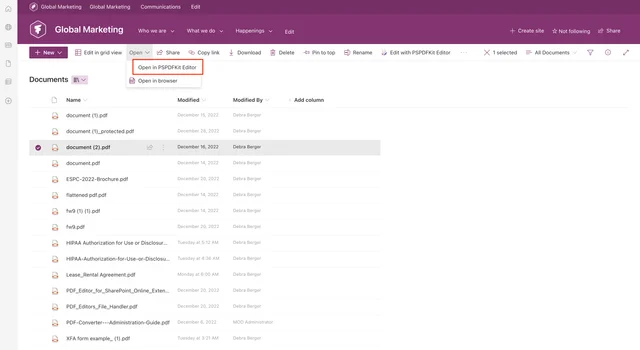
Select a PDF from the SharePoint library, click Open from the dropdown menu, and choose Open in PSPDFKit Editor.
Step 2: Marking Items for Redaction
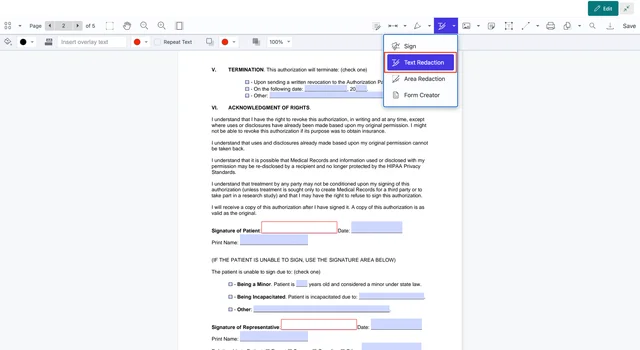
Use the magnifying glass icon in the top-right corner of the toolbar to search for a word, phrase, or number in the document that you want to conceal. Alternatively, you can scroll through the document or type the page number in the top-left corner to quickly find information in your PDF that you want to redact.
Select the portion of the text you want to redact and a small widget will pop up. Click the last icon, which is the redact option. It will mark the content that you want to redact.
Alternatively, click the drop-down arrow to the right of the sign icon and choose the Text Redaction tool. Click the selected content to mark items for redaction.
Step 3: Applying Redactions
Once you select a piece of content you want to redact, the Apply Redactions button will appear in the top-right corner, and the additional PDF redaction options will appear in the top-left corner.
As a default setting, the redacted content will be colored in black and the outline area will be in red. If you want to change the color or write something over the redacted content, use the options in the top-left corner before you apply redactions. The default color of the overlay text is white, but you can change that color too.
Select the Repeat Text box if you want to have the same text on every redaction box throughout the PDF document. You can also change the percentage of fill opacity and make the redacted content more or less transparent.
Use the recycling bin icon to cancel the changes to your document.
Note: Redacting a PDF means that the redacted content will be permanently removed. If you want to keep a non-redacted version of a PDF, you can export the redacted PDF to your computer and keep the original version in SharePoint. To do this, click Export instead of Save. This will download the redacted PDF to your computer.
Redacting Images and PDF Form Fields in SharePoint
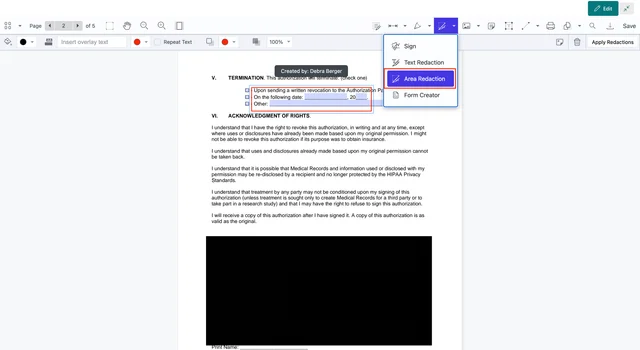
The easiest way to redact images and form fields in PDFs is to use the Area Redaction tool.
Click the dropdown menu to the right of the sign icon and choose the Area Redaction tool.
Select the area in the document you want to redact by dragging the mouse cursor. Click Apply Redactions.
As mentioned above, before applying the redaction, you can change the color of the redaction and its border, enter overlay text, and change its color.
Adding Notes to the Redacted PDF
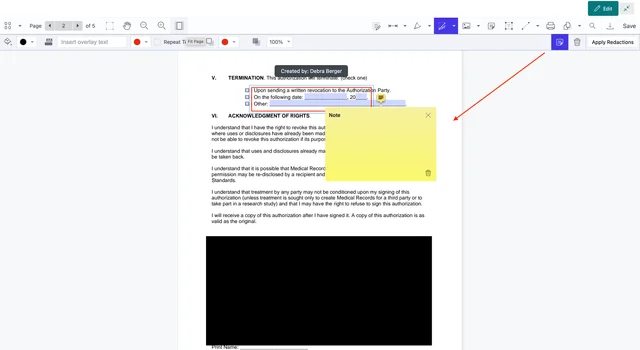
When you redact PDF content, you can also add notes. To the left of the recycle bin icon is the Note icon. Type text in the note field and then click X to close the note. It will still be visible and can be opened with a single click.
Keep in mind that the position of the note cannot be changed, and it’ll be placed next to the redacted content.
Free Trial
Try PDF Editor for SharePoint Online free for 14 days by downloading the app directly from Microsoft App Source. This is a full trial version, without watermarks, but limited in time. There’s an unlimited trial version, where all files are watermarked, and you can choose between three different installations: file handler, web part, or online extension. Refer to the table on the free trial page to learn more.
PDF Editor for SharePoint On-Premises covers all different license types and SharePoint editions (2013–2019 and SE). The detailed installation guide is included in the download. During the free trial, all your documents will be watermarked.