We recently released the Muhimbi PDF Converter Xtension for Nintex Automation Cloud. You can download it here or learn more about available Muhimbi deployments for Nintex on our product page.
Our PDF Converter for SharePoint and PDF Converter Services supports the conversion of HTML-based content. So, you can now export any SharePoint page to a PDF document, including those containing all entries in a list. When converting HTML to PDF, ensure you are running version 8.3 (or higher) of the Muhimbi PDF Converter, which has much improved features.
You can convert MS SharePoint Form to PDF, which is illustrated below with a simple example.
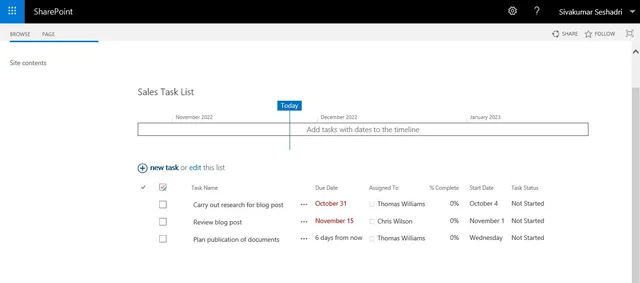
You can use a simple Tasks list for this. If you do not have one, feel free to create one (Sales Task List) by navigating to your MS SharePoint site and adding a ‘Tasks’ app. If you use the MS SharePoint Form’s default view, the PDF file generated will also have all the SharePoint User Interface’s Quick Launch menu as well. To have the MS SharePoint Form without the Quick Launch menu, you can create a Form that displays all items in the list with as little of the SharePoint User Interface around it as possible.
Create a New MS SharePoint Form Without the Quick Launch Menu:
To create a new page without the Quick Launch menu follow these steps:
Navigate to the All Site Content screen and click gear icon and click Add a page.
Enter the Title and add a List Web Part, and add a List - *Sales Task List
On the newly created page click Add a Web Part and add the Sales Task List.
Before adding the list in the page, please ensure you select the columns you want to be included in the PDF file by navigating to the List Settings in the List. For example % Complete, Due Date, Start Date and Task Status.
Under the Item Limit section set the limit to an appropriately large number. We don’t want to page through the data in batches as we want to include all items in the PDF file.
Click Save button to save the changes and Publish button to publish your changes.
Save the page’s URL as we need it later. E.g.
http://gbsavdws106/sites/Demo2019/SitePages/SalesTaskList.aspx
This new page will be used as the underlying layout of the PDF document. Feel free to modify it further in SharePoint designer / JQuery and remove more parts of the SharePoint user interface. You could also consider creating a minimalistic master page and applying that to the new PDFTasks page.
Setup Automatic PDF Conversion Using Nintex Workflow
The Muhimbi PDF Converter for SharePoint On-Premises comes with comprehensive support for all Nintex Workflow versions (NW2007 – NW2019).
In this example, a Nintex workflow converts a MS SharePoint form to PDF. In this example, you will generate a PDF file whenever the Tasks list is modified. The generated PDF file is stored in the Shared Documents library. You can create the workflow as follows:
Similar to all other Nintex Activities provided by Muhimbi, the HTML to PDF Conversion activity integrates with Nintex Workflow at a deep level. It supports SharePoint 2007-2019, allows errors to be handled and also supports integration with Nintex’ iterators to deal with multiple items and loops.
A screenshot of Convert URL or HTML to PDF action has been given below.
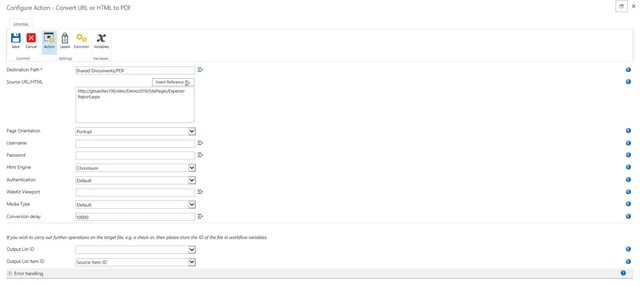
The fields supported by this Workflow Activity are as follows:
- Destination Path: Enter the path to write the converted file to, either:
- A relative path to a subsite / document library / folder, e.g. Shared Documents/Some Folder/Some File.pdf.
- An absolute path to a different site collection, e.g. /sites/Finance/ Shared Documents/Some Folder/Some File.pdf.
Note: Always use forward slashes (‘/’) in path names.
- Source URL / HTML: Either a fully qualified URL of the page to convert or an HTML fragment.
- Page Orientation: Specify if you wish to use Portrait or Landscape for the generated PDF file.
- Username: By default all pages are requested by the conversion service using the account the service is running under. If that account has no privileges on the requested URL then specify an alternative user name in this field.
- Password: The password associated with the optional user name. Please note that any password entered here is displayed in clear text to allow field references to be added.
- HTML Engine: Specify which HTML conversion engine to use. Chromium (the default on most modern systems) generally produces better results, especially with SharePoint 2013 and later, but for some rare scenarios the IE (Internet Explorer) or WebKit options may work better.
- Authentication: By default the Muhimbi PDF Converter attempts to authenticate using standard Web / HTTP / Windows authentication. However, in order to convert SharePoint Online pages, a different authentication type will need to be specified.
- WebKit Viewport: Control the ‘virtual browser size’ to improve the rendering of responsive websites. (e.g. distinguish between mobile, tablet and desktop versions of a website)
- Media Type: HTML is primarily aimed at displaying information on screen, not on paper. However, modern web pages - including SharePoint - use CSS to define a different look and feel for the screen and the printer. Providing the default 'WebKit' based HTML Converter is used, the converter can use Print optimized CSS (the default) or Screen optimized CSS. (The IE based converter always uses the 'Screen' option).
- Conversion Delay: Modern web pages, including SharePoint 2013 and later, as well as SharePoint Online, use complex methods for rendering pages, often involving JavaScript. Under normal circumstances the Muhimbi Converter will convert HTML to PDF the moment the page has finished loading. However, you may want to add some milliseconds (a value of 1000 is 1 second) to allow all JavaScript to finish executing.
- Output List ID: If you wish to carry out further actions on the generated PDF file, e.g. perform a check-in, then you can optionally write the ID of the List the PDF was written to in a workflow variable of type String.
- Output List Item ID: Similarly to PDF List ID, the Item ID of the generated PDF file can optionally be written to a workflow variable of type Item ID (in SharePoint 2007) or Integer (in SharePoint 2010 and later versions).
- Error Handling: Similar to the way some of Nintex’ own Workflow Activities allow errors to be captured and evaluated by subsequent actions, all of Muhimbi’s Workflow Activities allow the same. By default this facility is disabled meaning that any error terminates the workflow.
Setup Automatic PDF Conversion Using Nintex Workflow
In this simple example, a Nintex workflow retrieves the URL of a MS SharePoint form and converts it to PDF.
Note: You can customize this workflow to suit your organizational needs. The workflow example given below just has one step to demonstrate the HTML to PDF conversion. A more comprehensive example is beyond the scope of this article.
To create a new workflow, you can follow the instructions below.
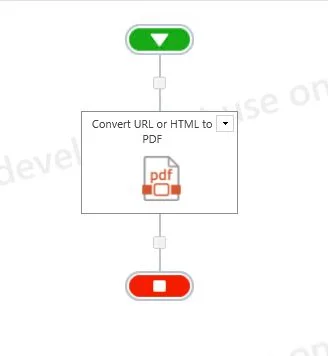
The finished workflow
Prerequisites
Before we start building the workflow, ensure all prerequisites are in place. It is also assumed that the reader has some knowledge of building Workflows using Nintex Workflow.
Make sure the PDF Converter for SharePoint On-Premises version 8.3 (or newer) is installed in line with chapter two of the Administration Guide.
Naturally, Nintex Workflow will need to be installed as well.
Make sure the Muhimbi.PDFConverter.Nintex.WebApp SharePoint Feature is activated using SharePoint Central Administration on the relevant Web Application.
You will need to have the appropriate privileges to create workflows.
Creating a new workflow
To get started, create a new workflow and choose the blank template. Ensure the workflow doesn’t start automatically.
Adding the workflow actions
You are now ready to add the action to the workflow.
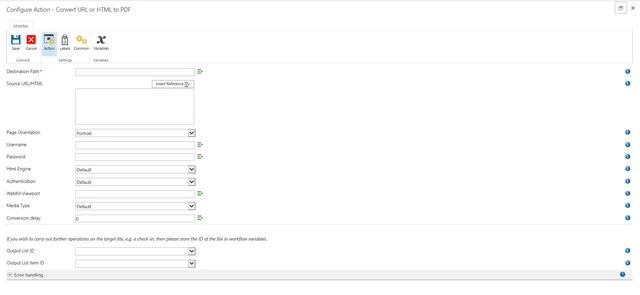
You need to add the Convert URL or HTML to PDF action listed under the Muhimbi PDF section. You can fill this section as per the image below:
The PDF Converter integrates with all Nintex Workflow versions.
Ensure the Source URL/HTML has the URL to the MS SharePoint form you created earlier. If you leave the Destination Path empty, it will write the PDF File to the same location as the source file. For more information about the Destination Path or any of the other fields, hover the mouse over the small information icons.
The workflow is now done.
Running the workflow
You can finalize the workflow by saving and publishing it, after which the workflow is ready to be executed.
You can either run the workflow manually or schedule it to run at a specific time of your choice.
You can use the output of one PDF Workflow Action as the input of the next Action.