In this guide, you’ll learn how to OCR and extract text from a scanned or faxed PDF document using Power Automate.
This example uses the Muhimbi Extract text using OCR action to extract text from an image-based PDF (list attachment) and write the extracted text to an MS SharePoint list column.
Note: Extracting text will only work with image-based content (mainly scans and faxes). It isn’t possible to extract text from PDFs that contain “real text,” such as PDFs generated from MS Word documents.
Prerequisites
Before building the workflow, ensure all prerequisites are in place. You should have some knowledge of building workflows using Power Automate.
Additionally, you’ll need:
- An Office 365 subscription with a SharePoint Online license.
- A full or trial subscription for Muhimbi PDF Converter for Power Automate. Note that free subscriptions don’t support OCR.
- Appropriate privileges to create flows.
- Working knowledge of MS SharePoint Online and Microsoft Flow.
Setting Up the MS SharePoint Online Environment
- Create an MS SharePoint Online list and add the columns shown in the image below.
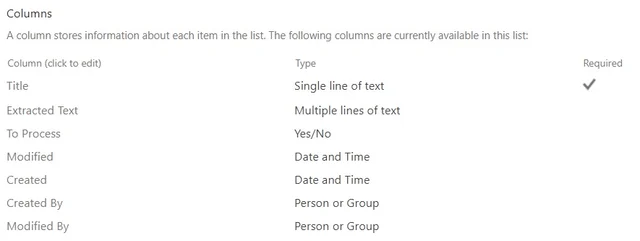
| Field | Data Type | Details |
|---|---|---|
| Extracted text | Multiple lines of text | Use this to store the text extracted from the PDF document. |
| To process | Yes/No (Default value ‘Yes‘) | Use this to prevent recursive flows. |
Using Power Automate to Extract Text from PDF Documents and Forms
On a high level, the workflow will look as shown below.
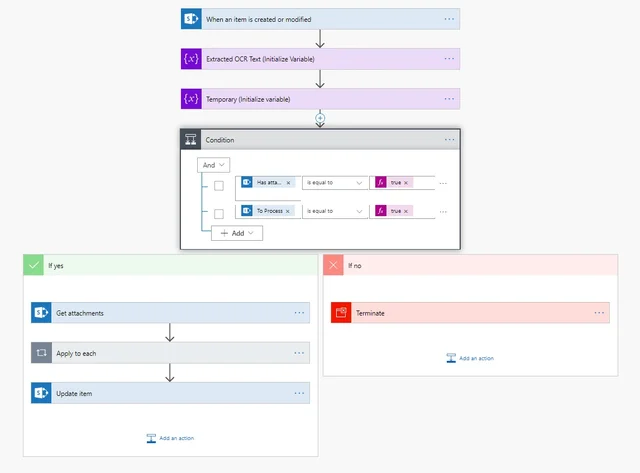
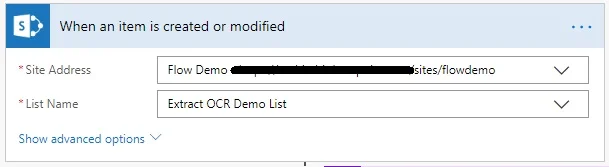
- Use the When an item is created or modified SharePoint flow trigger. In the trigger, specify the path to the SharePoint Online list to monitor for new items.
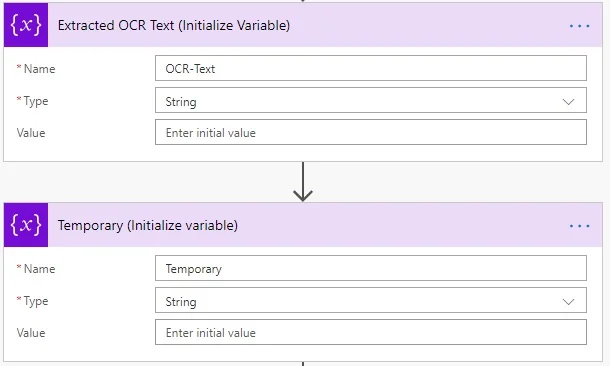
- Initialize the variables as shown in the following screenshot.
- Now, in the Condition, manage the recursive event (continuous loop).
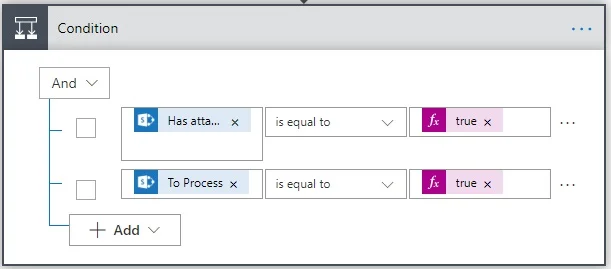
The And operator is used to prevent an endless loop.
- Has attachment is the output of the When an item is created or modified trigger, and it’s equal to true.
- To Process is the output of the When an item is created or modified trigger, and it’s equal to true.
- To Process is a column of type Yes/No, and the default value is set to Yes (true). Only if both the values evaluate to true will it OCR the document. Otherwise, it’ll terminate the flow.
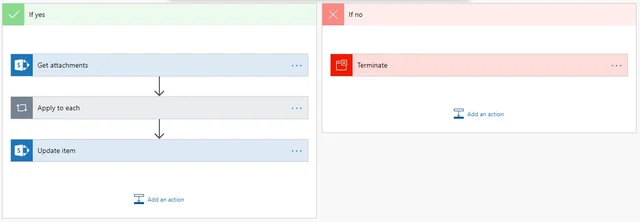
- Set the To Process field to False (No) in the Update item action.
- Now, as the flow updates a column in the same item, the When an item is created or modified trigger will always be invoked by the Update Item action. However, now that the To Process field is set to false, the flow will be terminated when it’s triggered a second time.
- If both conditions evaluate to true (Yes), OCR the document. If they evaluate to false (No), terminate the flow.
- Add the Get attachments MS SharePoint action and specify the path to the MS SharePoint Online list.
Select ID, which is the output of the When an item is created or modified trigger.

- A list item can have multiple attachments, so add the Apply to each loop, and in the Select an output from previous steps field, set it to Body. This is the output of the MS SharePoint Online **Get attachments’**action.

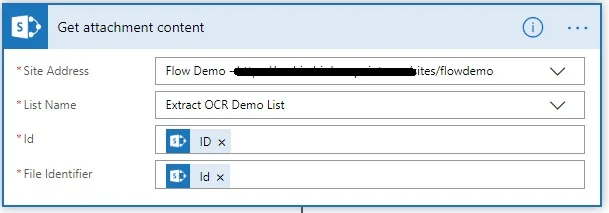
- Add the MS SharePoint Online Get attachment content action, and specify the path to the MS SharePoint Online list.
- In the Id field, select ID, which is the output of the When an item is created or modified trigger.
- In the File identifier field, select Id, which is the output of the Get attachments action.
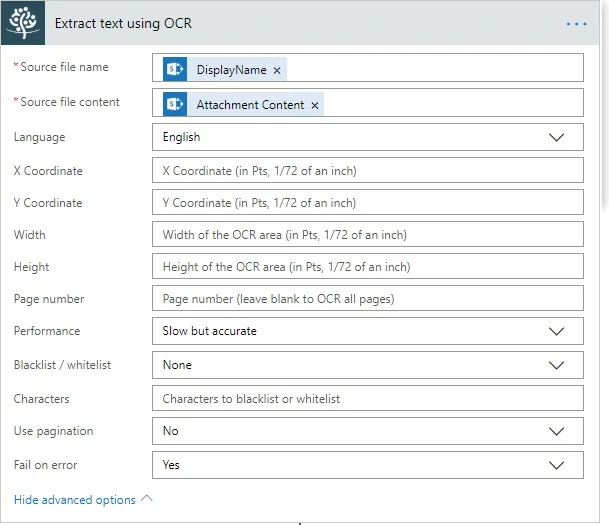
- Add the Extract text using OCR action. This is where the extraction of the text from the image happens. This example extracts all text from the page. However, it’s possible to specify a range of coordinates to extract the text from.
Fill in the following:
- In the Source file name field, use DisplayName, which is the output of the Get Attachment action.
- In the Source file content field, use Attachment Content, which is the output of the Get attachment content action.
- In the Language field, use the language the source document is written in. It defaults to English, but supports other languages, such as Arabic, Danish, German, English, Dutch, Finnish, French, Hebrew, Hungarian, Italian, Norwegian, Portuguese, Spanish, and Swedish.
- Specify the x and y coordinates and width and height of the region to retrieve text from. The unit of measure (UOM) is 1/72 of an inch. When extracting text from non-PDF files, e.g. a TIFF or PNG, consider that, internally, the image is first converted to PDF, which may add margins around the image. However a single, unified UOM is used across all file formats. If you want to know how internal conversion affects the dimensions of your image or scan, convert the file to PDF and open it in a PDF reader to get the details.
- By default, text is extracted from all pages and concatenated. To extract the text from a specific page, specify the page number in the Page number field.
- In the Performance field, specify the performance/accuracy of the OCR engine. It’s recommended to leave this on the default setting of Slow but accurate.
- The Blacklist / whitelist field controls which characters are recognized. For example, limit recognition to numbers by allowing 1234567890. This prevents, for example, a 0 (zero) from being recognized as the letter o or O.
- In some specific cases, a single image spans multiple pages. Enable pagination for those cases with the Use pagination field.
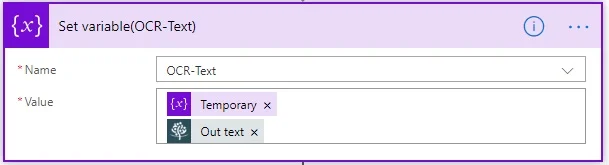
- Add the Set variable action. Set the value of OCR-Text to Temporary, and set Out text to the output of the Extract text using OCR action. This enables you to concatenate the text of all the list item’s attachments into a single variable.
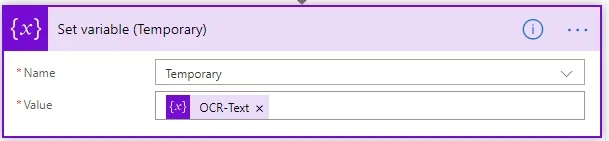
- Add the Set variable action, and set the Name field to Temporary and the Value field to OCR-Text.
- Add the MS SharePoint Online Update item action, and specify the path to the MS SharePoint Online list for the item to be updated. Note that this action is outside the Apply to each loop.
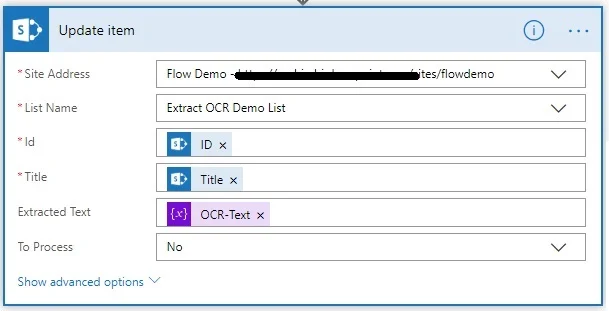
- In the Id field, select ID, which is the output of the When an item is created or modified trigger.
- In the Title field, select Title, which is the output of the When an item is created or modified trigger.
- In the Extracted Text field, select OCR-Text, which is the output of the Set variable(OCR-Text) action.
- Set the To Process field to No. This prevents a continuous loop.
- With everything in place, create a list item with attachments, and after a few seconds, the text that’s extracted from the PDF files will be updated to the MS SharePoint list.