Muhimbi’s PDF Converter for Power Automate has an action that enables you to automatically extract text from PDF documents, select and copy text, extract text by page range, or separate pages.
To extract text from PDF documents using Power Automate:
- Create a flow in Power Automate.
- Define your action.
- Update the file properties.
- Publish your workflow.
1. Creating a Manual Flow
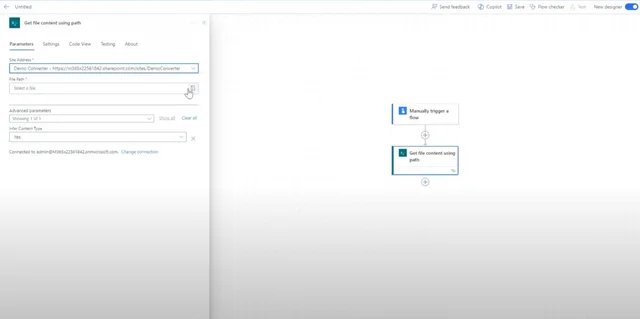
From the list of triggers, choose the option to manually trigger a flow. Then add the SharePoint Get file content using path action to the Power Automate canvas and configure it according to the details below:
- Site Address — Specify the path to the SharePoint Online site collection that holds the file.
- File Path — Choose the file by clicking the folder icon at the far right of the text box.
2. Extracting Text from the PDF
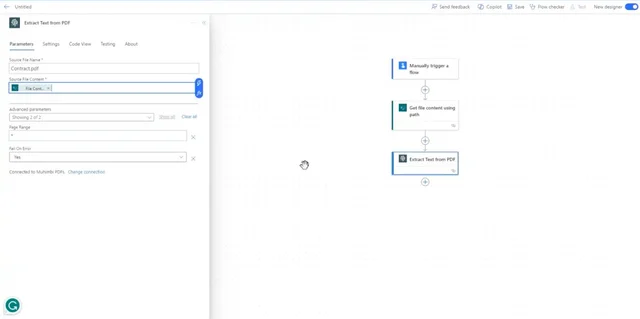
Add the Muhimbi Extract Text from PDF action to Power Automate and configure it as follows:
- Source File Name — Enter the name manually, e.g.
Test.pdf. This is a mandatory field. - Source File Content — Select File Content, which is the output of the Get file content action. This is a mandatory field.
- Page Range — Include the page range if you want to extract text from certain pages.
- Fail On Error — Select Yes if you want to terminate the action if the flow has an error.
3. Updating File Properties
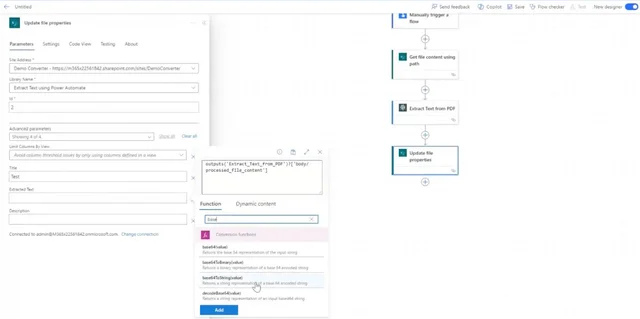
Update the file properties as follows:
- Site Address — In this field, enter your SharePoint site address. This field is mandatory.
- Library Name — Specify the SharePoint library where the file is located. This field is mandatory.
- ID — Provide a unique identifier.
- Title — Add the title of the file.
- Extracted Text — Add a function, e.g.
Base64tostring. This text field is the output of the Muhimbi action.
4. Publishing Your Flow
Publish your flow and run it manually to see how it works.


