In this guide, you’ll learn how to extract a single page or multiple pages from a PDF using Power Automate. This example shows how to extract pages from a PDF, but you can also use it with other file formats by first converting a file to a PDF and then extracting pages. You can see the file formats we support here.
Prerequisites
Before building the workflow, ensure all prerequisites are in place. You should have some knowledge of building workflows using Power Automate.
Additionally, you’ll need:
- An Office 365 subscription with a SharePoint Online license.
- A full or trial subscription for Muhimbi PDF Converter for Power Automate.
- Appropriate privileges to create flows.
- Working knowledge of MS SharePoint Online and Microsoft Power Automate.
Using Power Automate to Extract Pages from PDF Documents and Forms
On a high level, the workflow will look as shown in the following image.
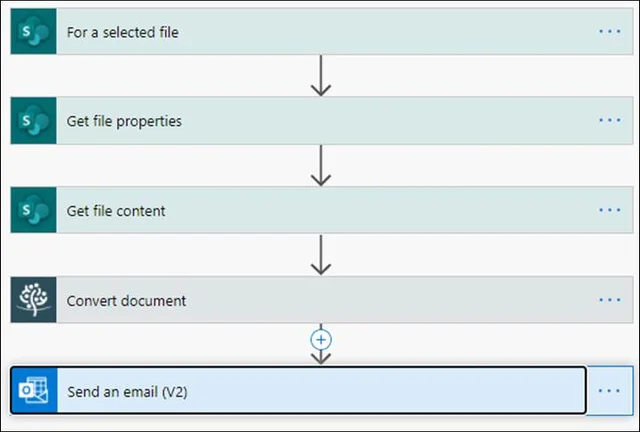
1: Creating a New Flow
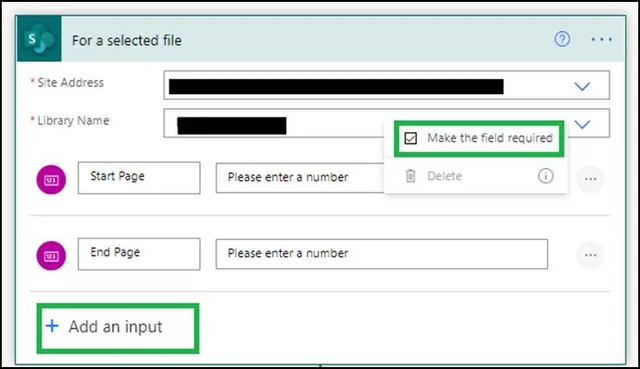
Add the For a selected file MS SharePoint trigger action with two mandatory number inputs. You can use this trigger to start the flow, and the user can fill in the Start Page and End Page fields manually from the MS SharePoint Online user interface.
2: Getting the File Properties
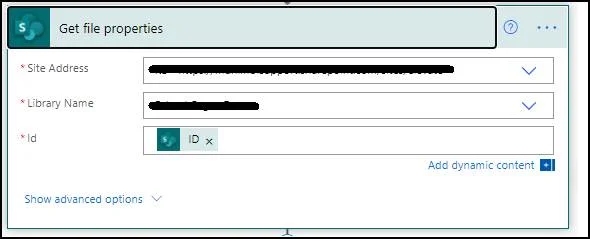
Add the Get file properties MS SharePoint action, and fill in the Library Name field to specify where you want to run the document extraction process. Pass the ID value to the Id field.
3: Getting the File Content
Add the Get file content SharePoint action, and pass the Identifier — which is the output of the Get file properties action — into the File Identifier field.

4: Converting the Document
Add the Muhimbi Convert document action and fill in the following information.

- Source file name — Add fileName, which is the output of the For a selected file trigger.
- Source file content — Add File Content, which is the output of the Get file content action.
- Output format — Select PDF from the dropdown.
- Override settings — In this field, enter the following:
Note: In the XML above, you need to pass the Start Page and End Page inputs that are passed by the trigger action.
5: Sending an Email
Add the Send an email (V2) action and configure it according to the details below.
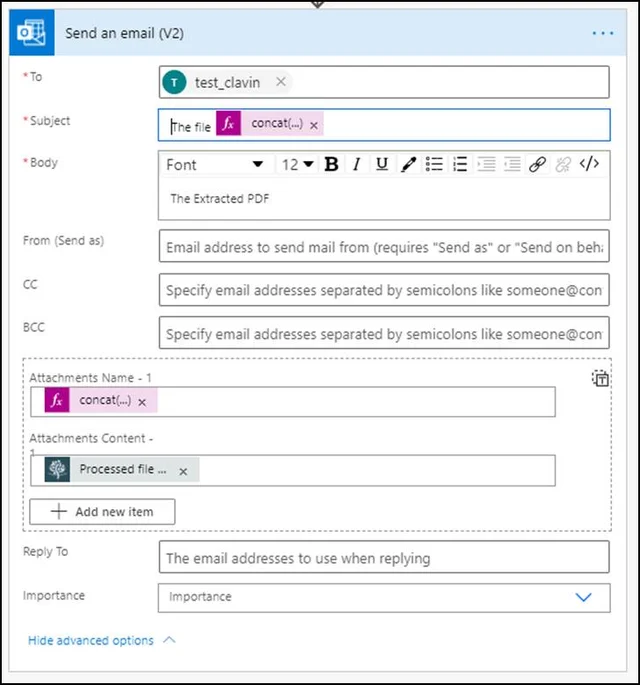
- To — Enter the manager’s email address.
- Subject — Add The file concat(outputs(‘Convert_document’)?[‘body/base_file_name’],’Extracted’,’.pdf’)
- Body — Include the email body.
- Attachments Name – 1 — Add concat(outputs(‘Convert_document’)?[‘body/base_file_name’],’Extracted’,’.pdf’)
- Attachments Content -1 — Add Processed File Content, which is the output of the Convert document action.
You used the For a selected file trigger to manually start a flow on a document. This works similarly to flows that are automatically triggered when a file is created or changed, with one major exception, which is that by default, the person starting this flow will need to authenticate all services used by it.
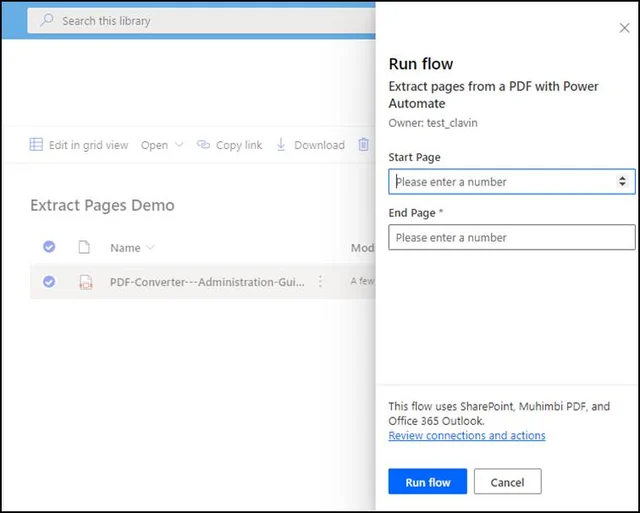
6: Running the Flow
Now, navigate to the original library and select an item. Click the flow dropdown and select the name of the flow you created. It should open the window in which you can fill in the Start Page and End Page fields. Then, click Run flow.
After a few seconds, you’ll receive an email with the extracted pages as a PDF attachment.