We recently released the Muhimbi PDF Converter Xtension for Nintex Automation Cloud. You can download it here or learn more about available Muhimbi deployments for Nintex on our product page.
In this guide you’ll learn how to add watermarks to documents using Nintex Workflows. These workflow actions allow elements such as text, rectangles, images, PDF files, QR Codes, barcodes as well as other shapes to be added as a watermark to a wide variety of documents.
This article covers the watermarking of documents using Nintex Workflows and Nintex Workflow for O365.
Using Nintex Workflows for O365 for Watermarking
Prerequisites
Before you begin, please make sure the following prerequisites are in place:
- Muhimbi PDF Converter for SharePoint Online installed and enabled in your workflow's site with a full, or trial, subscription.
- Muhimbi PDF Converter Services Online full or trial subscription and an associated API KEY. (Start trial)
- Nintex Workflow for Office 365 installed and enabled in your workflow's site.
- The appropriate privileges to deploy these Apps, and author workflows.
- Working Knowledge of Nintex Workflow for Office 365, as a detailed tutorial on Nintex Workflow for Office 365 is beyond the scope of this article.
Please note that this article is for the MS SharePoint Online version of Nintex Workflow.
Building the Workflow
It is strongly recommended to follow the tutorial below, but the workflow is available for download as well. Import it in Nintex Workflow for Office 365, SET THE API KEY, publish it and you are ready to go.
Navigate to a site collection and document library of your choice. You can choose the option to create a new Nintex Workflow. In this example, we use the standard Document Library that is available on most site collections.
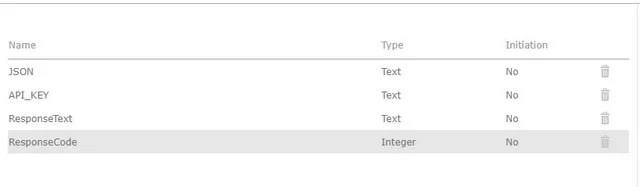
Create the following workflow variables as we need them later:
JSON (Text): Contains the JSON, JavaScript Object Notation, the command that will be sent to the conversion service.
API_KEY (Text): A unique ID that will be used to look up your Muhimbi subscription details.
ResponseText (Text): The status message returned by the Conversion Service.
ResponseCode (Integer): The status code returned by the Conversion Service.
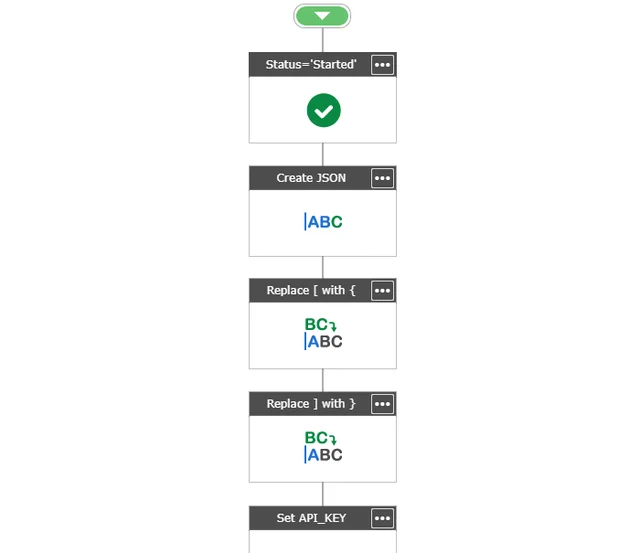
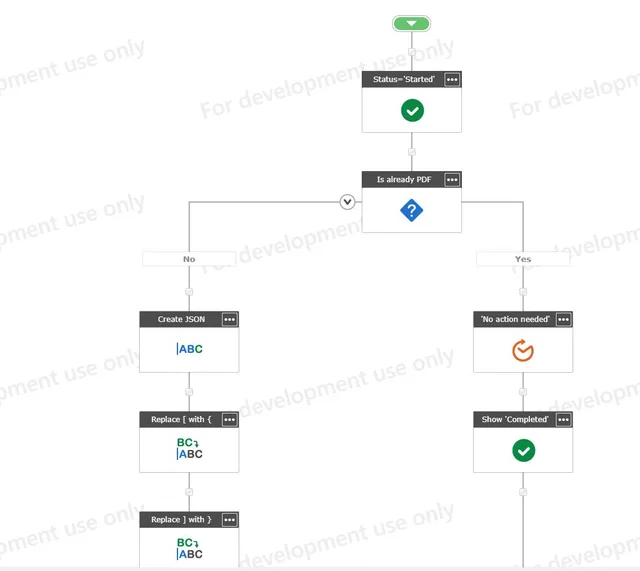
You can then insert a Set Workflow Status action, edit it and set it to ‘Started’. As MS SharePoint Online does not show a separate status, adding this action will show us the status that the workflow has actually triggered and it will also give us something to click on to inspect the current status of the workflow.

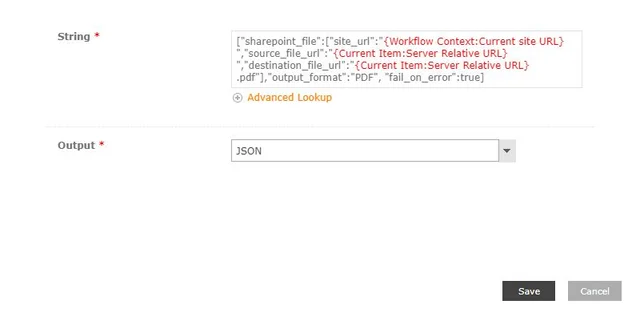
You can then add a Build String action and set the Output to the JSON workflow variable. In the String field enter the following:

You need to pay attention to the following:
JSON Notation: Please note that we have replaced the curly braces - { } - with square brackets [ ] due to a bug in Nintex Workflow for Office 365. If you have any concerns using square brackets, (as they are also used for Array types) you can replace them with anything else, as we will fix this in a follow-up step.
Copy & Paste: When copying and pasting the JSON code, ensure you paste it in Notepad (and copy back) to strip out non-standard characters and formatting being copied.
References: The text displayed in red are Nintex Workflow references. After copy pasting the code fragment, you need to replace each Nintex reference using the Advanced Lookup facility located below the field.
Output file name: In this basic example, we just add '.pdf' to the end of the output path and file name. This is not particularly pretty, but in order to keep things simple we are not including the Nintex Workflow actions to strip off the old extension and add the new one. You can use whatever you like here as long as it is a valid output path and file name.
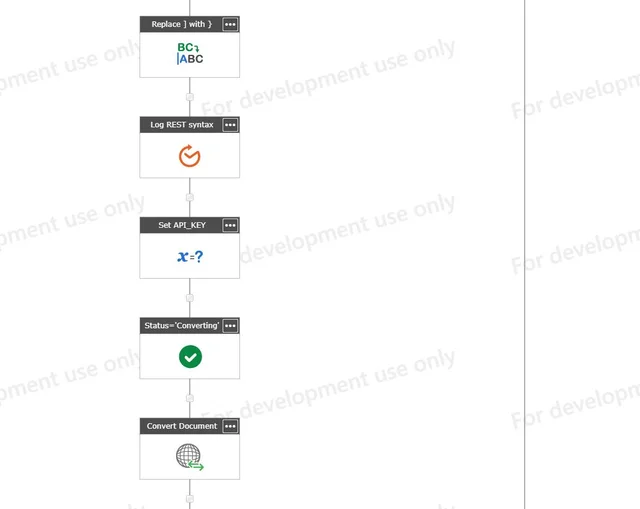
- In an earlier step, as we have used square brackets in JSON, we need to replace them with curly braces again. You can do this by using Replace Substring in String action and by configuring it as follows:
- Search String: Enter the opening square bracket [.
- Replace String: Enter the opening curly brace {.
- String: Insert a reference to the workflow variable named JSON.
- Output: Pick the JSON workflow variable to store the results in.
Click Save button.
- You can now copy the workflow action using the action's menu, and by pasting it as the next action. You can configure the newly pasted workflow action and replace the opening bracket with the closing bracket ']'.
You can do the same for the curly brace and replace '{' with '}', and click Save button to save the action. You now have valid JSON that you can send to the Conversion Service.
- As the next step, we need to set the API_KEY. Insert a Set Workflow Variable action and configure it to set the API_KEY workflow variable to the API Key you received by email when signing up for the Muhimbi PDF Converter Services Online. e.g.:
decafbad-baad-baad-baad-decafbaaaaad
Do not try to use this particular key, as it will not work. Ensure you do not put curly braces around the key. Click Save button to save the action.
- Next, insert a Web Request action and configure it as follows:
URL: https://api.muhimbi.com/api/v1/operations/convert
Method: POST
Content type: application/json
Add header: Click Add header, specify API_KEY as the Header name and insert a reference to the API_KEY workflow variable for the Header value.
Body: Select the Content option, add a reference to the JSON workflow variable in the Data field.
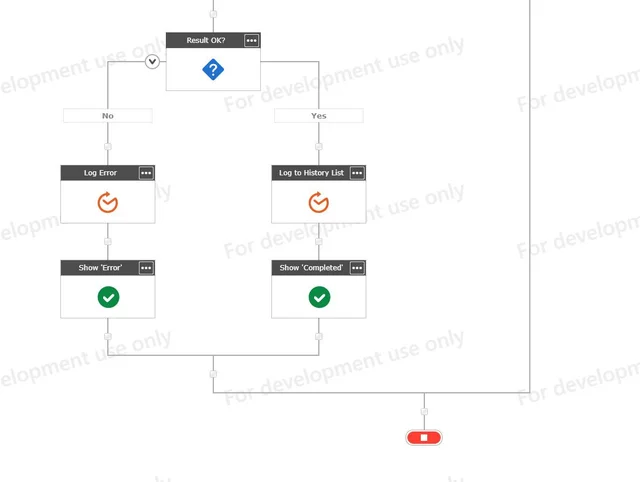
Store response content in: ResponseText.
Click Save button to save the action.
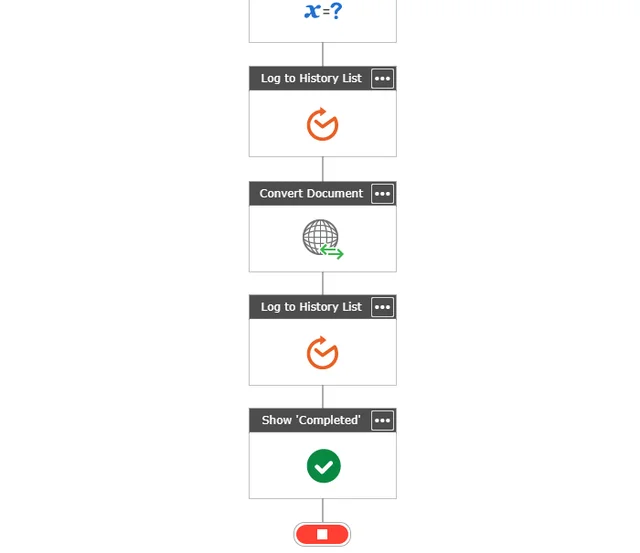
Finally, insert another Set Workflow Status action and configure it with the text ‘Completed’. This should indicate when the workflow instance has completed its run. Your workflow should look something like the following:
Save and Publish the workflow by giving it a suitable name and set the Start Options to a value of your choice.
Once published, open the document library the workflow is associated with, make sure a file of the supported type is present, and manually start the workflow. After a few seconds, the PDF file will show up next to the file the workflow was started on.
Troubleshooting
Although both Nintex Workflow for Office 365 and the Muhimbi PDF Converter work very well together, there are a lot of moving parts in the workflow like custom generated JSON, customer-specific API keys, paths to the document libraries, etc. So, there are chances that you may encounter some issues when deploying the workflow. Some common issues and troubleshooting tips are provided below for your reference:
- Check prerequisites: Double-check that the prerequisites listed in the beginning of this section are in place.
- Log to History List: If it is not clear what is going wrong, log critical parts such as the JSON workflow variable (after the replace operation) as well as the ResponseText workflow variable (after the web request) using the Log To History List workflow action. You can see the contents of this list by clicking on the Workflow Status column for the List Item the workflow is running on.
- Send email: The amount of text that can be logged to the History List is limited (roughly 250 characters). For larger messages, use the Send an Email action instead to send an email with debug content in the body of the email to yourself.
- Copy & Paste: When copying the JSON fragment into your workflow, paste it into Notepad first to clean it, and then copy it from Notepad and paste it into your workflow. This is because browsers tend to insert hidden characters that are not filtered out by the Nintex Workflow editor.
- Nintex References: Make sure that the Nintex Workflow references in the JSON provided are replaced by actual Nintex Workflow references. You can double-check if the references are active by logging the JSON workflow variable to the History List. You should see the actual paths and not {Current Item:Server Relative URL}.
- Muhimbi Support: After double checking all prerequisites and going over all troubleshooting steps in this section, if you are still stuck, please contact our friendly support desk, who are here to help.
Fine-tuning
The workflow created in the previous section was to give a quick idea of how to use the Converter. However, it would benefit from error handling and a solution for a possible recursion problem where the workflow will be triggered for PDF files that it has created by itself.
We have created a version of the workflow that is more production ready. Full details on the same are beyond the scope of this article. You can download the full workflow here and customize this as per your requirements.
After customization, you can import it into Nintex Workflow for Office 365, and set the API KEY, and then publish it for your use.
Other Operations
This section demonstrated how to invoke the Convert action on Muhimbi's REST interface. Full examples are beyond the scope of this article, but you can find examples in the SharePoint section of our GitHub repository.
Using Nintex Workflows for Watermarking
Support for SharePoint Designer, a Web Services API as well as a host of other watermarking functionality has been available for a while, but since version 5.1 we have added support for Nintex Workflows as well. In addition to the new PDF Watermarking Nintex Workflow Activity, we are also adding activities for PDF Security, PDF Merging as well as HTML to PDF Conversion.
Similar to all other Nintex Activities provided by Muhimbi, the Watermark PDF activity integrates with Nintex Workflow at a deep level. It supports SharePoint 2007, 2010, 2013 & 2019, allows errors to be handled and even supports integration with Nintex’ iterators to deal with multiple items and loops.
For a comprehensive example and details about how to enable the Nintex Workflow integration see the blog post that discusses our generic Nintex PDF Conversion activity.
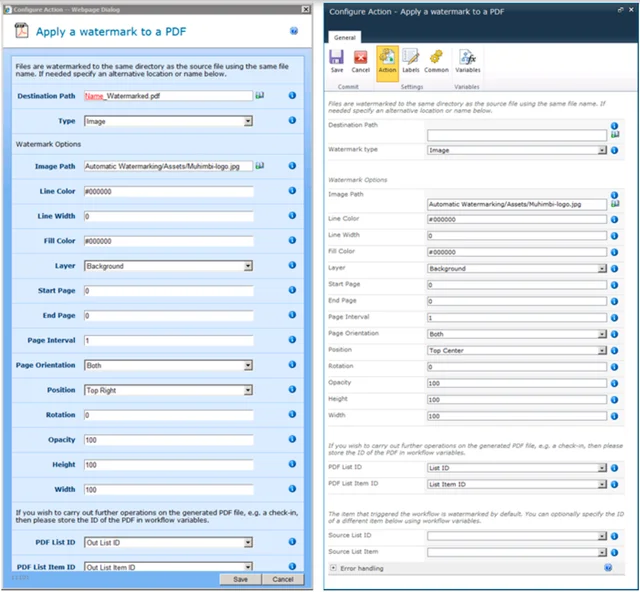
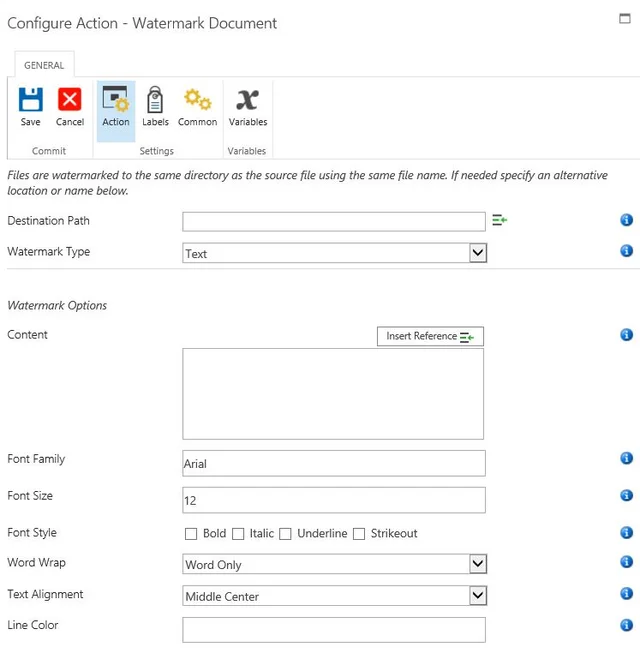
The fields supported by this Workflow Activity are as follows:
- Destination Path: Enter the path to write the watermarked file to, either:
- Leave it empty to use the same filename (and path) as the file that triggered the workflow.
- A file name, without the full path, to write a differently named file to the same location as the source file.
- A relative path to a subsite / document library / folder, e.g. Shared Documents/Some Folder/Some File.pdf.
- An absolute path to a different site collection, e.g. /sites/Finance/Shared Documents/Some Folder/Some File.pdf. Please make sure the path does not include the host name, e.g. ‘http://your site/...’..
- Watermark type: A number of different watermark types are supported. Unlike our individualSharePoint Designer workflow activities, all watermark types have been rolled up into a single Nintex Activity. The functionality is largely the same. The following watermark types are supported.
- Text: Add a text based watermark with full control over the font type, size, style, rotation and field codes such as {PAGE}.
- PDF: Add the first page of another PDF file as the watermark.(Not supported in Office file types)
- QR Code: Add a QR Code as the watermark.
- Linear Barcode: Add a barcode watermark.
- Image: Use a BMP, JPG, GIF, PNG, TIFF, WMF or EMF / EMF+ file as a watermark.
- RTF: Use RTF based text as a watermark
- Ellipse: Add an ellipse based watermark.
- Line: Add a line based watermark.
- Composite: For complex watermarks, or watermarks consisting of multiple elements such as line AND text AND images, use the Composite Watermark in combination with ourXML based watermarking syntax.
- Display: Either display the watermark Always, or only When Printing. (When supported by target file format)
- Output List ID: If you wish to carry out further actions on the watermarked file, e.g. send it by email or perform a check-in, then you can optionally write the ID of the List the file was written to in a workflow variable of type String.
- Output List Item ID: Similarly to PDF List ID, the Item ID of the watermarked file can optionally be written to a workflow variable of type Item ID (in SharePoint 2007) or Integer (in SharePoint 2010 and later versions).
- Source List ID & List Item: The item that triggered the workflow is watermarked by default. You can optionally specify the ID of a different List and List Item using workflow variables. Please use the same data types as used by Output List ID and Output List Item ID.
- Error Handling: Similar to the way some of Nintex’ own Workflow Activities allow errors to be captured and evaluated by subsequent actions, all of Muhimbi’s Workflow Activities also allow the same. By default, this facility is disabled meaning that any error terminates the workflow.