We recently released the Muhimbi PDF Converter Xtension for Nintex Automation Cloud. You can download it here or learn more about available Muhimbi deployments for Nintex on our product page.
The Muhimbi PDF Converter for SharePoint comes with comprehensive support for all Nintex Workflow versions, currently NW2007 to NW2019. It can easily merge documents in multiple formats and create a document in PDF format.
Similar to all other Nintex Activities provided by Muhimbi, the Merging files (and URLs) to PDF activity integrates with Nintex Workflow at a deep level. It supports SharePoint 2007-2019, allows errors to be handled and even supports integration with Nintex’ iterators to deal with multiple items and loops.
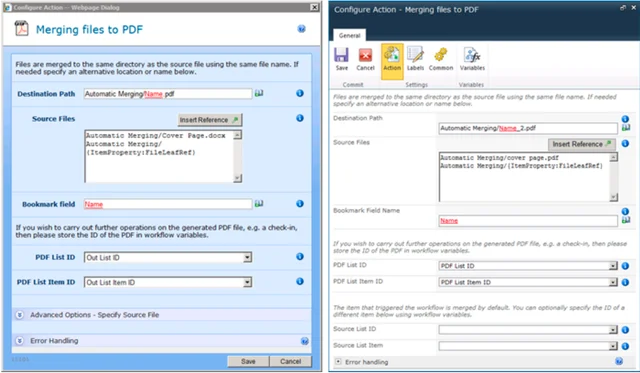
The fields supported by this Workflow Activity are as follows:
- Destination Path: Enter the path to write the merged file to, either:
- Leave it empty to use the same filename (and path) as the file that triggered the workflow.
- A relative path to a subsite / document library / folder, e.g. Shared Documents/Some Folder/Some File.pdf.
- An absolute path to a different site collection, e.g. /sites/Finance/Shared Documents/Some Folder/Some File.pdf. Please make sure the path does not include the host name, e.g. ‘http://your site/...’. For details see Appendix - Specifying path and file names.
- Source Files: This field specifies the list of documents to merge (and convert if needed). Each file must be specified on a new line and each line may contain three ‘;’ separated values:
- File Path: The path to the file, or URL, to merge. This may already be a PDF file, but if not – and the file format is supported by the converter – then it will be converted first. The path can be relative to the current site (e.g. Shared Documents/Some File.docx) or absolute (e.g. /sites/Finance/Shared Documents/Some Folder/ Some file.docx). Nintex Workflow References are fully supported, which can be used to dynamically generate the path for the current file, e.g. {ItemProperty:FileLeafRef}. Some string manipulation to generate the exact path to the file may be needed.
Note: When specifying a file please make sure the path does not include the host name, e.g. ‘http://your site/...’.When converting a web page then the path MUST start with http:// or https://
- **Include Bookmarks:**The source file may already include PDF Bookmarks, or may be able to generate such bookmarks as part of the conversion process, e.g. a MS Word file. Specify true to copy these bookmarks to the merged PDF file, or false to strip out any bookmarks. This value is optional
- Custom Bookmark value: The Bookmark field (see below for details) can be overridden using the third parameter. Specify the content of the ‘top level bookmark’ for the file, specify "" to remove the bookmark for this document or don’t specify anything at all to use the value stored in the content specified in the Bookmark field.
- Bookmark: In a way similar to the User Interface for the merge facility, it is possible to specify a name of the column, or any kind of Nintex Reference, which contents will be used to populate the PDF Bookmark for the merged document. For example, specifying Name or Title (using the appropriate Nintex Workflow Syntax) makes it very easy to jump between the various sections of the merged PDF file.
- Start Page (Each Document): Control if empty pages are added between documents to make sure each merged document always starts on the right-hand, or left-hand side when printing it double sided.
- Output List ID: If you wish to carry out further actions on the generated PDF file, e.g. merge additional documents or perform a check-in, then you can optionally write the ID of the List the PDF was written to in a workflow variable of type String.
- Output List Item ID: Similarly to Output List ID, the Item ID of the generated PDF file can optionally be written to a workflow variable of type Item ID (in SharePoint 2007) or Integer (in SharePoint 2010 and later versions).
- Source List ID & List Item: The item that triggered the workflow is merged by default. You can optionally specify the ID of a different List and List Item using workflow variables. Please use the same data types as used by PDF List ID and PDF List Item ID.
- Error Handling: Similar to the way some of Nintex’ own Workflow Activities allow errors to be captured and evaluated by subsequent actions, all of Muhimbi’s Workflow Activities allow the same. By default this facility is disabled meaning that any error terminates the workflow.
In this example, we will merge all documents in a Document Library to PDF format. To create a new workflow, you can follow the instructions below.
Prerequisites
Before we start building the workflow, ensure all prerequisites are in place. It is also assumed that the reader has some knowledge of building Workflows using Nintex Workflow.
Make sure the PDF Converter for SharePoint On-Premise version 4.1 (or newer) is installed.
Naturally Nintex Workflow will need to be installed as well.
Make sure the Muhimbi.PDFConverter.Nintex.WebApp SharePoint Feature is activated on the relevant Web Application using SharePoint Central Administration.
You will need to have the appropriate privileges to create workflows.
Creating a New Workflow
You can create a new workflow by performing the following steps:
- To get started, create a new workflow and choose the blank template. Make sure the workflow doesn’t start automatically and add the workflow variables listed in the following screenshot.
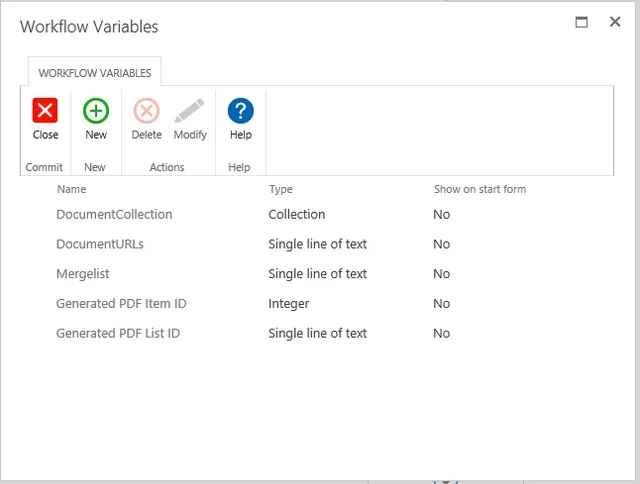
Ensure that the appropriate data types are assigned. They are listed under the ‘Type’ column beside each variable name. The names are largely self-explanatory, but some additional information is provided below:
- Document Collection: This is the collection where the documents to be merged are located.
- Document URLs:Use this to add the URL location of the Library where the document(s) to be merged is located.
- MergeList: The list of all the files that needs to be merged is stored in this variable.
- Generated PDF Item ID: Once a file has been merged to PDF, you may want to carry out additional actions on this new file. For example, check it in. Once converted, the ID of the PDF is automatically stored in this variable.
Note: For versions prior to MS SharePoint 2010 select List Item ID as the type. - Generated PDF List ID: As the PDF Converter allows files to be written to different document libraries, and even completely different Site Collections, you may want to know the ID of the destination list.
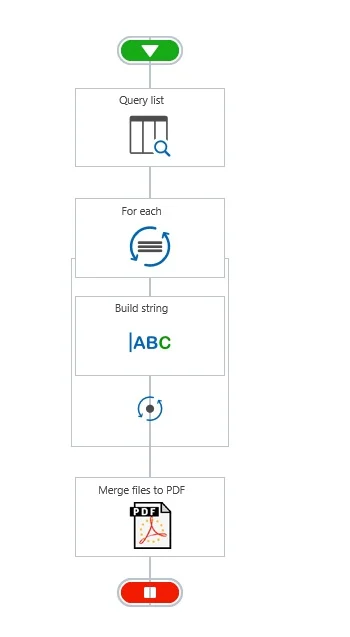
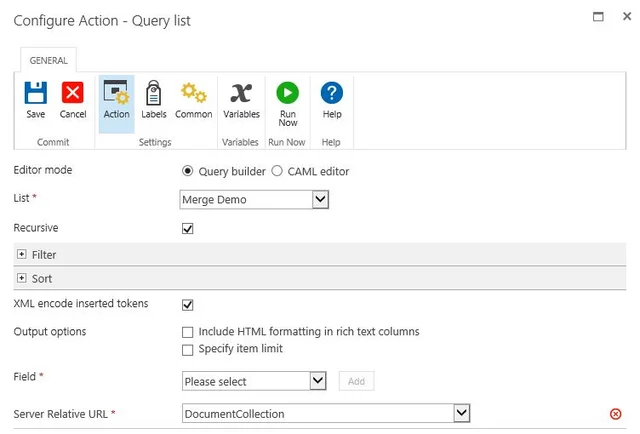
You are now ready to add the actions to the workflow. You can start with adding a Query List action. Select the Document Library in the ‘List Field’. In the Field select ‘Server Relative URL’ and click Add button and set it to ‘DocumentCollection Variable’. Save this action.
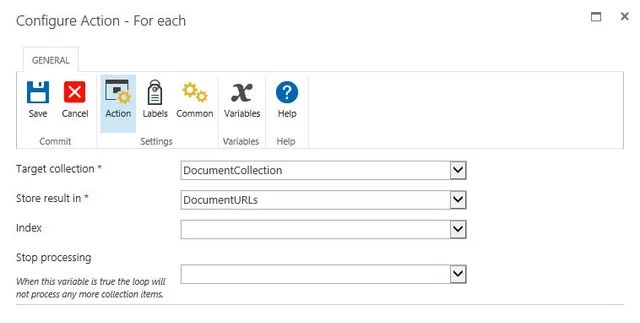
You can continue by adding the For Each action to the workflow. Specify the name of the collection to iterate over and the name of the variable to store the Item’s ID in. In our case, you can set the ‘Target collection’ field to ‘DocumentCollection’ variable and ‘Store result in’ to ‘DocumentURLs’ variable. Save.this action.
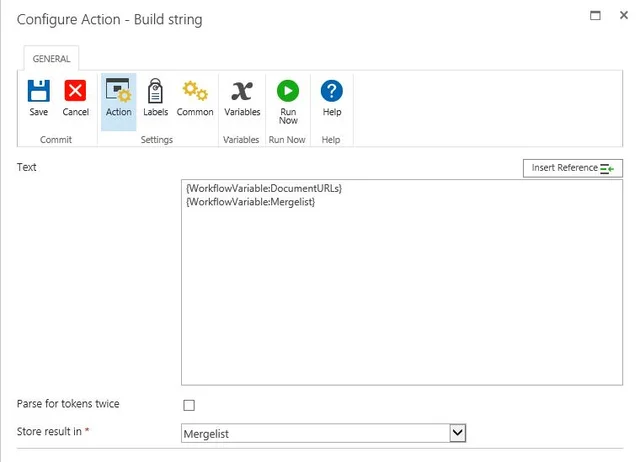
The next set of actions that you add, will need to be added inside the For Each action, to make sure they are executed separately for each file in the list.
You can continue by adding the Build sting action to the workflow. You need to click the Insert Reference icon and add the Workflow Variables ‘DocumentURLS’ and ‘MergeList’ in the Text Field and set the ‘Store result in’ field to ‘Mergelist’. Save this action.
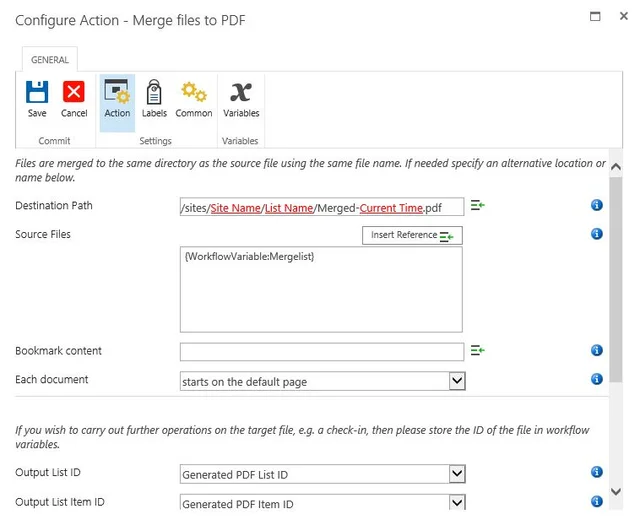
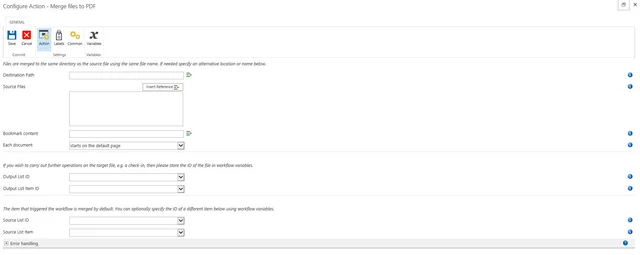
After this, you need to add the Merge file to PDF action listed under the Muhimbi PDF section. You can fill this section as per the image below:
The PDF Converter integrates and performs Merge with all Nintex Workflow versions
You may want to leave the Destination Path empty, which will write the PDF File to the same location as the source file. For more information about the Destination Path or any of the other fields, hover the mouse over the small information icons.
- Click Save and then Publish to ensure the workflow can be executed.
Running the Workflow
You can run the workflow manually and you will notice that the merged PDF file will be generated in the specified library.