In this guide you’ll learn how to automatically combine and merge multiple files using SharePoint Designer Workflow. In this example, we use MS SharePoint Designer 2013, but it will not work in the legacy MS SharePoint Designer 2007 and 2010 versions.
Merge Document Workflow Activity
The following are the options provided by the Merge Document workflow activity:

In typical Muhimbi fashion, the workflow sentence is consistent with our other Workflow Activities, and is largely self-describing.
- these Documents: This field specifies the list of documents / URLs to merge (and convert if needed). Each file must be specified on a new line and each line may contains three ‘;’ separated values:
- File Path: The path to the file to merge or URL of web page to convert. This may already be a PDF file. If this is not the case and the file format is supported by the converter, then it will be converted first. The path can be relative to the current site (e.g. Shared Documents/Some File.docx) or absolute (e.g. /sites/Finance/ Shared Documents/Some Folder/Some file.docx). SharePoint Designer Workflow Lookups are fully supported, which can be used to dynamically generate the path for the current file, e.g. [%Current Item:URL Path%].
- Include Bookmarks: The source file may already include PDF Bookmarks, or may be able to generate such bookmarks as part of the conversion process. e.g. a MS Word document. Specify ‘true’ to copy these bookmarks to the merged PDF file, or ‘false’ to strip out any bookmarks. This value is optional.
- Custom Bookmark value: The ‘this field’ parameter can be overridden using the third parameter. Specify the name of the ‘top level bookmark’ for the file, specify "" to remove the bookmark for this document or don’t specify anything at all to use the value stored in the column referenced by the ‘this field’ parameter.
- this File: An optional filename (and path) to write the merged document to. When not specified, the same name as the document that triggered the workflow will be used with a ‘.pdf’ file extension.
Note: Ensure the path does not include the host name, e.g. ‘http://your site/...’. - this Field: In a way similar to the User Interface for the merge facility, it is possible to specify a name of the column which contents will be used to populate the PDF Bookmark for the merged document. For example, specifying a name or title makes it very easy to jump between the various sections of the merged PDF file.
- select start Page (Each Document): Control if empty pages are added between the documents to make sure each merged document always starts on the right-hand, or left-hand side when printing it double sided.
- Variable: List ID: If you wish to carry out further actions on the generated PDF file, e.g. perform a check-in, then you can optionally write the ID of the List the PDF was written to in a workflow variable.
- Variable: List Item ID: Similarly to List ID, the Item ID of the generated PDF file can optionally be written to a workflow variable.
Prerequisites
Before starting, please ensure the following prerequisites are met.
Download and install the Muhimbi PDF Converter for SharePoint.
Make sure you have the appropriate privileges to create workflows on a site collection.
Building the Workflow
You can create the workflow as follows:
Create a new workflow using MS SharePoint Designer.
Associate the workflow with the library of your choice, and tick the boxes next to both ‘Automatically start....’ options and proceed to the next screen.
Add the following local variables:
- FileList (String): This variable stores the list of file Urls that are going to be merged into the pdf.
- ResponseContent (Dictionary): This variable will store the response received from the web service.
- responseCode (String): The response status (Ok/Failed) is returned from the web service call and stored in this variable.
- RequestHeader (Dictionary): This will be used as a header for web service calls.
- ListofServerRelativeUrls (String): This is used to temporarily store file urls and also used in the Loop.
- CurrentServerRelativeUrls (String): This is used to store the current url and also used in the Loop.
- Index (Integer): This is used to store the file count and used in the loop
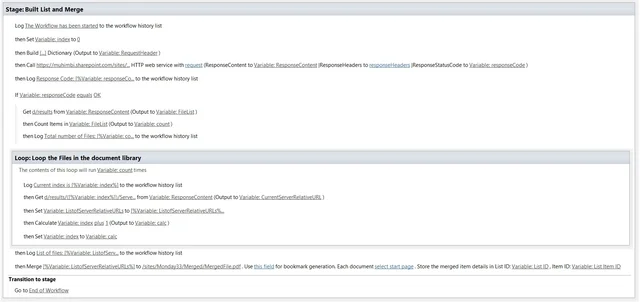
Add the ‘Set Workflow variable’ condition and set the Workflow variable ‘index’ value to ‘0’.
Add the ‘Build Dictionary’ condition. Click ‘this’ and add the following Key/Value pairs:
- Accept : application/json;odata=verbose
- Content-Type : application/json;odata=verbose
Set ‘Output to’ variable to ‘RequestHeader’.
Add the ‘Call HTTP Web Service’ action.Once this is inserted, select the line that contains the web service workflow action and click the ‘Properties’ button in the ribbon. Configure the Parameters with reference to details below:
- Address: https://<SiteUrl>/_api/web/GetFolderByServerRelativeUrl(‘<Document Library Name>’)/Files?$select=ServerRelativeUrl
e.g. https://tenantname.sharepoint.com/sites/sitecollectionname/_api/web/GetFolderByServerRelativeUrl(‘Libraryname’/Files?$select=ServerRelativeUrl
Note:* The example above only fetches the ServerRelativeUrl property because we need file urls.
- RequestHeaders: Set the “RequestHeader” workflow variable.
- ResponseContent: Set the “ResponseContent” workflow variable.
- ResponseStatusCode: Set the “responseCode” workflow variable.
Add a ‘Log to History List’ action. Log ‘responseCode’ to the history list so that we know the status of the response.
Add an ‘If any value equals value’ condition and set it to If ‘responseCode equals OK’. This checks for the web service response code and proceeds only when it is successful.
When the ‘If condition’ evaluates to ‘True’:
- Add ‘Get an Item from the Dictionary’ action. Click on the items by name or path link and type ‘d/results’, set the ‘from’ variable to the ‘ResponseContent’ workflow variable and Output it to the ‘FileList’ workflow variable.
- Add ‘Count Items in Dictionary’ action. Click on the dictionary link and set the variable to the ‘FileList’ workflow variable and set the Output to variable ‘count’.
- Add the ‘Log to History List’ action. Log ‘Count’ to the history list so that we know the total number of files we need to merge.
- Add the ‘Loop n times’ action.
- Set ‘The Contents of this loop will run’ to ‘Variable: Count’.
- Add the ‘Get an Item from the Dictionary’ action. Click on the ‘items by name or path’ link and type ‘d/results/([%Variable:index%])/ServerRelativeUrl‘, set the ‘from’ variable to the ‘ResponseContent’ workflow variable and Output it to the ‘Current ServerRelativeURL’ workflow variable.
- Add the ‘Set Workflow Variable’ action and Set the workflow variable to ‘ListofServerRelativeUrls’ and use the String Builder to set it to: [%Variable:ListofServerRelativeUrls%] [%Variable:Current ServerRelativeURL%]
- Add the ‘Do Calculation value’ action and set the value to the workflow variable ‘Index’ plus ‘1’ and set the Output to the ‘calc’ variable.
- Add the ‘Set Workflow Variable’ action and Set the workflow variable to ‘index’ and the value of the workflow variable to ‘calc’.
- Outside the Loop, Add ‘Log to History List’ action.
- Log the variable ‘ListofServerRelativeUrls’ to the history list.
- Add the Muhimbi ‘Merge Documents to PDF’ Action and set the ‘these documents’ field to the workflow variable ‘ListofServerRelativeUrls’ and ‘this field’ to ‘Merged.Pdf’.
Note: The Filename is being hardcoded in this example, however you can also dynamically create the file and also specify a different destination.
Set the ‘Transition to Stage’, to go to ‘End of Workflow’. The workflow should look like this:
Publish the workflow and upload a few PDF files in the Document Library. Manually start the workflow. After a few seconds the workflow should have completed and the merged files should appear in the specified location..