In this guide you’ll learn how to extract text from a PDF in SharePoint. Common use cases for this functionality is to extract a particular area of text from all documents that use a common template or layout. For example, if a reference number can always be found at the top right corner of a scanned document then that text can be extracted and stored in a SharePoint column from where it can be included in searches or be used in further workflow steps.
This guide describes achieving this using the MS SharePoint Designer Workflow.
Once the PDF Converter for SharePoint is installed, a number of new Workflow activities will be added automatically in MS SharePoint Designer, including the new Extract text using OCR activity and looks as follows.

The workflow sentence is consistent with our other Workflow Activities (e.g. Converting / Watermarking / Merging / Securing) and largely self-describing.
this document: The source document to OCR and to extract text from. For most workflows selecting Current Item will suffice, but some scenarios may require the lookup of a different item.
OCR language: The language the source document is written in. It defaults to English, but versions 7.2 and above supports Arabic, Danish, German, English, Dutch, Finnish, French, Hebrew, Hungarian, Italian, Norwegian, Portuguese, Spanish and Swedish.
OCR Performance: Specify the performance / accuracy of the OCR engine. It is recommended to leave this on the default Slow but accurate setting.
Whitelist / Blacklist: Control which characters are recognised. For example limit recognition to numbers by whitelisting 1234567890. This prevents, for example, a 0 (zero) to be recognised as the letter o or O.
Pagination: In some specific cases, a single image spans multiple pages. Enable pagination for those cases.
Region: Specify the x, y, width and height coordinates of the region to retrieve text from. The unit of measure (UOM) is 1/72nd of an inch. When extracting text from non-PDF files, e.g. a TIFF or PNG, then please take into account that internally the image is first converted to PDF, which may add margins around the image but guarantees that a single – unified - UOM is used across all file formats. If you are not sure how internal conversion affects the dimensions of your image or scan then use our software to convert the file to PDF and open it in a PDF reader before specifying the coordinates.
Page: By default, text is extracted from all pages and concatenated. To extract the text from a specific page specify the page number in this field.
Result: The recognised text will be stored in this variable (type String).
Note: OCR and PDF/A Archiving Add-On license is needed in order to use OCR in your production environment.
Example of MS SharePoint Designer Workflow to Extract text from PDF
In this example, a MS Workflow Designer workflow retrieves all the PDF files created during the current day and extracts specific text from the PDF, and updates this into a List Column. In an ideal setup, you will schedule this workflow to run out of office hours to batch-process all newly created PDF files and extract text from the same.
The legacy MS SharePoint 2007 / 2010 workflow engine is fully supported, as is the optional Workflow Manager that comes with MS SharePoint 2013 and later versions. For more details, refer to this post.
Before you start, make sure the PDF Converter for SharePoint On-Premises has been installed, and you have access to a site collection with the appropriate rights to create workflows.
To retrieve PDF files from a Document Library and extract specific text from them and update them to a List Column, you will need to configure the Document Library to store PDF files and then also configure the workflow as per the details given below:
Create and Configure the Document Library
You can create and configure the Document Library by performing the following steps:
Create a Document Library named Proposal Documents. You can use any name of your choice.
Once created, navigate to the library’s Settings →
Document Library Settings → Versioning Settings screen and enable Requires content approval for submitted items.In the Document Library, create two folders (You can use any name of your choice): Confidential Proposals and
Approved PDF Files.Add a separate column called OCR of text type.
Create and Configure MS SharePoint Designer Workflow
You can create and configure the MS SharePoint Designer Workflow by performing the following steps:
Start MS SharePoint Designer and open the site collection that contains the Proposal Documents Document Library.
Click Add Item and select List Workflow. Specify the following settings:
Name for the workflow: Extract Text from PDF Format
Select the Document Library associated with the Workflow: Proposal Documents list.
When creating a SharePoint Designer Workflow in SharePoint 2013 or later, select the appropriate Platform Type.
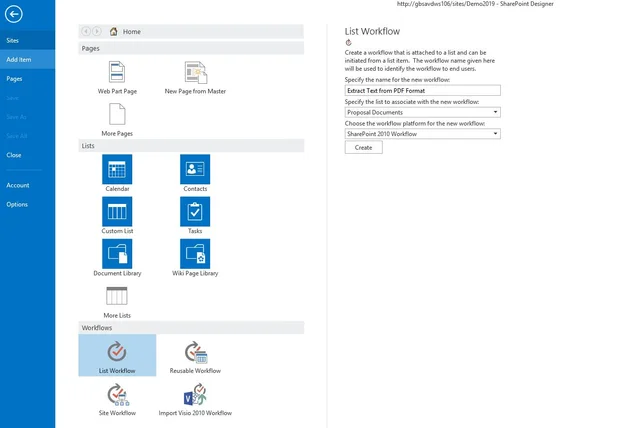
Click Create button to proceed.
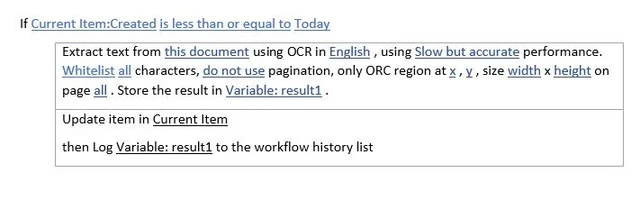
We are now ready to create the workflow. From the ‘Conditions’ menu, select the ‘If current item field equals value’ condition.
Click the first value (field) and select ‘Created’ from the drop-down..
Click the next value (equals) and select ‘is less than or equal to’ from the drop-down.
Click the next value (value) and select the three dots (...) beside function (fx). Select ‘Current Date’ from the popup.
Click OK button to continue.
With the Conditions in place we can now add the Actions, which is where the magic happens.
From the Actions menu, select Extract text using OCR. It may be hidden behind the All Actions option.
The following action is inserted:
*Extract text from ‘this document’ using OCR in ‘English’ , using ‘Slow but accurate’ performance. ‘Whitelist’ ‘all’ characters, ‘do not use’ pagination, only ORC region at ‘x’ , ‘y’ , size ‘width’ x ‘height’ on page ‘all’ . Store the result in ‘Variable result’ .*Let’s examine what the various options within the action mean:
- this document: Specify which PDF document from which the text has to be selected. Select the option and make sure Current Item is selected.
- Language: This is the language the source document is written in. It defaults to English, but from PDF Converter for SharePoint On-Premises version 7.2 and above, supports Arabic, Danish, German, English, Dutch, Finnish, French, Hebrew, Hungarian, Italian, Norwegian, Portuguese, Spanish and Swedish.
- Performance: Specify the performance or accuracy of the OCR engine. It is recommended to leave this on the default Slow but accurate setting.
- Whitelist / Blacklist: You can control which characters are recognised. For example, you can limit recognition to numbers by whitelisting 1234567890. This prevents, for example, a 0 (zero) to be recognised as the letter o or O.
- Pagination: In some specific cases, a single image spans multiple pages. Enable pagination for those cases.
- Region: Specify the x, y, width and height coordinates of the region to retrieve text from. The unit of measure (UOM) is 1/72nd of an inch. When extracting text from non-PDF files, e.g. a TIFF or PNG, then please take into account that internally the image is first converted to PDF, which may add margins around the image but guarantees that a single – unified - UOM is used across all file formats. If you are not sure how internal conversion affects the dimensions of your image or scan then use our software to convert the file to PDF and open it in a PDF reader before specifying the coordinates.
- Page Number: By default text is extracted from all pages and concatenated. To extract the text from a specific page specify the page number in this field.
- Result: The recognised text will be stored in this variable (type String).
Insert a new action named ‘Update List Item’ and select ‘this list’. We are now going to update the text copied from the PDF to the SharePoint List Column.
- Click ‘this list’.
- Select ‘Current Item’ from the list and click Add button and select ‘OCR’ from Set this field. Click fx button next to ‘To this value’, and specify ‘Workflow Variables and Parameters’ as the Source and set the field to the variable name to which the text has been stored to. Click OK button.
- Click OK again to return to the MS SharePoint Designer Workflow. It should look like the image below.
Insert a new action named ‘Log to History List’ and enter ‘Text Copied’.
Your MS SharePoint Designer should look like this:
Click Publish button to deploy and activate the workflow.
Testing the Workflow
You can test the workflow created by performing the following steps:
Upload a PDF document containing text as specified in the x and y coordinates in the workflow definition to the ‘Confidential Proposals’ folder.
From the context menu, manually start the workflow.
This will start the workflow, and after a few seconds, the Workflow status should change to Completed. Refresh the list, and you will notice that the OCR Column contains the text that has been copied from the PDF updated.
If an error occurs during the execution of the workflow you can perform the following to troubleshoot the same:
Check the messages on the workflow status screen.
Check for errors in the Windows Event log.
Check for errors in the SharePoint trace log.