We recently released the Muhimbi PDF Converter Xtension for Nintex Automation Cloud. You can download it here or learn more about available Muhimbi deployments for Nintex on our product page.
In this guide, you’ll learn how to copy a document’s metadata in SharePoint when converting it to a PDF using a Nintex workflow.
Here’s how to copy metadata:
- Copy either all metadata or only the selected fields.
- Copy metadata to files in different folders or site collections.
- Change the content type to either the source file, destination file, the default content type for the library, or a specific named content type.
- Copy the content of the Author, Created, and Modified fields by explicitly specifying these field names. This information isn't copied when the default option to copy all fields is enabled. It isn't possible to copy the Editor field, as it's always overwritten by the workflow.
Copying Metadata and Setting Content Types Using Nintex Workflow 2007 and 2010
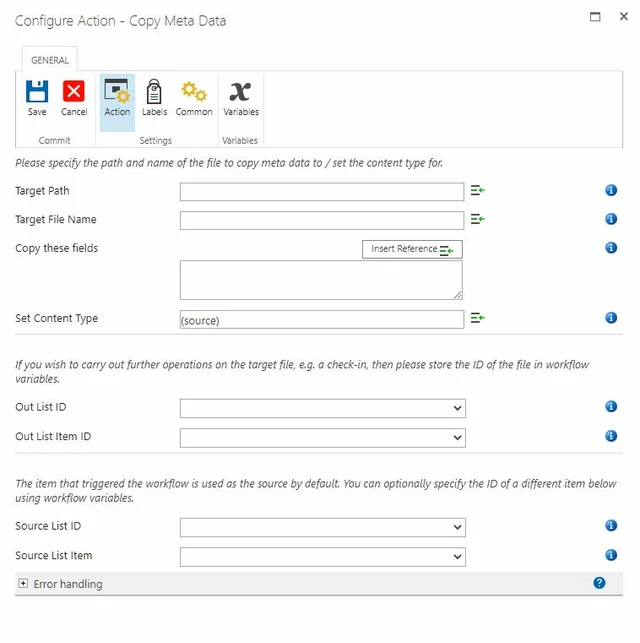
The fields supported by this workflow activity are:
Target Path — Enter the path of the target file to copy metadata to, either:
- Nothing, if you want to use the same directory as the source file.
- A relative path to a subsite/document library/folder.
- An absolute path to a different site collection.
Ensure the path doesn’t include the host name, e.g.http://your site/….
Target File Name — The name of the file to copy the metadata to. Leave this field empty to use the source file, which can be useful if you only want to set the content type of a file.
Copy these fields — By default, the content of all fields is copied to the destination file. However, if you wish to copy only specific fields, then the field names can be specified in this list. You can separate fields using line breaks,
,or;, and you can use both internal and display field names.Set Content Type — While copying metadata, you have full control over the content type of the destination file. The following options can be specified:
- (source) — The content type of the source file is copied to the destination file. Please include the round brackets.
- (target) — The content type of the destination file isn’t modified and remains as it was before the copy operation. Please include the round brackets.
- (default) — The default content type for the document library is applied to the destination file. Please include the round brackets.
- Name of Content Type — The destination file is set to a specific, named content type. Please do not use round brackets around the name of the content type.
Out List ID — If you want to carry out additional actions on the target file — e.g. perform a checkin — then you can optionally write the ID of the list that holds the target file to a workflow variable of type string.
Out List Item ID — Similar to Out List ID, the item ID of the target file can optionally be written to a workflow variable of type item ID (in SharePoint 2007) or integer (in SharePoint 2010).
Source List ID and Source List Item — The item that triggered the workflow is used as the source item by default. You can optionally specify the ID of a different list and list item using workflow variables. Please use the same data types as those used by Out List ID and Out List Item ID.
Error handling — Similar to the way some of Nintex’s own workflow activities allow errors to be captured and evaluated by subsequent actions, all of Muhimbi’s workflow activities allow the same. By default, this facility is disabled, meaning that any error terminates the workflow.
Similar to our other workflow activities, this new copy metadata facility is both simple and powerful and works in legacy MS SharePoint versions, as well as in MS SharePoint 2019.