In this guide you’ll learn how to create a PDF form template and fill in list items using watermarks in SharePoint using Muhimbi PDF Converter.
The Muhimbi Converter for SharePoint has long had the ability to convert SharePoint List items (including those customized with InfoPath or Nintex Forms) as well as inserting the List Item data into a PDF document. This allows the list data, along with the look and feel of the form to be converted to PDF.
Another way to fill a PDF form is to create a template and then simply watermark the required data into the template. List item fields are stored in SharePoint and can be accessed using Muhimbi’s XML watermarking format making it a good alternative for form filling.
To keep this example simple, we’ll start out with a plain SharePoint list that contains a number of custom columns holding basic personal information:
You can then place a PDF copy of the form to be filled out, in this case a U.S. W-9, in a library accessible to the workflow.
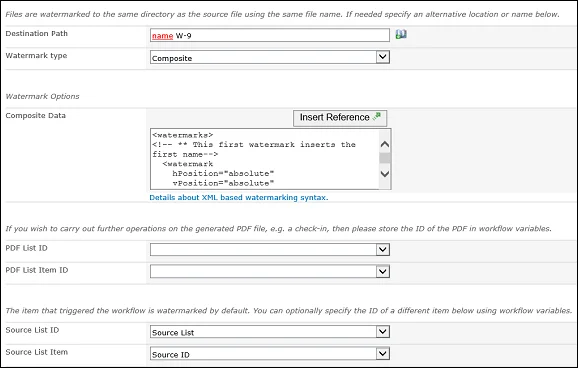
The example uses a simple workflow that watermarks this PDF using our XML syntax that can pull in the list item data as the content for the watermark.
Note: This workflow does not run against the list item that started the workflow, but rather the source W-9 PDF that we are watermarking, so that document’s Source List ID and List Item is specified as well, since we are adding the watermark content from the list item, we have copied that content to workflow variables so it’s referenced properly, no matter what item is being worked on.
The following screenshot shows our software being used in Nintex workflow, but it works equally well in MS SharePoint Designer Workflows and Visual Studio Workflows.
This sample XML places the first and last name of the user (as defined in the First and Last workflow variables) in the correct location:
The placement of the watermarks is specified using the specific coordinates of where the data needs to be placed. The coordinates are specified in Points (1/72nd of an inch). After running the workflow on the two items in the list, we get 2 separate PDFs with the custom information watermarked into them.
Once this is in place, it is very simple to just modify the watermarking action to move the data to different locations, allowing multiple different forms to be filled out using a single workflow. When forms change slightly, all that needs to be done is change the coordinates of the fields that moved, and everything works again.


