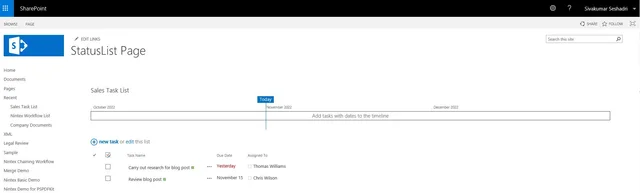
In this guide, you’ll learn how to export a SharePoint list to PDF in SharePoint. You can use an existing task list, or you can create one (Sales Task List) by navigating to your SharePoint site and adding a Tasks app.
If you use the list’s default view, the PDF file generated will also have the SharePoint user interface (UI) Quick Launch menu. If you’d like to have the list without the Quick Launch menu, we recommend creating a page that displays all items in the list with as little of the SharePoint UI around it as possible.
Creating a New Page without the Quick Launch Menu
To create a new page without the Quick Launch menu, perform the following steps:
Open the SharePoint site where you want to add the page. Click Site Contents and go to the Pages folder. Click New \Web Part Page.
Enter a name for the page — in this example, Sales Task List — and select Full Page, Vertical layout. Select the document library where this page will be saved, and click Create.
Click Add a Web Part, and select the list you want to display on this page. Select Add part to Full Page and click the Add button.
Next, click the newly inserted web part’s Edit button and select Modify Shared Web Part.
Click Edit the current View and select the columns you want to be included in the PDF file — for example, % Complete, Due Date, Start Date, and Task Status.
Under the Item Limit section, set the limit to an appropriately large number. This will ensure all items are included in the PDF file without paging.
Click OK to save the changes, and then click Stop Editing.
Save the page’s URL, as you’ll need it later. For example, http://gbsavdws106/sites/Demo2019/SitePages/SalesTaskList.aspx
The new page will be used as the underlying layout of the PDF document. You can modify it further in SharePoint Designer / JQuery and remove additional parts of the SharePoint UI.
Automatically Exporting SharePoint Lists to PDF with Designer Workflow
Follow these steps to set up an automatic PDF conversion with SharePoint Designer and generate a PDF file whenever the tasks list is modified:
Create a new workflow using SharePoint Designer.
On the Workflow definition screen, associate the workflow with the tasks list, tick the boxes next to both Automatically start options, and proceed to the next screen.
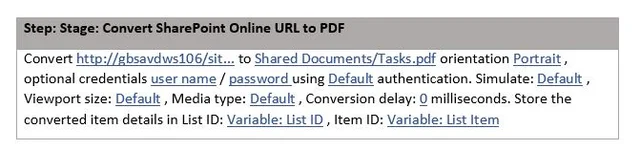
Add the Convert HTML to PDF action, click this url, and enter the URL to the page that was created in the previous step, e.g. http://gbsavdws106/sites/Demo2019/SitePages/SalesTaskList.aspx
Click this file and enter the path and file name where the PDF file will be generated, e.g.
Shared Documents/Tasks.pdf.Optionally, change the generated page’s orientation from Portrait to Landscape.
The username and password are optional. The credentials that are run by default will be used to open the web page. You can leave that field empty.
Click Publish to deploy and activate the workflow.
You can enter one or more tasks to test. Every time a task is added or updated, a PDF file is written to the Shared Documents/Tasks.pdf location. You can open the PDF file to check the results.