In this guide, you'll learn how to extract data from a PDF form using Power Automate. When working with PDF forms and Muhimbi PDF Converter, you can extract information from PDF forms in the FDF, XFDF, and XML standards.
There are two ways to extract PDF form data:
- Converting the XML string to a JSON object and parsing it.
- Parsing the XML using XPath.
There are advantages and disadvantages to both methods. JSON’s data types also have a one-to-one mapping (key-value pair) to data, while XML is a markup language and uses tags (<>) to represent data items. JSON has a smaller overhead compared to XML, hence it’s easier and quicker to parse, as it’s more lightweight. Sometimes, converting XML to JSON might become a little overwhelming, so you may want to use XPath to extract meaningful information.
In this guide, you'll learn how to extract data from PDF forms using both methods. You'll work with an example where a form filled with relevant data is uploaded to an MS SharePoint document library. The flow will pick up the uploaded form automatically, extract the data contained within it, and then add the data to an MS SharePoint list.
Prerequisites
Before beginning, ensure the following prerequisites are in place:
- A Power Automate subscription.
- A full or free trial subscription to Muhimbi PDF Converter for SharePoint.
- Appropriate privileges to create Power Automate flows.
- Working knowledge of Power Automate.
Converting an XML String to a JSON Object and Parsing It
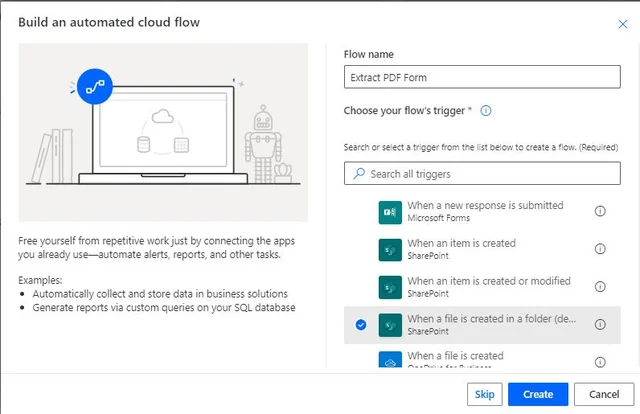
Create a new flow using the Automated cloud flow option.

Give your flow a meaningful name and select the When a file is created in a folder SharePoint trigger. Then click Create.
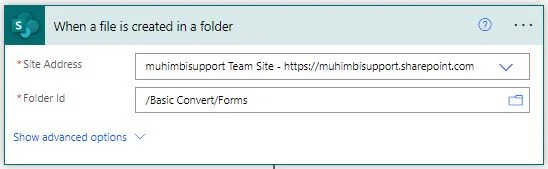
In the trigger, you can specify the path to the SharePoint Online library to monitor for new files.
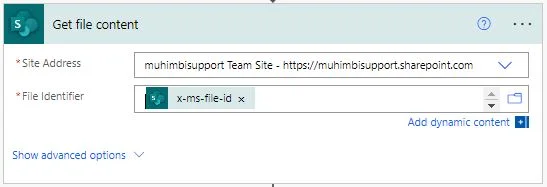
Add the SharePoint Get file content action to the flow canvas and configure it with the details below:
- Site Address — Specify the path to the SharePoint Online site collection that holds the file.
- File Identifier — Select x-ms-file-id, which is the output of the When a file is created in a folder action.
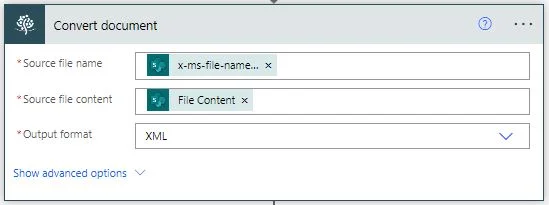
Add the Muhimbi Convert document action to the flow canvas and configure it with the details below:
- Source file name — x-mx-filename-encoded, which is the output of the When a file is created in a folder action.
- Source file content — Specify File Content, which is the output of the Get file content action.
- Output Format — Choose XML.
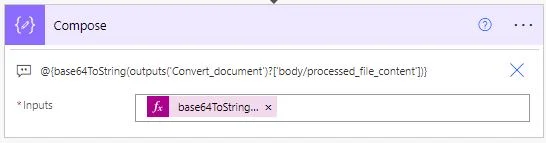
Add the Compose action to the flow canvas. Add the Processed file content output from the Convert document action, and convert it to base64ToString.
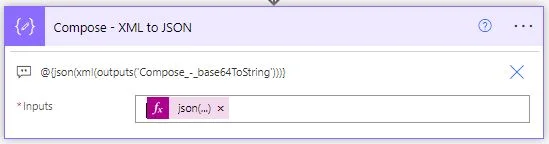
Add the Compose action to the flow canvas. Then, add the output from the base64ToString action and convert it to JSON using the expression json(xml(outputs('Compose\_-_base64ToString'))).
Save and perform a manual test on the workflow. Upload a supported file type to the folder that's configured by the trigger. After a few seconds, you'll see the XML output in the Compose - base64ToString action and the JSON output in the Compose - XML to JSON action.
XML output:
Add the Parse JSON action to the flow canvas and configure it with the details below:
- Content — Add the output of the XML to JSON action.
- Schema — Click the Generate from sample button and copy the JSON from the step above.
Add the SharePoint Create item action, and pass the following expressions:
- Site Address — Select the location of the SharePoint list where the list item should be added.
- List Name — Select the SharePoint list where the list item should be added.

Note: In this step, you'll add the expressions directly and map them to the SharePoint list.
Publish your flow and upload a supported file type to the folder monitored by the specified SharePoint trigger. After a short wait, a new list item within the target SharePoint list will be created.
Parsing XML Using XPath
The process of parsing XML using XPath is similar. Perform the steps to get the XML output. Then add the following actions to the flow.
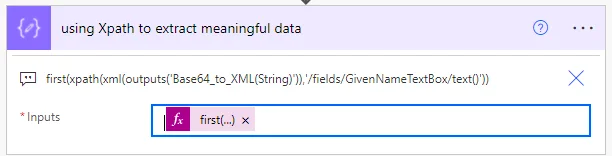
Extract the text() value from XML using the xpath('\<xml\>', '\<xpath\>') XPath expression.
This will return an array with XML nodes or values that match the specified XPath expression. In this scenario, there's only one element in the array, so use the first value using the expression first(), which is first(xpath(xml(outputs('Base64_to_XML(String)')),'/fields/GivenNameTextBox/text()')).
Add the SharePoint Create item action, and pass the expressions directly, like so:
- Site Address — Select the location of the SharePoint list where the list item should be added.
- List Name — Select the SharePoint list where the list item should be added.
**
Note: In this step, you'll add the expressions directly and map them to the SharePoint list.
Publish your flow and upload a supported file type to the folder monitored by the specified SharePoint trigger. After a short wait, a new list item within the target SharePoint list will be created.