In this guide, you'll learn how to archive files by converting them to PDF/A using Power Automate.
It’s important to note that you can easily customize this example to save your archived files to destinations like Dropbox, Google Drive, OneDrive, or any platform supported by Power Automate.
What Does PDF/A Aim to Achieve?
PDF/A aims to produce files with static content that can be precisely reproduced both today and in many years' time. Files subject to long-term archiving should work regardless of the device or operating system used. The future usability of PDF/A files must also be guaranteed in a manufacturer-independent manner, and this includes Adobe.
PDF/A is a “complete” format. This means PDF files that comply with the PDF/A standard are complete in and of themselves and use no external references or non-PDF data. The PDF/A-1 standard is based on PDF/A specification 1.4, which means that it works within the technical scope of the functions available in Acrobat 5.
A range of rules must be observed when generating PDF/A files to meet the goals named above. For example, when generating PDF/A files, it's important to embed all fonts and clearly specify all colors. Forms, comments, and notes are only permitted to a limited extent. Compression is allowed as a general rule, but LZW and JPEG2000 are excluded. Transparent objects and layers (optional content groups) aren't permitted. PDF/A uses rules for metadata that are based on the Extensible Metadata Platform (XMP). Finally, a PDF/A file must identify itself as such.
Note that you need the OCR and PDF/A Archiving Add-On license, in addition to a valid PDF Converter for SharePoint On-Premises or PDF Converter Services license, to use this functionality.
Using Power Automate to Convert to PDF/A
Ensure the following prerequisites are in place:
- An Office 365 subscription with a SharePoint Online license.
- A full subscription to Muhimbi PDF Converter for Power Automate. Note that the free version doesn't support this functionality.
- Appropriate privileges to create flows.
- Working knowledge of SharePoint Online and Microsoft Power Automate (Flow).
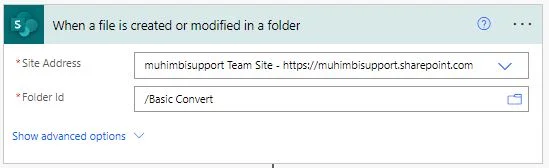
1: Creating a New Flow in Power Automate
Create a new flow and use the When a file is created or modified in a folder trigger. Fill out the URL for the site address and select the relevant SharePoint folder from the selection.
2: Converting PDF to PDF/A with Power Automate
Insert Muhimbi's Convert document action and fill it out as shown in the screenshot below. Substitute the Source file name and Source file content fields with suitable values.
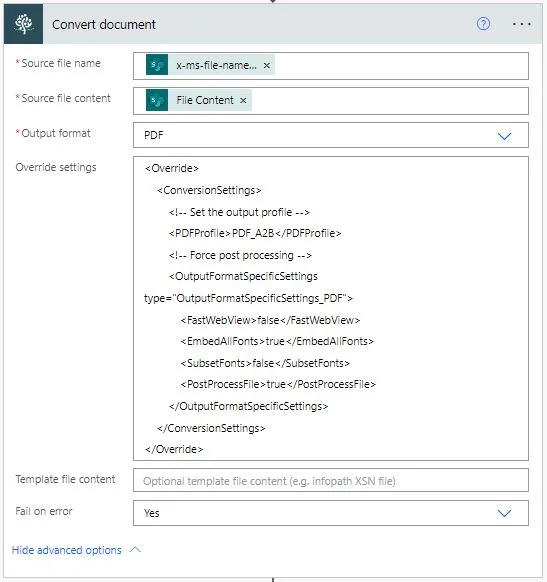
- Source file name — Add x-ms-file-name-encoded, which is the output of the When a file is created or modified in a folder trigger.
- Source file content — Add File Content, which is the output of the When a file is created or modified in a folder trigger.
- Output format — Specify PDF.
- Override settings — Include the following.
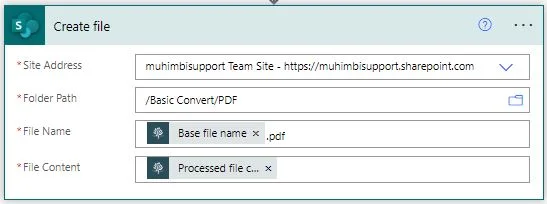
3: Creating a File
Insert a Create file action to write the converted PDF/A file back to SharePoint Online.
- File Name — In this field, add
Base File name.pdf, which is the output variable of the Convert document action. - File Content — In this field, add Processed file content, which is the output variable of the Convert document action.
4: Publishing the Workflow
Publish the workflow and upload any document. After a few seconds, the flow will trigger and a PDF/A file will be generated in the target location.