In this guide, you’ll learn how to create a QR code in a document using Power Automate. This example adds a QR code to a PDF in Dropbox, but you can easily add a QR code to other file types (see file formats we support).
QR codes are two-dimensional barcodes that are often used by mobile devices to scan and quickly access information. You can also use QR codes to store metadata such as a document's ID, last update time, author, and more.
This example uses Power Automate to add a QR code to a PDF in Dropbox. However, you can easily add QR codes to PDFs in other destinations, like SharePoint, Google Drive, OneDrive, or any platform supported by Power Automate. You can also extend this example by adding additional automation, like sending your file as an email.
Prerequisites
Before building the workflow, ensure all prerequisites are in place. You should also have some knowledge of building workflows using Power Automate.
- A full or free trial subscription for Muhimbi PDF Converter for Power Automate
- Appropriate privileges to create flows
- A Dropbox account connected with Power Automate
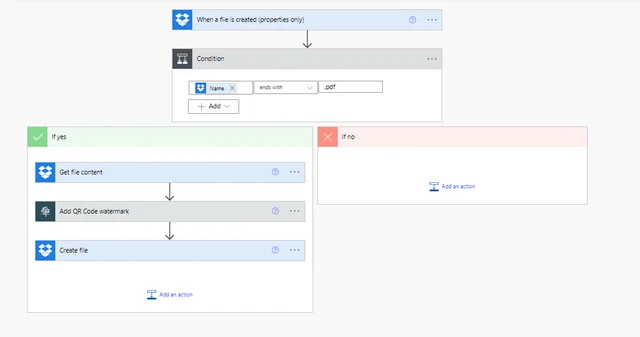
From a high level the workflow will look as follows:
Using Power Automate to Add QR Codes to PDF Documents
From a high level, the workflow will look like what's shown below.
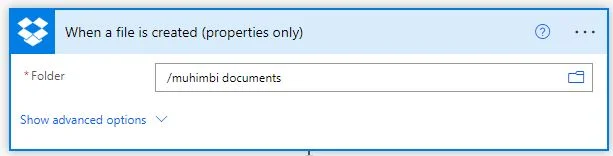
Specifying the Folder
Insert the When a file is created (properties only) flow action for Dropbox, and in the Folder field, specify /muhimbi documents.
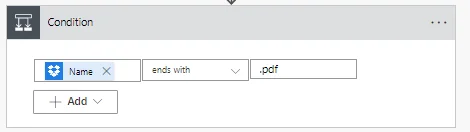
Inserting a Condition
Insert the Condition flow action and specify List of Files Names, which is the output of the When a file is created (properties only) action. It ends with .pdf.
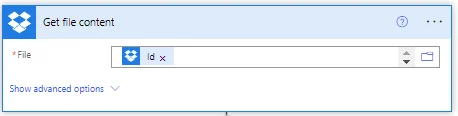
Getting the File Content
If the step above evaluates to true, add Get file content for the Dropbox action in the If yes box. In the File field, enter List of Files Id, which is the output of the When a file is created (properties only) action.
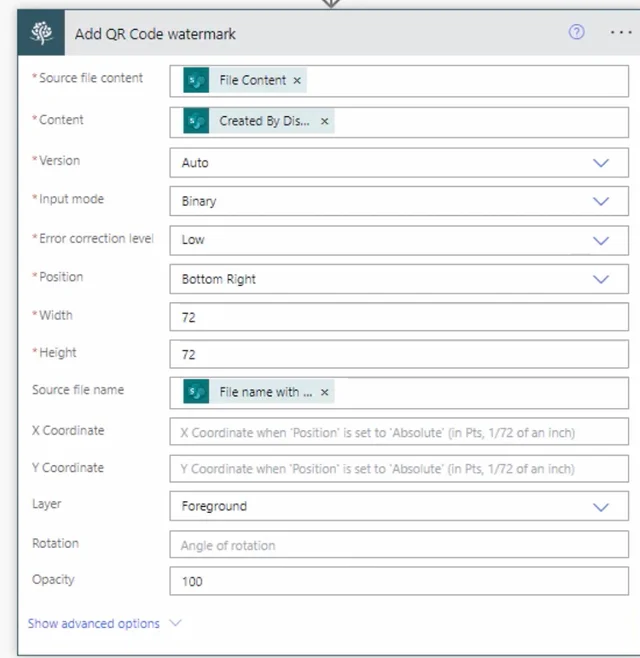
Adding the QR Code Watermark
Insert the Muhimbi Add QR Code watermark action and add the following mandatory fields to the action:
- Source file content — Specify File Content, which is the output of the Get file content action.
- Content — Enter the detail you want to be captured in the QR.
- Version — Auto
- Input mode — Binary
- Error correction level — Low
- Position — Bottom Right
- Width — 72
- Height — 72
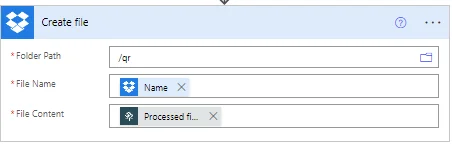
Creating a File
Insert the Dropbox Create file action after the Add QR Code watermark action.
The action has three main parameters:
- Folder Path — The path of your destination folder.
- File name — List of Files Names, which is the output of the When a file is created (properties only) action.
- File Content — Processed file content, which is the output of the Add QR Code watermark action.
You can test this workflow by uploading a PDF document to the Dropbox location. This will trigger the flow after a minute and create a new document with a QR code, as shown in the screenshot below.
When you scan this QR code, you'll see it reads File Accessed on <<Date and Time>>.
Additional Resources
For more information, refer to the following resources.