In this guide, you’ll learn how to add multiple watermarks to PDFs using Power Automate and Muhimbi PDF Connector. You can build workflows that add text, rectangles, ellipses, images, PDF files, RTF files, QR codes, barcodes, and other shapes as watermarks to PDFs. However, in cases when you need to combine multiple watermarks, a more complex action is available, which is to use an XML syntax. Here’s how to use the Add composite watermark Power Automate action of Muhimbi’s PDF Converter connector.
Prerequisites
Before you start building the workflow, ensure all prerequisites are in place:
- A full or free trial subscription to PDF Converter for Power Automate
- Permission to use Power Automate and create flows in Microsoft 365
Using Power Automate to Add Composite Watermarks to PDFs
Click Create to create a new flow in Power Automate.
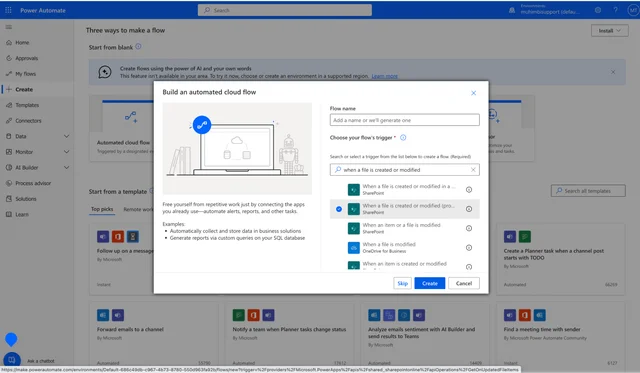
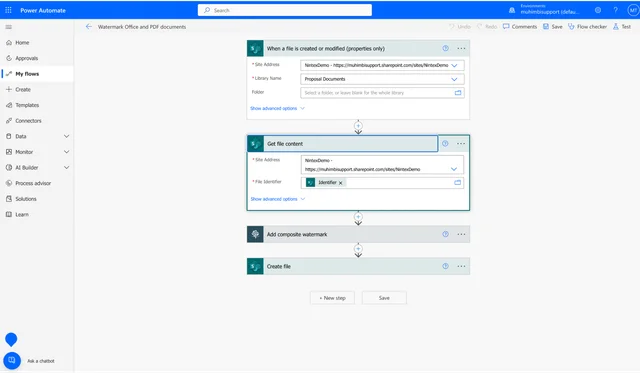
Click Automated cloud flow, and from the list of triggers, select the When a file is created or modified (properties only) trigger. By using this trigger, a new flow will start when a file is added to a specified folder.
In the trigger dialog, specify the path to the SharePoint Online library where the new files will be stored.
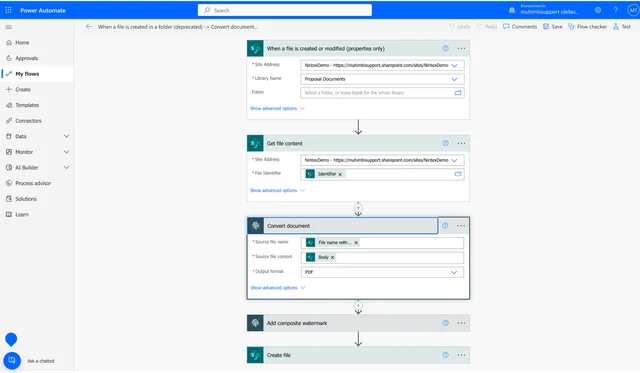
Search for the Get file content SharePoint action, specify the site address, and in the File Identifier field, select Identifier.
Search for Muhimbi actions and select the Convert document action. Specify File name with extension as the source file name, Body as the source file content, and PDF as the output format.
Add another Muhimbi action, Add composite watermark, to the flow canvas.
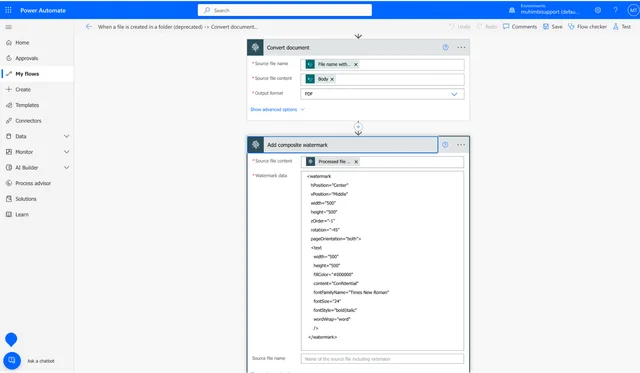
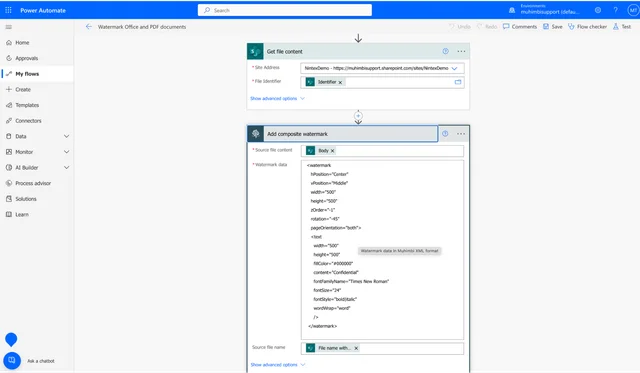
In the Source file content field, add Processed file content, and in the Watermark data field, copy and paste the sample Watermark XML of your choice that's shown in the next section of this guide. Select the Source file name again.
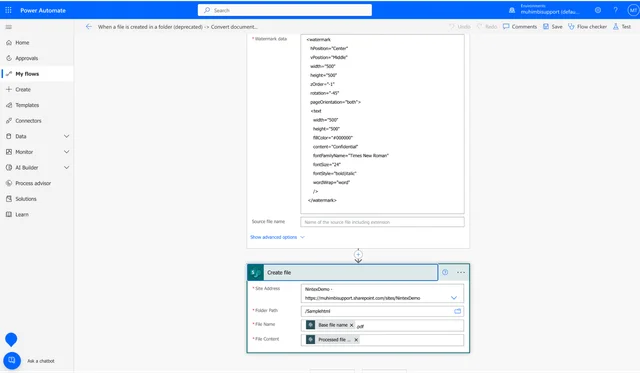
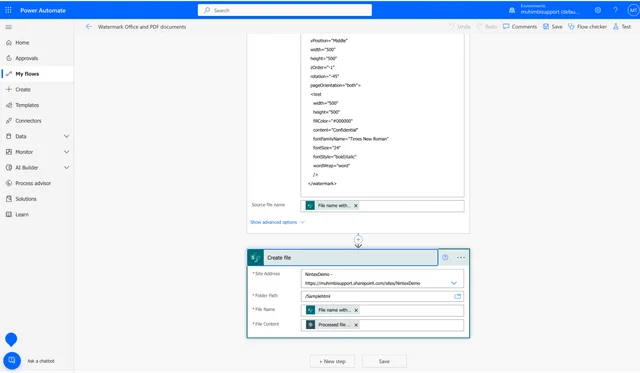
- Add the Create file SharePoint action to create the PDF document. Specify the site address and a folder path that’s different than the one where the source file is. In the File Name field, choose the Base file name trigger and add .pdf at the end, as shown in the image above. In the File Content field, choose Processed file content, and save the flow.
- Upload a non-PDF file — for example, a Word document — or create a new file in SharePoint to test the flow. You’ll find a watermarked PDF in the output folder.
Sample Watermark XML
The sample codes below produce three different watermarks.
The first adds an image of the company logo (in the foreground) to the top-right corner of each page in the document:
The second adds text that reads Confidential to the center of the page in the background:
The third adds an automatically generated page number to the bottom-right corner of each page:
If you use this example, make sure the imageFilePath attribute is updated to an anonymous file URL in your system.
Applying Watermarks to Office or PDF Files without Converting to PDF
There’s another Power Automate flow for when you need to add multiple watermarks to PDF files or Office files that you don't want to convert.
- Click Create to create a new flow in Power Automate.
- Click Automated cloud flow, and from the list of triggers, select the When a file is created or modified (properties only) trigger. By using this trigger, a new flow will start when a file is added to a specified folder.
- Specify the library name and folder where the source file will be uploaded or created.
- Search for the Get file content SharePoint action, specify the site address, and in the File Identifier field, select Identifier.
- Add Muhimbi’s Add composite watermark action to the flow canvas.
- In the Source file content field, choose the Body trigger. Copy and paste the XML sample of your choice that's mentioned in the section above.
- In the Source file name field, choose File name with extension.
- Add the Create file SharePoint action. Specify the site address and a folder path different to the one where the source file is. In the File Name field, choose the File name with extension trigger. In the File Content field, choose Processed file content, and save the flow.