As of version 7.3, the Muhimbi PDF Converter for SharePoint provides native support for the K2 workflow engine using K2’s SmartObjects technology. This post describes how to create a basic workflow to convert documents to PDF (as well as other formats) using a basic K2 Studio Workflow. Similar tutorials are available for K2 Designer, Nintex Workflow as well as SharePoint Designer.
A note on licensing the Muhimbi PDF Converter for SharePoint when used in combination with K2 blackpearl. Muhimbi’s licensing model is very simple, if a server runs Muhimbi Software in any way shape or form, then it requires a server license. Even though the PDF Conversion engine may be installed on a non-K2 server, all K2 Servers run our SmartObjects and therefore require a license. For details, in plain English, about how Muhimbi’s software is licensed, see this Knowledge Base Article .
A version of this blog post can also be found in the User Guide, Chapter 5.2.
Creating the workflow
Before creating the workflow, please make sure Muhimbi’s K2 Integration facilities have been deployed as described in the Administration Guide, Appendix – Deploying K2 Integration facilities. Basic knowledge of creating workflows in K2 Studio, and having the privileges to do so, is assumed.
This tutorial was written for SharePoint 2010. Muhimbi’s PDF Converter for SharePoint integrates equally well with SharePoint 2007 & 2013, but the actual steps for creating K2 workflows differ in each SharePoint version, particularly in SharePoint 2013. Please refer to K2’s tutorials and documentation for your particular environment.
In this tutorial we will create a basic workflow to convert files to PDF and associate the workflow with a Document Library named Tutorial.
Create a new Document Library named Tutorial in a site collection of your choice.
Launch K2 Studio and create a new project of type K2 Process using template Blank Process. Save it in a location of your choice.
Once the workflow editor is displayed select Process Wizards in the left hand pane and drag the SharePoint Events Process onto the design surface.
Click Next in the wizard and then, in the Action screen, select the Events for List and Library Items option.
On the Connection Settings screen specify the URL of your site collection, browse to the Tutorial Document library created as part of step 1 and click Next.
In the Events Selection screen select Item Updated. Although we could select the Item Added option as well to automatically convert new documents, that would require additional logic to see if the created type is of type PDF, which complicates this workflow and is beyond the scope of this tutorial. Click Next.
This tutorial does not require any of the item’s Metadata, so click Finish to complete the wizard.
Using the Event Wizards pane drag the SmartObject Event onto the design surface and click Next on the first screen of the Wizard.
Enter Convert Document as the Event Name and click the ellipses (…) next to SmartObject Method to open the Context Browser.
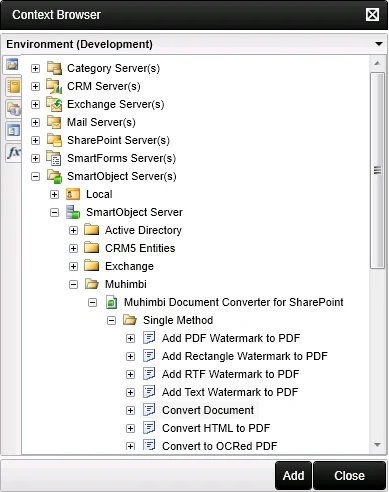
In the Context Browser Navigate to the Environment (the first) tab and select SmartObject Server(s) / SmartObject Server / Muhimbi / Muhimbi Document Converter for SharePoint / Single Method / Convert Document and click the Add button followed by the Next button.
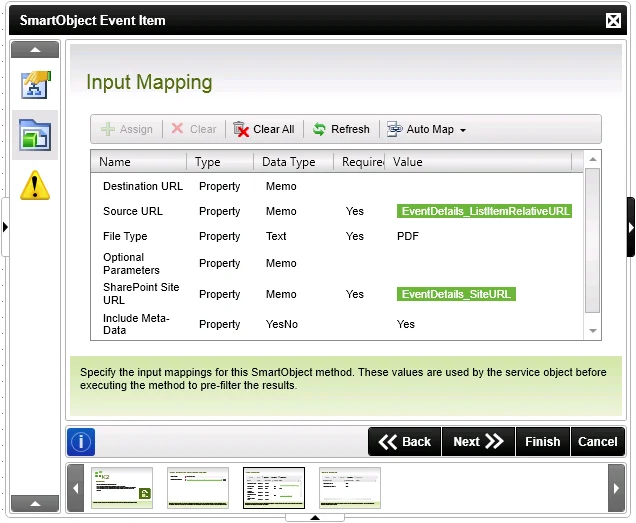
The Input Mapping screen shows the various properties supported by the Convert Document SmartObject.
Source URL: The URL of the document to convert. The syntax is as per this post, please make sure that the web application name (http://yourwebapp) IS NOT included in the URL. In this tutorial we are going to convert the document that started the workflow.
- Select Source URL and click the Assign button followed by the Ellipses button behind the Value field.
- In the Context Browser select the Process/Activity Data tab (the 3rd one) and navigate to XML Fields / [Your Project Name] / EventDetails / EventDetails / ListItemRelativeURL. Click the Add button followed by OK.
Destination URL: The optional path and file name of where the converted file will be written to. When left empty the converted file will be saved in the same folder as the source file using the same file name, just with the extension of the specified file type. This field uses the same format and rules as the Source URL field. In this tutorial we’ll leave this field empty. For details on what locations documents can be converted to and how to specify paths, please see here.
File Type: Theextension of the file type we are converting to. In this case assign the PDF value.
Optional Parameters: The Muhimbi PDF Converter is a very powerful product that allows many different settings to be specified. It is not feasible to make all of these settings available via individual field mappings, which is why we have developed a special XML syntax to populate these parameters. For this tutorial leave this field empty, you can find more details in this blog post. Please keep in mind that K2 Studio does not provide support for entering line breaks in SmartObject mappings so we recommend creating this XML in a regular code editor (or Notepad) and copy it from there into the Optional Parameters field.
SharePoint Site URL: Similar to K2’s other SharePoint SmartObjects and Wizards, you will need to specify the URL of the site collection the workflow is acting on. The steps are identical to specifying the Source Url, just select SiteURL from EventDetails.
Include Meta-Data: In this example we want to copy all meta-data available on the source document to the converted document. Please assign Yes to this field. Please keep in mind that at the time of writing K2 Does not validate the values specified in YesNo fields, so pay extra attention when filling out this field.
In this tutorial we are not using the Return Mappings, so click Finish to close the wizard.
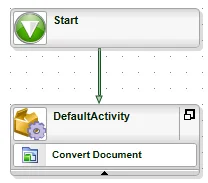
We need to connect the Workflow Activity to the workflow. On the Design Surface right-click on the Start element and drag a line to the newly created activity.
Click the Deploy button in the Home ribbon. Once the Deploy Project Wizard is displayed click the Finish button.
Testing the Workflow
Verify the workflow is working correctly by uploading an MS-Word (or Excel, MSG, TIFF, PowerPoint or any of the many other formats we support) into the Tutorial Document Library. As we have configured the workflow to only trigger when a document is updated, either open the document and resave it or update the properties of the document using the ribbon.
If all has been configured well and the workflow has been created correctly then, within a few seconds, a PDF copy of the source file should appear in the Tutorial library.
Troubleshooting
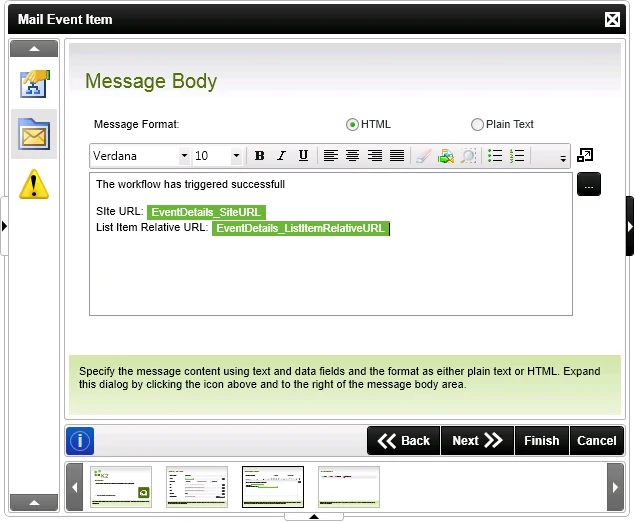
If the workflow does not work correctly then either use the Process Overview report in K2 Workspace to drill down into the workflow, or - and this is what we like to do - insert an E-Mail event step before the Convert Document step and populate the email with the content of the various lookup fields. Sending an email to the originator makes it easy to verify that the workflow is actually running and get an overview of what is going on without having to dive into the K2 Workspace Reports.
For more details on how to create SharePoint Workflows using K2 blackpearl see the K2 Website. A fully installed Virtual Machine (Excluding the Muhimbi PDF Converter for SharePoint) is available as well.
Labels: Articles, K2, pdf, PDF Converter, Workflow
