


Muhimbi PDF Converter version 8.3 and above supports the conversion of the latest HTML, JavaScript, print, and screen CSS media types to PDF.
In addition, it can convert SharePoint Online webpages and URLs, a unique feature exclusive to Muhimbi’s range of products. This is particularly useful when it comes to archiving lists and list items in PDF format or sharing the content of SharePoint pages and wikis with third parties.
Using Power Automate, you can also convert files created using one provider — such as OneDrive for Business, Google Drive, or Dropbox — to PDF and store the converted file using a different provider — such as MS SharePoint. This blog post will show you how.
Prerequisites
Before beginning, ensure the following prerequisites are in place:
- An Office 365 subscription with Power Automate and OneDrive for Business support.
- Muhimbi PDF Converter for Power Automate — full, free, or trial subscription.
- Appropriate privileges to create flows.
- Appropriate privileges in MS SharePoint Online and OneDrive for Business.
- Working knowledge of Microsoft Power Automate.
Converting a File Created in OneDrive to PDF and Adding It to SharePoint
This example takes you through converting a file created in OneDrive for Business to PDF and then adding this converted file to MS SharePoint.
On a high level, the flow will look like what’s shown in the image below.
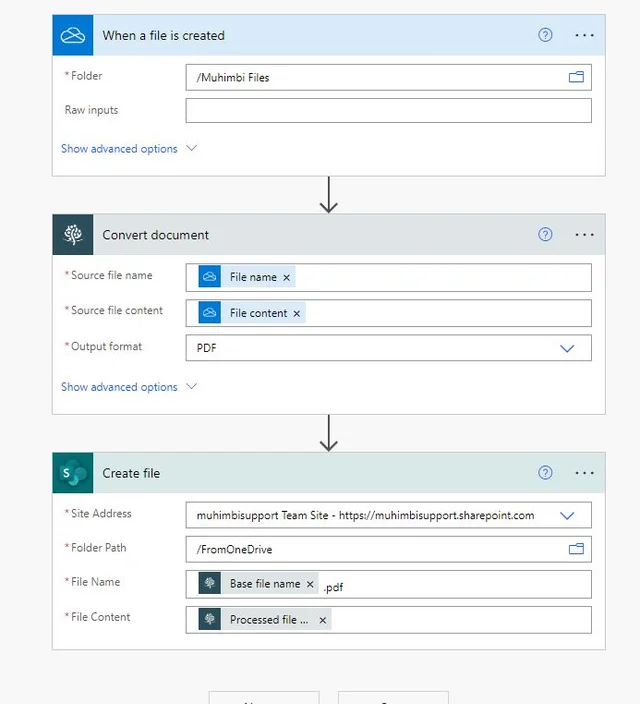
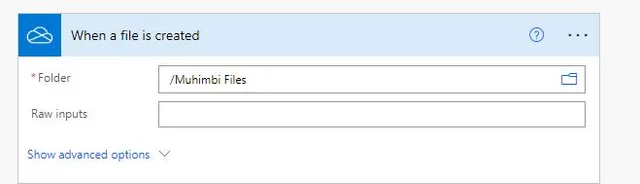
Step 1
Create a new flow and use the When a file is created OneDrive for Business trigger. For the Folder field, select the OneDrive folder where you want the converted file to be uploaded.
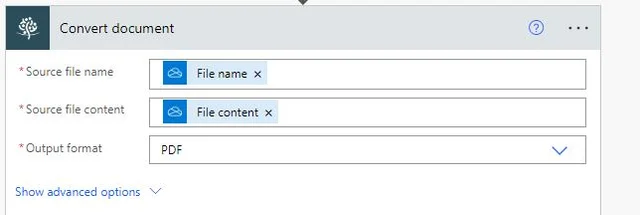
Step 2
Insert Muhimbi’s Convert document action.
- In the Source file name field, add the File name that is the output of the When a file is created action.
- In the Source file content field, add the File content that is the output of the When a file is created action.
- In the Output format field, enter PDF.
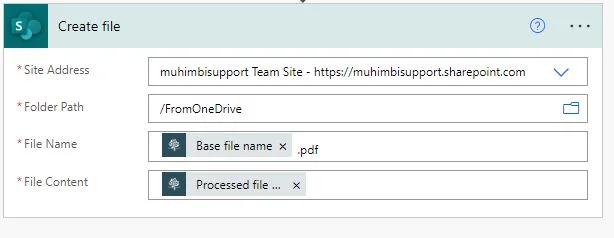
Step 3
Insert an MS SharePoint Create file action to write the converted file to an MS SharePoint Online location. You can also use providers like Dropbox, OneDrive, and Google Drive, or send the PDF via email. This example uses the MS SharePoint provider.
- In the Site Address field, select the location of the MS SharePoint site where you want to store the converted PDF document.
- In the Folder Path field, select the folder where you want the converted PDF file to be saved.
- In the File Name field, add the Base file name that is the output of Muhimbi’s Convert document action. Don’t forget to add the .pdf extension to the file name.
- In the File Content field, add the Processed file content that is the output of Muhimbi’s Convert document action.
Step 4
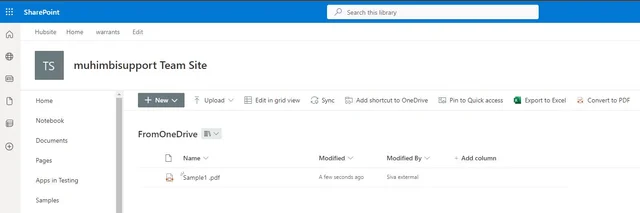
Publish the workflow and upload a new item, such as an MS Word document, to the OneDrive location.
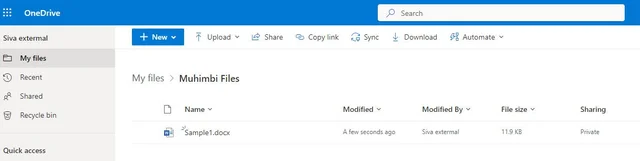
After a few seconds, the flow will be triggered and a PDF file will be generated and uploaded to the MS SharePoint location.
Conclusion
In this post, you learned how to convert a OneDrive for Business file to PDF and store it in SharePoint. Check out our new guides and learn how to implement PDF Converter into your cloud platforms with a REST-based API. Or, explore the additional capabilities of our Power Automate connector.