As one of the leading vendor in the SharePoint PDF Conversion market, we are frequently asked about how our products can be used to convert a SharePoint List into a PDF file. Up until now we have never had a good answer to this question as we mainly deal with the conversion of Office Documents and InfoPath forms.
However, as the new “4.0” version of the PDF Converter for SharePoint and PDF Converter Services support the conversion of HTML based content we can now export any SharePoint page, including ones that contain all entries in a list, to a PDF Document. This article shows how to put this together.
OK, let’s get going. In this example we use a simple Tasks list, so open your SharePoint site and create a Tasks lists if one doesn’t already exists.
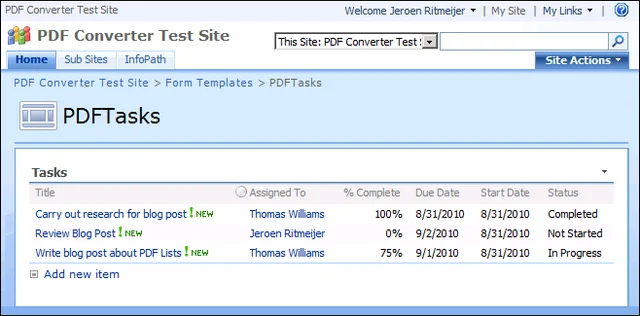
Next up we need to create a page that displays all items in the list with as little of the SharePoint User Interface around it as possible. We could just use the list’s default view, but that would convert the Quick Launch menu to PDF as well, which doesn’t look very clean. To create a new page without the Quick Launch menu follow these steps:
Navigate to the View All Site Content screen and click the Create button.
In the Web Pages column select Web Part Page.
Name the page PDFTasks.aspx, choose the Full Page, Vertical template and click the Create button.
On the newly created page click Add a Web Part and add the Tasks list.
Click the newly inserted Web Part’s Edit button and select the Modify Shared Web Part option.
Click Edit the current View and select the columns you want to be included in the PDF file. For example % Complete, Due Data, Start Date and Status. Do not close the screen yet.
Under the Item Limit section set the limit to an appropriately large number. We don’t want to page through the data in batches as we want to include all items in the PDF file.
Click OK to save the changes.
Save the page’s URL as we need it later. E.g. http://moss/sites/Management/FormServerTemplates/PDFTasks.aspx.
This new page will be used as the underlying layout of the PDF document. Feel free to modify it further in SharePoint designer / JQuery and remove more parts of the SharePoint user interface. You could also consider creating a minimalistic master page and applying that to the new PDFTasks page.
With the page in place the next thing we need to do is setup the automatic PDF Conversion using a SharePoint Designer workflow. In this example we generate a PDF file whenever the Tasks list is modified. The generated PDF file is stored in the Shared Documents library. Create the workflow as follows:
Make sure you have the appropriate privileges to create workflows on a site collection.
Create a new workflow using SharePoint Designer.
On the Workflow definition screen associate the workflow with the Tasks list, tick the boxes next to both ‘ Automatically start….’ options and proceed to the next screen.
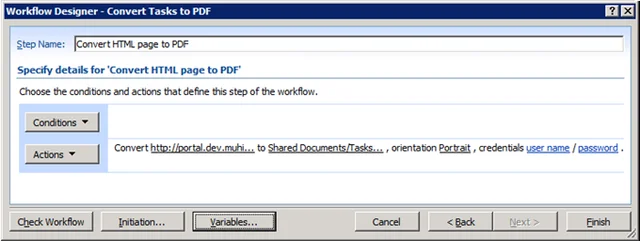
Add the Convert HTML to PDF action and click on this url and enter the URL to the page that was created in a previous step, e.g. http://moss/sites/Management/FormServerTemplates/PDFTasks.aspx.
Click this file and enter the path and file name where the PDF file will be generated, e.g. Shared Documents/Tasks.pdf.
Optionally change the generated page’s orientation from Portrait to Landscape.
The user name and password are optional. By default the credentials the Muhimbi Conversion Service runs under will be used to open the web page. For now leave it empty.
Click the Finish button to activate the workflow.
As a test enter one or more tasks. Every time a task is added or updated a PDF file is written to Shared Documents/Tasks.pdf. Open the PDF file to see the results.
In summary, the HTML conversion capability of the new version opens up a whole array of new possibilities. As always, upgrades are completely free. Don’t hesitate to leave a comment below if you have any questions or contact us to discuss anything related to our products.
Labels: Articles, News, pdf, PDF Converter, PDF Converter Services, Workflow


