

Digitally certified documents have become a common feature of today’s business landscape, but why? Well, think of them as digital letterhead- a way to show that a document originated where it said it did and has not been modified. Historically, letterheads were difficult to re-create and provided a level of assurance about a document’s provenance and limited the ability of someone to modify it. In the current digital landscape, with the most basic MS Paint user able to easily copy and paste letterheads to anything they please, this is simply no longer the case. So just as personal digital signatures have replaced the security aspect of the old scrawl at the bottom of a page, digital certificates have replaced letterhead as a company’s means of proving the provenance of their documents and assuring readers (and themselves) that they have not been modified since being signed.
The world of digital certificates is a complex one, so we’ll stick to a fairly simple example here using .PFX files ( Personal Information Exchange) and simply discuss two certificate options that can be added to PDFs in the same way. A digital certificate can either be self-signed or issued by a Certificate Authority (CA). A self-signed certificate is created locally for free and simply says who you claim to be- there is no authority behind it beyond your own assertion. A digital certificate issued by a CA is one that is created by the authority and says they have verified that the certificate holder is actually who they say they are.
There are a huge number of CAs out there, however Comodo is good choice as they provide a large number of options, support, global recognition as a CA, and competitive pricing. Both methods provide the same level of document security (the ability to sign cannot be derived from the document and modifying the document invalidates the signature) and are installed and used in the same manner, the CA certificate simply promises that not only did the document come from you, but you are who you say you are.
This functionality requires at least version 7.3 of the Muhimbi Converter for SharePoint as well as the Workflow Power Pack.
A quick introduction for those not familiar with the product: The Muhimbi Workflow Power Pack for SharePoint allows custom C# or VB.NET code to be embedded in SharePoint Designer Workflows without the need to resort to complex Visual Studio based workflows, the development of bespoke Workflow Activities or long development cycles. Please note that the Workflow Power Pack is only compatible with SharePoint 2007 and 2010. To sign PDFs in SharePoint 2013 use the sample code provided below as a starting point for your own custom workflow activity or web part.
Before starting on this example, you will need to have both the Muhimbi PDF Converter for SharePoint and the Workflow Power Pack installed and configured in your SharePoint environment. As well, you will need the .PFX certificate file and password available. If you have elected to get a certificate from a CA, you may need to convert it to a .PFX.
In case you do not already have the Workflow Power Pack, you can download a fully functional evaluation copy here.
Follow the installation and configuration instructions from the Administration Guide to deploy it.
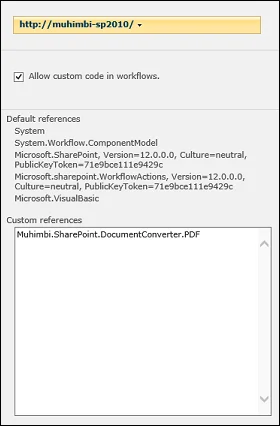
In SharePoint Central Administration / Application Management / SharePoint Web Application Management / Muhimbi Workflow Power Pack Settings ensure that the box marked “allow custom code in workflows” is enabled and add the following custom reference for the Web Application where you would like digital signatures to be enabled:
Muhimbi.SharePoint.DocumentConverter.PDF
Once this is done, you can move on to the actual creation of the signing workflow, a very simple example of which you’ll find below. Please note that the code provided is just a sample, specific details will need to be customized for your particular environment and digital certificate.
- Arrange a digital certificate or quickly create a test one using tools such as the x509 Digital Certificate Generator.
- Save the certificate in “C:\cert\DigitalCert.pfx” (The default path used by our example below)
- Create a new SharePoint Designer Workflow
- Under Conditions, select ‘'File type is a specific type” and set the type to “pdf”. (The exact syntax depends on the version of SharePoint used)
- Under Actions, select “Execute Custom Code”.
- Click “this code” and paste the code listed below. Please note, the location of the PFX, PFXFilePath, will need to be changed in order to reflect it’s location in your environment (if this code will run on multiple servers, then a network location available to all of them is suggested) and the password, PFXFilePassword, will need to be changed to reflect the actual password you have chosen.
- If you want to specify a different location or name for the newly signed file then please modify destinationFolderName and destinationFileName accordingly. In our sample the destination folder name is taken from the workflow ‘parameter 1’ and the destination file name is the same as the source, but with ‘-signed.pdf” appended to the end of it.
- You will also want to change the ContactInfo, LocationInfo, and possibly Reason entries to suit your environment and needs.
using System.IO;
using Syncfusion.Pdf.Parsing;
using Syncfusion.Pdf.Security;
using Muhimbi.SharePoint.DocumentConverter.PDF;
After the code is entered, you should have a workflow condition and action that look like this:

This code can easily be added to a pre-existing conversion or watermarking workflow action, however, once it is run, no other changes should be made to the PDF as they might invalidate the signature.
When you then open the PDF, you will see that it has been signed. In the first case, a locally created signature was used, so while it can be used to show that the file has not been modified since it was signed, it does not provide any information about validity of who signed it:

When the PDF is signed by a certificate from a trusted source (either a commercial CA or an authority you have added as trusted), then the signature shows that not only has the file not been modified, but the signer is trusted as well:

If the PDF is subsequently modified, the signature reflects this, depending on the changes made :


Any questions or remarks, contact our support desk or leave a message below.
Labels: Articles, pdf, PDF Converter, Security, Workflow