


Unlike 90% of the other posts on this blog, this post is not about SharePoint or our range of server based PDF Conversion products. Unless you have a (casual) interest in building high performance systems, you may want to skip straight to the PDF Converter Scalability tests we executed on this new machine.
So, if you are still with me, let’s talk about building some nice hardware. At Muhimbi we are big fans of virtualisation so we already have some nice hardware to run a large number of Test and Development environments on. However, the Dell T605 Servers we bought a couple of years ago are becoming a bit long in the tooth, are difficult to upgrade and are extremely ‘jet-engine’ loud (Dell sells them as ’silent servers’, right!).
So we decided to get some new kit. There always is the option to buy something off-the-shelf from HP, but for something with these specifications that would be extremely expensive. It wouldn’t give us a high level of control either and would probably be very loud as well, so we decided to go for a custom build. We approached Boston, Broadberry and Armari, who all provided competitive quotes for custom builds of silent servers. If you have no desire to build your own system, or if you are not a complete control freak, then by all means contact them. In the end we decided to completely build our own system, not because it would be cheaper (it was), but because it would give us ultimate control and be a lot of fun as well.
Buying the hardware
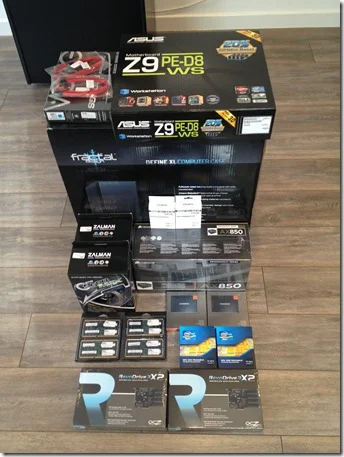
So we freshened up on the latest Intel Xeon processors and bought the following hardware. Most of it was ordered from Scan, but they let us down with the delivery because they couldn’t source the Xeons quickly enough.
- Dual Xeon E5-2670: Purchased from Ballicom, one of the very few suppliers with stock. These processors are extremely pricey (£1080 / $1740 each, before tax), but the E5-2670 offer the best performance ratio without paying an additional premium.
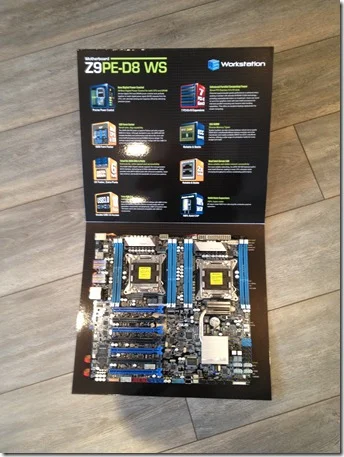
- Asus Z9PE-D8 WS: The choice of dual Xeon boards is extremely limited. We decided to go with Asus because they have a good track record for both compatibility and extensibility.
- 8 x 8GB DDR3 Hynix: The maximum memory supported by the motherboard for ECC Registered memory is 64GB (256GB for non-ECC). We decided to go for the Hynix 1600MHz ECC Registered memory because it it very affordable and available from Scan.
- 2 x OCZ RevoDrive3 X2: We don’t need crazy amounts of storage, but as the system will run a number of operating systems in parallel, including databases, we need storage to be fast with high levels of concurrent IO. The logical choice is SSD drives and the fastest, of the affordable, SSD Drives are these PCI-Express based cards that bypass the SATA bus all together. Both 480GB cards will be installed in a RAID-1 (mirrored) configuration. We bought these cards from Kikatek who had them in stock at a great price.
- 2 x Samsung 830 SSD: We need something to boot from and they almost give these drives away. They perform brilliantly on SATA 6Gbps so we installed two 128GB units in a RAID-1 configuration. Purchased from Scan, but they were cheaper on Amazon.
- 2 x Zalman CNPS9900-MAX: CPUs need to be cooled and these CPU coolers work very well. They are quiet and keep the cores below 50 degrees centigrade under load. We bought these from Scan and purchased the Socket 2011 support clips for this cooler from Quiet PC (unnecessary as the clips were included in the box, but that was not clear from the description). The CPU coolers were purchased from Scan as well.
- Corsair AX850 Power supply: This professional series power supply is highly efficient and very quiet. Purchased from Scan as well.
- Fractal Design Case: We need to put everything in a box so we bought this stylish looking Define XL computer case. It supports the E-ATX form factor and comes with quiet fans. Purchased from Box.co.uk who had it in stock.
That is all, you don’t need anything else other than perhaps a phillips screw driver. All cables, including plenty of SATA cables, are included with the various components.
Building the System
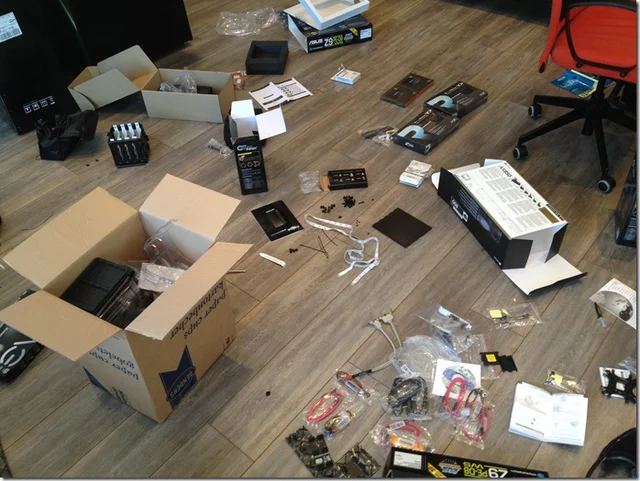
If you have never put a PC together than you may feel a bit discouraged by the sheer amount of cables, connectors, little screws and components littering your floor after opening the boxes (The picture below was taken after cleaning most of it away). However, with the help for someone experienced, or strangers on the internet, it is not too difficult to put together. There is no ‘Ikea like’ step-by-step guide, but after reading the documentation (and Googling like crazy) things quickly fall into place.
I won’t bore you with the details, but a few issues deserve mentioning:
- EEB Form Factor: The Asus motherboard uses the EEB form factor, which is usually reserved for servers. It is not easy to find a case that uses this exact same form factor, but you can buy a regular E-ATX case. The only real difference is that not all of the holes in the motherboard match the case, only 7 out of 11. This is good enough, just don’t blindly screw all 11 risers into the case as the 4 that do not have a corresponding hole in the motherboard will most likely cause a short circuit on the back of the board.
- Direction of CPU Coolers: Each CPU cooler has a big fan that can be pointed either left or right. My concern was that if I both point them in the same direction then the ‘hot air’ from fan 1 would be blown into CPU / Fan 2. I went ahead with this anyway as both fans blow towards the nearest and most powerful case fan.
- I/O Shield: The motherboard comes with a nice ‘plate’ to cover the block of ports at the back of the motherboard (USB, LAN, Keyboard etc). I was unable to make this fit, there simply was no room in the case. Not the end of the world, but I would have preferred less open air holes in the back.
- Fan connectors: The Fractal Design case fans have 3 pins while the motherboard has 4-pin connectors. Don’t worry about it, just plug them in, they only fit in one way. The industry cannot decide on a single standard apparently.
- Power plug connectors: Similar to the Fan connectors, there doesn’t appear to be an agreed standard for power connectors to the CPU. The Corsair power supply comes with 2 ‘EPS’ connectors while the motherboard requires 2 ATX12V connectors. Turns out these are the same, but as the pattern on the plugs (defined by square and round pins) doesn’t match I hesitated for a full 24 hours before just forcing the plugs in. I wasn’t too keen to fry £2500 worth of motherboard and CPUs. After contacting Corsair they told me they get that question a lot and that you can push the 8 pin EPS Connector into the ATX12V slot. It worked, pfew.
- System panel connectors: Various little wires come out of the case to deal with the reset and power button as well as the case light. They are clearly labeled, but have a good look at your motherboard manual and remember that white & black both mean ‘ground’. (A racial equality decision, hurrah!)
- Raid select: The documentation for the Z9PE-D8 WS motherboard is incorrect. On page 2-28 it shows the jumper for the RAID select at the bottom, but it is located just right of the Intel C602 chip (level with the top most SATA port on the right-hand side). A digital copy of the documentation can be found here and allows you to zoom all the way in.
These were the only real stumbling blocks encountered (well, and one of the RevoDrives being DOA). It was our expectation to put it all together in 4 hours, but the problem with the power plug connectors delayed successful completion by 24 hours.
Installing the OS / Software
With the system built we were keen to get the OS installed to carry out a burn-in test and run some benchmarks. We decided to install Windows Server 2012. As we don’t have a DVD drive in the server (it is 2012 for god’s sake) we used the Windows 7 USB Download tool to create a bootable Win2K12 installer on a memory stick. Works like a charm!
Unfortunately the Windows 2012 installer crashed spectacularly. It turns out that the default BIOS of the Z9PE-D8 WS motherboard is not compatible with Windows 8 / Win2K12. Downloading and installing the latest BIOS solved the problem. Just make sure you write it to a FAT/FAT32 memory stick or you get the ' Rom file is not an EFI BIOS’ message. (The Win2K12 USB Stick uses NTFS, so don’t use that to upgrade the BIOS.)
As the boot volume is mirrored (in our case) we downloaded and unpacked the latest drivers for the motherboard and placed them on the same USB stick as the Windows Installer. Depending on which RAID solution you pick (the motherboard has 3) you may be asked to load a driver during installation. A separate blog post will go deeper into the topic of RAID and SSD and why not to use the on-board LSI RAID solution (seriously, don’t do it, it is painfully slow, pick the Intel or Marvell based one).
Even though all storage drivers were present on the USB stick Win2K12 installation failed as we received the “we couldn't create a partition or locate an existing one” error when selecting the installation disk. It turns out that the RAID1 boot disks could not be selected when the RevoDrive is also present in the system, so we temporarily disabled the PCIE Option Rom in the system BIOS for the slot that contains the RevoDrive.
With that change made Windows installed smoothly and quickly. That was until we enabled ‘Event Logging’ in the BIOS, which caused the Win2K12 boot process to slow down to a crawl (Another 24 hours lost before we figured out this was the cause).
Finally, we ran a Burn in test for 24 hours to check the system does not overheat under stress. This test was executed by running Prime 95 for several hours and measuring the temperature for each CPU core using CPU Thermometer 1.2. The results are impressive, CPU Core temperatures are between 18 and 30 degrees (centigrade) when idle and between 39 and 50 degrees under maximum load.
The ambient noise level in the office is 40dB with the server off ( same as a Library) and, measured at 1 meter distance, 45dB with the server on (same as a Library, just including the background bird calls).
Any questions or remarks, did we do anything stupid or wrong? Let us know in the comments below.
Labels: Articles