


We have had a great response to our previous post about watermarking PDF files, however quite a few customers have told us that they want to use a dynamic watermark (e.g. a username, ip address etc) rather than a static one.
A quick introduction for those not familiar with the product: The Muhimbi Workflow Power Pack for SharePoint allows custom C# or VB.NET code to be embedded in SharePoint Designer Workflows without the need to resort to complex Visual Studio based workflows, the development of bespoke Workflow Activities or long development cycles.
Update: Please note that as of version 3.5 the PDF Converter Services also supports a native watermarking interface.
The solution presented below executes a workflow whenever a PDF file is added to a document library. It then applies security settings to prevent the watermark from being removed and then reads the watermark text from a SharePoint column. The workflow author can specify if the watermark is placed in the foreground or the background as well as the level of transparency. As the code is well documented it is easy to make further changes and customisations, e.g. the PDF file that needs to be watermarked may not be the file the workflow is acting on or the watermarked text may come from a workflow variable rather than a list column.
Create the workflow as follows:
Download and install the Muhimbi Workflow Power Pack for SharePoint.
Download and install the Muhimbi PDF Converter for SharePoint.
Note that you need version 3.1.2.18 or newer, older versions do not allow watermarking.
We need to be able to access functionality in the Muhimbi.SharePoint.DocumentConverter.PDF and System.Drawing assemblies. Add these references to the relevant Web Application using the Workflow Power Pack Central Administration screens as described in the Administration Guide. Make sure to place each reference on a new line.
Make sure you have the appropriate privileges to create workflows on a site collection.
Create a new column named Watermark in the Shared Documents library. The content of this column will be used as the text for the watermark.
Create a new workflow using SharePoint Designer.
On the Workflow definition screen associate the workflow with the Shared Documents library, tick the box next to ‘ Automatically start this workflow when a new item is created’ and proceed to the next screen. Please note that if you tick the ‘auto start on update’ box as well then the PDF file may be watermarked multiple times leading to unexpected results.
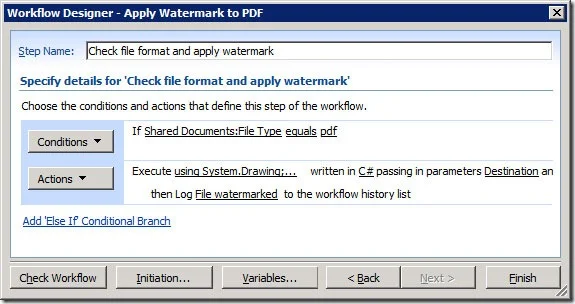
We only want to act on files of type PDF. Although we could have put this validation in the code, in this example we use a workflow condition for it so add a Compare Any Data Source condition and:
a. Click on the first value followed by the display data binding (fx) button.
b. Select Current Item as the Source and select File Type in the Field. Click the OK button to continue.
d. Click on the second value and enter pdf. (Use lower case as the compare option is case sensitive).
Click the Actions button and insert the Execute Custom Code action .
Optionally click parameter 1 and enter a relative or absolute destination path. Leave the parameter empty to save the watermarked file on top of the existing PDF file. For details about how paths are handled, see this post and search for the words ‘this url’.
Insert the C# based code embedded in step #3’s download (also listed below) by clicking this code.
Click the Actions button, select Log to History List, click this message and enter File watermarked.
Close the Workflow Designer.
Add a new PDF file to your library to trigger the workflow and apply the watermark. Make sure the content for the Watermark field is specified when the file is added as otherwise a generic watermark text will be inserted.

Naturally this is just a simple example. Feel free to play around with the code, change which parameters are passed into the workflow, modify where watermarked files are written to or use a different source for the watermark text. Leave a comment below if you are trying to do anything specific.
Update: If you get the message ‘no watermark specified’ then the workflow may have been triggered before you specified the contents of the Watermark field. For details see SharePoint Designer workflows trigger before properties are set .
.
Labels: Articles, PDF Converter, Watermarking, Workflow