In this guide, you’ll learn how to automatically archive emails using Power Automate. The example shows how to archive emails in SharePoint, but you can easily customize it to save your emails to destinations like Dropbox, Google Drive, OneDrive, or any platform supported by Power Automate.
For accurate email archiving, it’s important to support the following:
- Generating PDFs with clear resolution.
- All common email content types, including HTML, RTF, and plain text.
- Conversion of rich content, including inline images and tables.
- Converting email attachments.
Prerequisites
Ensure the following prerequisites are in place:
- An Office 365 subscription with a SharePoint Online license.
- A Muhimbi PDF Converter for Power Automate full or free trial subscription.
- Appropriate privileges to create flows.
- Working knowledge of SharePoint Online and Microsoft Power Automate.
Steps for the Flow
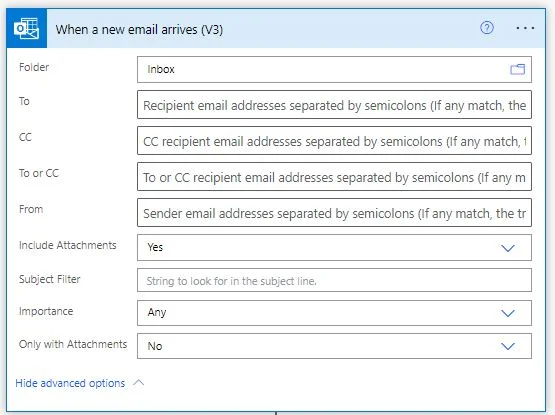
- Create a new flow and use the When a new email arrives (V3) Outlook action.
- Set the Folder to Inbox.
- Enter Yes for Include Attachments.
- Enter No for Only with Attachments.
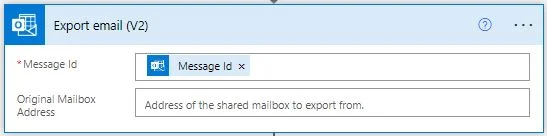
- Use the Export email (V2) Outlook action to export the content of the email.
- Specify Message Id for the Message Id field, which is the output variable of the When a new email arrives action.
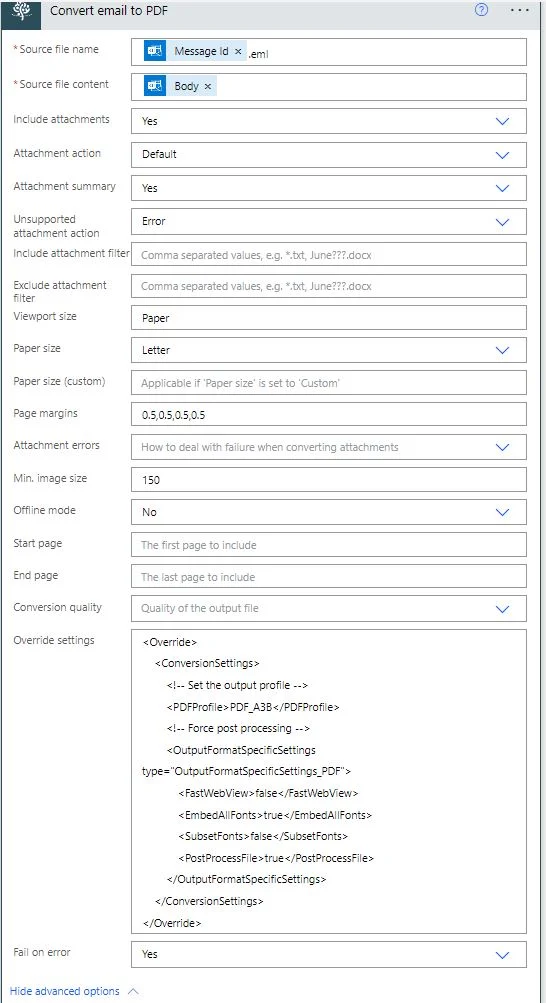
- Use the Convert email to PDF Muhimbi action to convert the exported content of the email, and specify the following:
Source file name — Message Id.eml, which is the output variable of the When a new email arrives (V3) action.
Source file content — Body, which is the output variable of the Export email (V2) action.
Include attachments — Yes
Attachment action — Default
Attachment summary — Yes (this displays the attachment name in the email header)
Unsupported attachment — Error (this specifies what should be done with attachments that cannot be converted into PDF)
Include attachment filter — No configuration required
Exclude attachment filter — No configuration required
Viewport size — Paper (specify the viewport size for the conversion in pixels, e.g. 1024×768)
Paper size — Letter (paper size for the output)
Paper size (custom) — No configuration required
Page margins — 0.5,0.5,0.5,0.5
Attachment errors — No configuration required
Min. image size — 150 (this excludes images smaller than the specified number of pixels)
Offline mode — No (in offline mode, external resources are disabled)
Start page — No configuration required
End page — No configuration required
Conversion quality — No configuration required
Override settings — These are optional settings using Muhimbi’s XML syntax. To control the PDF version on a request-by-request basis, specify the XML in this field:
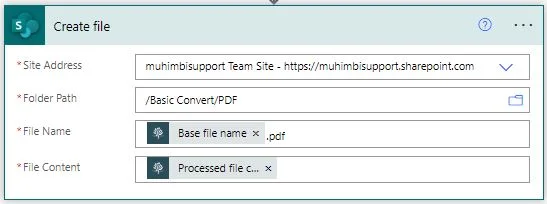
Insert a Create file SharePoint action to write the converted PDF file back to SharePoint Online.
File name — Set to Base file name.pdf, which is the output variable of the When a new email arrives action.
File content — Set to Processed file content, which is the output variable of the Convert Email to PDF action.
Publish the workflow and send any email. After a few seconds, the flow will trigger and a converted PDF file will be generated in the target location.
Troubleshooting / Caveats
HTML isn’t the best format for print or PDF conversion purposes. Depending on your exact needs and source material, you may need to experiment with various available settings. If you have any questions or require assistance, contact us.
Consider the following when using Power Automate:
Modern views — In SharePoint Online, it’s possible to display lists and libraries in modern or classic mode. Modern view is undergoing constant change (by Microsoft), and as a result, we currently only support the conversion of pages displayed in classic view. Note that some modern view pages will convert fine, while others won’t.
Multifactor authentication (MFA) — An increasing number of SharePoint Online / Office 365 environments are secured using MFA. Although this is a positive development, it gets in the way of automated systems such as our HTML converter. If your environment uses MFA, create an app password for HTML conversions, or disable MFA on your HTML conversion account.
HTML conversion option not displayed — The option to convert the current page to PDF is only available for classic SharePoint pages. Modern pages currently don’t provide the ability to extend the personal actions menu. As soon as Microsoft makes this functionality available, we’ll add it.
PDF layout does not match — By default, the page being converted is optimized for print / PDF output. If you prefer the PDF to look exactly like what’s displayed on the screen, including user interface elements, set the Media Type to Screen on the HTML conversion configuration screen.
User-modified content is not converted — The converter doesn’t have knowledge about the information currently displayed in the user’s browser (e.g. size of the browser window or custom data entered but not yet submitted to the server). The converter always requests a fresh copy of the URL and converts that information to PDF.
User-specific information is missing — HTML conversion is carried out in the context of the configured user account, though the system isn’t aware of the user carrying out the HTML conversion. Don’t specify accounts that display more information than what the users need to have access to.